Thursday, September 23, 2021

Finer Finishing Tips #3

  Dome Top Casket Progress...


So as you can tell, I have changed from referring to my little inexpensive Amazon dome top box as a 'box'... it is now a casket. I am really having a lot of fun just tricking this thing out! Above is a little peek at something going on the INSIDE~ do you know what it is? It is a 17th c technique called Gummed Silk. You may remember that I taught this quite a few years ago at the SouthWest Get Together. I have always loved this technique and have studied several different caskets that were either entirely covered in it or had bits and pieces. I have been refining and changing my technique over the past few years and finally am getting consistent results that I am happy with. I will be offering an online class teaching this technique soon~ if you are interested and would like to get on my email list for info, just drop me a line at rlkinnison@yahoo.com. 

The next little video for the Dome Top Casket project is up on my YouTube ~ or you can view it here. Hope you enjoy and come back to follow the growth of this super cute casket!

Happy Stitching!


Tuesday, September 14, 2021

New Finer Points of Finishing Tip Series

 Come Along....

I get so many questions on Embroidery Finishing that I have decided to run a small You Tube video series on the subject, FlossTube Finer Finishing Tips.  We spend so much time on our embroidery, years and years even, and then expect to mount said embroidery on a box in a weekend. NOT SO.  Just as much care should be spent on finishing as the embroidery itself. A great finishing job has the ability to elevate a mediocre embroidery...just as bad finishing can make the most elaborate and expertly worked embroidery look horrible. 

I will be having some finishing classes in the future, but hope that until then, you will join me to follow the transformation of a cheap wooden pine box (under 10.00 USD) purchased on Amazon. I will try and post a new video every 10 days or so. The second in the series is below:

I am not a scripted person, and I don´t make notes. What you see is what you get. When I get my arm stuck in glue...you will probably too. My camera angles need work. I am not a skilled cinematographer...but I think you will enjoy the videos and maybe pick up a few tricks to use in your own finishing~be it a stumpwork casket or mounting a cross stitch or needlepoint piece to a cigar box. 

As you will realize through this series, a box need not be expensive to offer a spectacular, unique finish for your precious embroidery. 


Friday, September 03, 2021

Boxes....

 Think Outside the Box....


Pomme & I made a video to give you some box tips if you are looking to mount your embroidery. You may need look no further than your refrigerator!  I have already got asked who the dollies were in the end, that I was too far away for yaĺl so peek at them, so here they are. My daughter wanted to make dollies last fall so she came over and I made these two. Watch the video to see what I used for their boxes!
This is Agnes with her Ravens

And Full Moon Party.. she is named after my favorite tea!


Monday, August 30, 2021

2021 Annual Ornament Kit

 All Flemish Coffer Pre-orders Have Been Shipped

If you have ordered this yearś ornament kit, it is on its merry way to you! I shipped the last of the preorders this morning. Etsy has been sporadic about sending out shipping notices, so if you have not got yours, check your order on ETSY. I have uploaded all tracking numbers so you will have accurate info on when your kit will arrive. 


I have cut, packaged, measured, primped and counted, and checked, and rechecked each and every morsel of happiness in each and every one of these kits myself. There is a Kit Contents page nestled in between the 60-page instruction packed and pattern packet. 


I know you will be so excited to open the box and inspect the contents, just like I do when I get a new kit! I have strategically placed all the contents into their box carefully, so do take care when putting everything back into the box. Be sure things are in their proper place so as to not squish the packet containing all the metal threads! It is shown in the upper right-hand corner in the picture above~

I hope you all have as much fun making your Coffers as I did. If you are interested in purchasing one, they are available in my ETSY store~the link is in the right hand sidebar. Currently, I have just 8 left in stock. Once these sell out, I cannot give a definite answer as to when they will be in stock again, as it has been a chore to get some of the materials!

Happy Stitching!

Monday, August 23, 2021

Mid 18th C

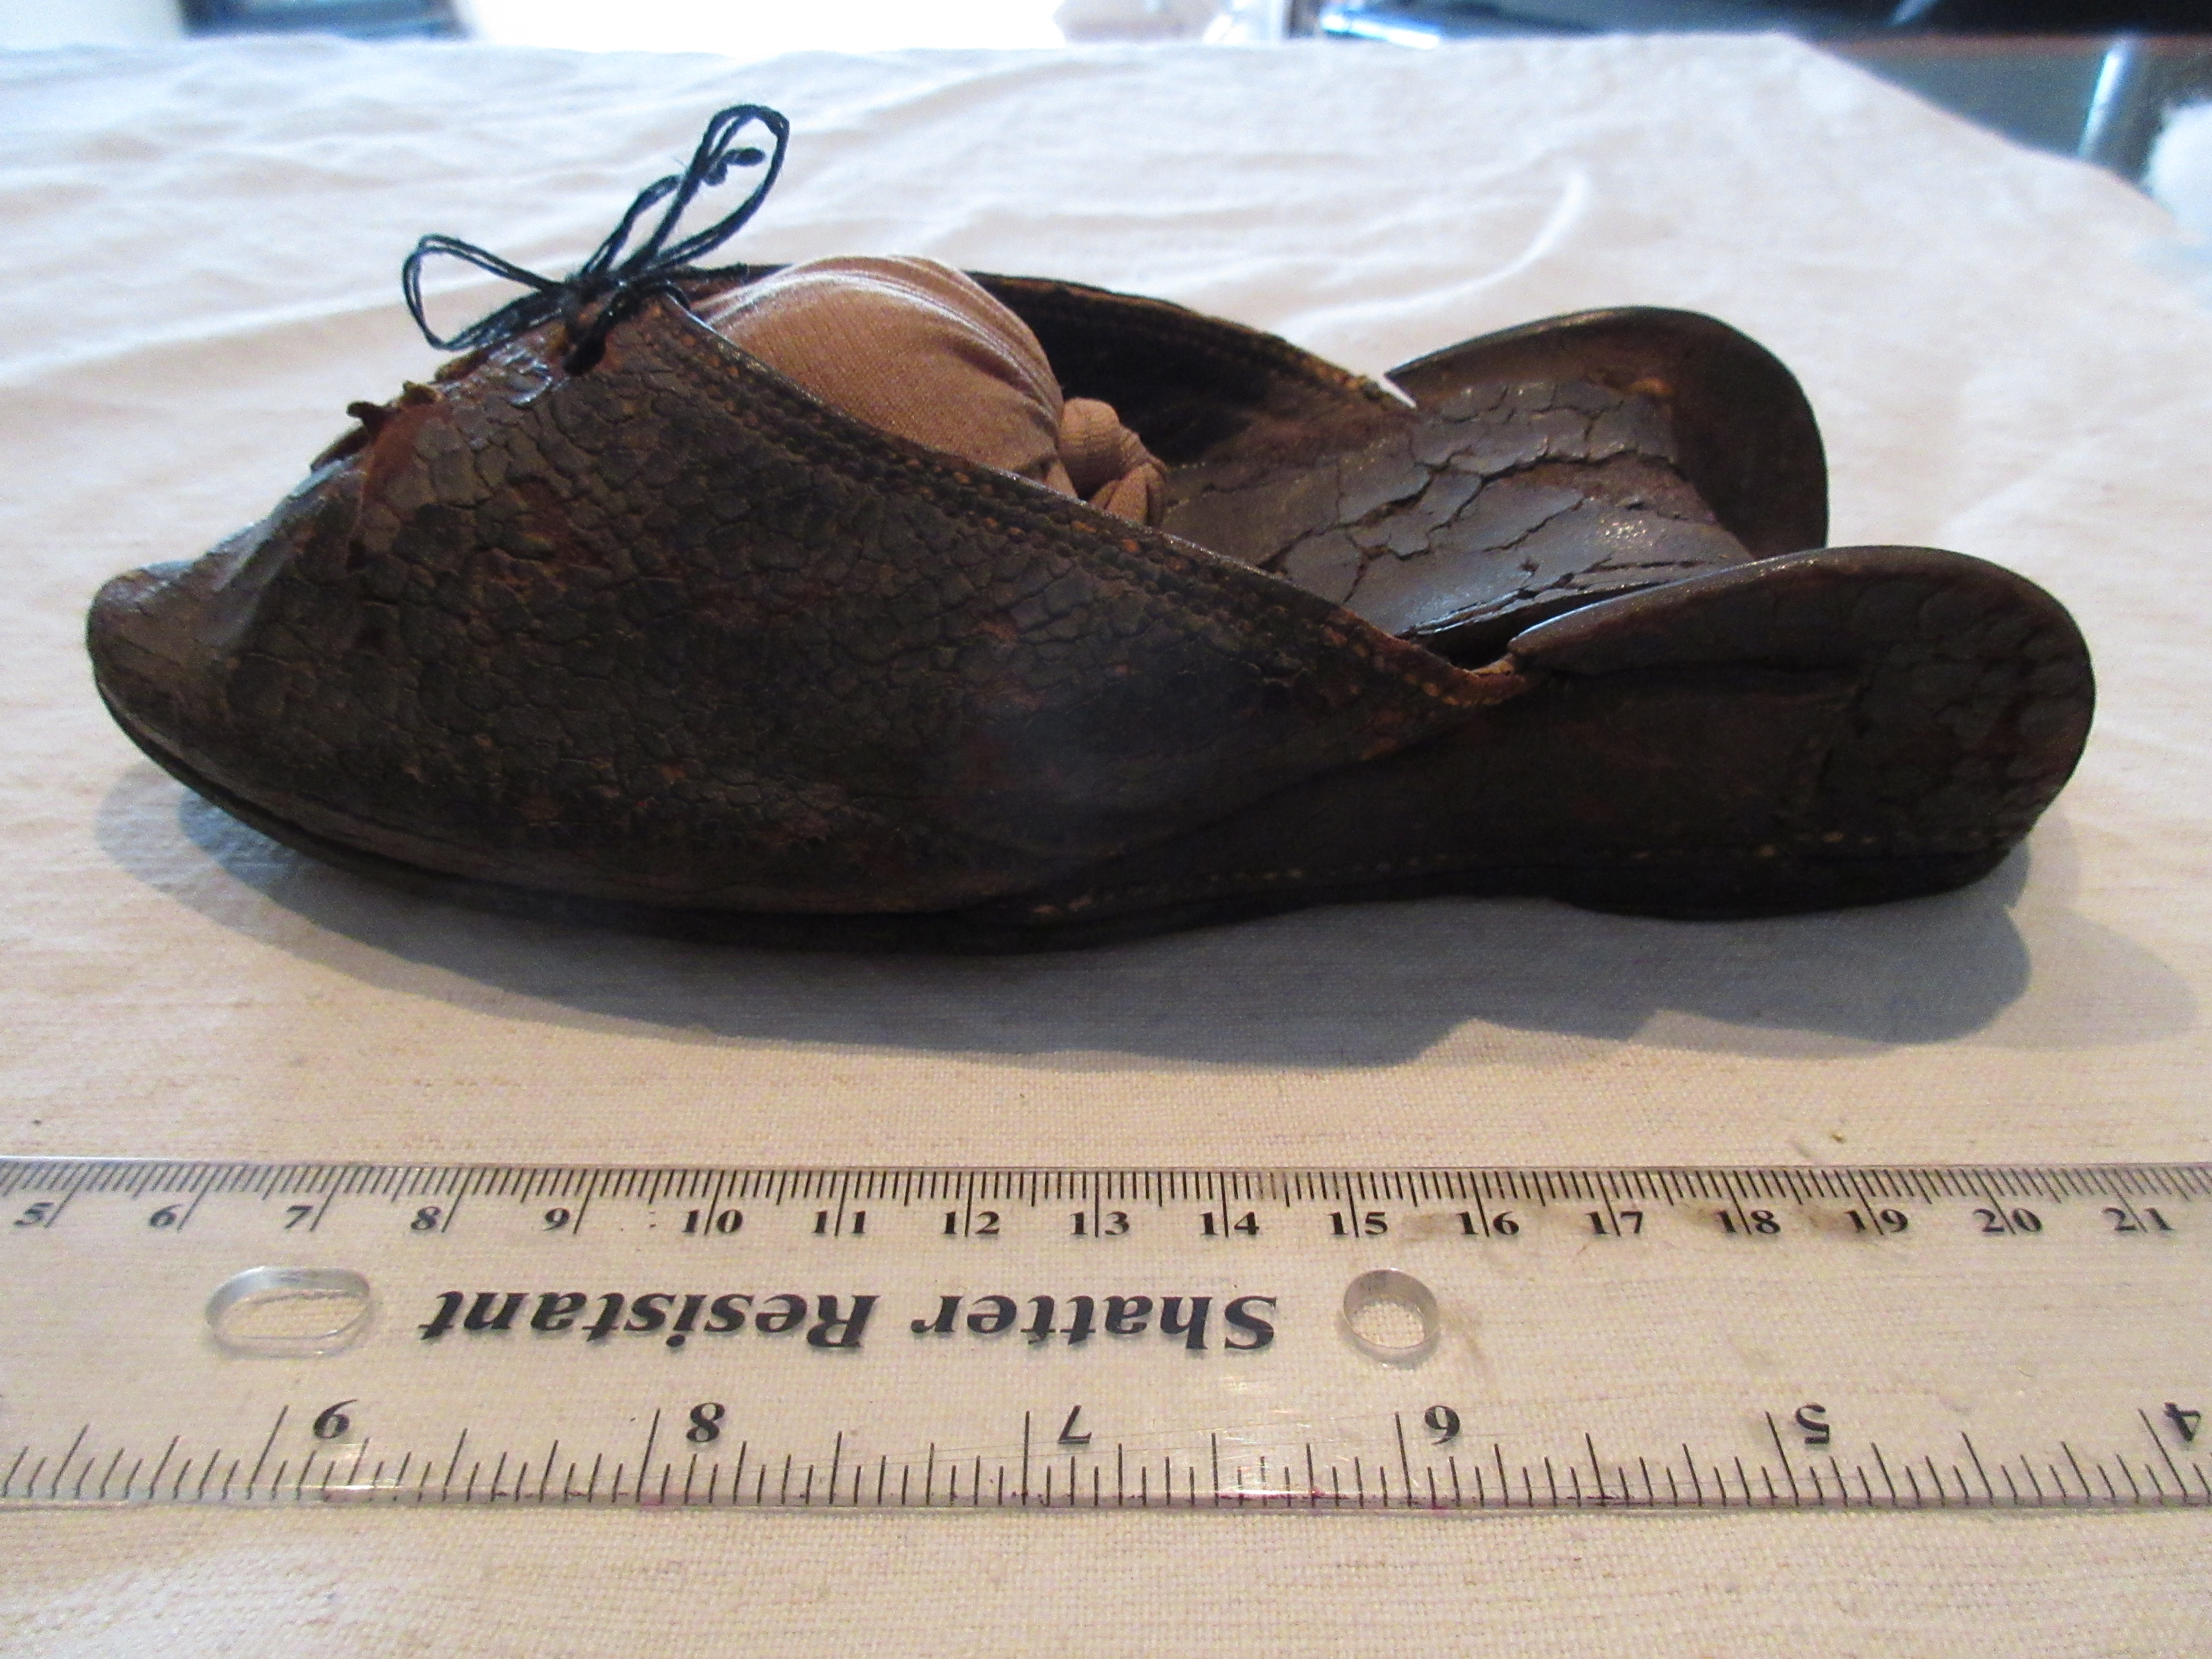
Single Leather Clog

I just found this wonderful little gem and am excited to share it with ya'll. It is, as stated above, a clog. Not to be confused with a wood and iron patten (you can search for those here on the blog in the upper left search tab). How is a clog different from a patten you ask? Both are worn as overshoes to protect the rather fragile shoes of the period when walking in mud and on city streets. Pattens have alder wood soles with an attached forged iron ring or shape that raises the foot up off the ground. They tie on over the shoe usually with leather tabs. They are robust. Made for out and about in the weather. But clogs....these things have always fascinated me. If there were pattens, what would the need be for clogs? 

Clogs are usually made from the same fabric as the shoe, such as in the above pair from the Joseph Box collection at the Powerhouse Museum. They are obviously just as delicate as the shoes they are meant to protect and thus, the general thought is that they were worn indoors to help protect the shoes. My practical thinking obviously asks well why on earth would you wear these indoors? A lady wearing such a shoe would not be slopping around in the kitchen or have dirty floors enough to need a protective overshoe. Were these worn from the house out to the carriage? I honestly have no idea...I got a lot of questions whenever time travel becomes the new rage....


One cannot say it was the shape of the heel seat either...as this pair of pattens from the Met have the same deep heal seat. They have the typical plain leather latchet tie straps usually associated with the more robust wood and iron pattens. I have never seen a patten with a cloth strap.

This single clog, one of a pair at one time of course, I would say was more of a working-class middling sort's possession. Maybe they were owned and worn by a merchant....someone who wanted to protect their shoes indoors but needed something a bit more robust than a cloth upper. AND...speaking of uppers...we get to the reason I had to add this amazing creature to the collection in the first place.  The upper is closed! Look back up at the Powerhouse Museum examples, and the Met...all of them I have ever seen are open-toed with just a strap to tie up over the vamp of the shoe. I have never, ever seen a fully closed upper on a clog, so this just thrills me to no end. Above here you can appreciate the deep heal seat to accommodate the timber heels of the period.


The leather is very worn, but the expert hand stitching is still nice and tight and can be fully appreciated. The single eyelet holes for ties are stamped from the leather and left unfinished. 
Construction of the heel is the same on these as is typically seen on the cloth examples. One may be so inclined to wonder if the timber heels were so very fragile they needed support from underneath in order to get the most wear out of them???

From the view of the sole one can see these did get much wear. There is but a tiny single layer stack on the heal, other than that they are flat on the bottom. The wear shows they were tied on quite tight, as there are no signs from the wear on the sole that these were shuffled along as a person walked in them. The heels did not drag off from flopping down off of the shoe when the foot was picked up. 

Have you ever seen a solid or closed upper clog? If so, send me the link, please!

Monday, August 16, 2021

Working Hard

 Flemish Coffer Ornament Kit Update


I have been working so hard these past few weeks kitting this ornament. It's ready to go save for the gilt broad plate coming from Australia. It has been so challenging getting everything during this covid nightmare. I owe a huge amount of gratitude to Access Commodities for really hooking me up and helping me find nearly nonexistent materials~ we have scoured the globe for this kit, literally, and I am so proud of it. The instructions made arrival from the printer today~ 60...yes, SIXTY glorious full-colour pages of instructions, along with 8 pages of diagrams and keys, all printed for your stitching pleasure at your leisure.

If you would like to learn more about it, it is available in my ETSY shop, link to the right in the sidebar.

Happy Stitching!


Friday, July 30, 2021

How to Separate Soie Ovale


Here is a short video on how to separate Soie Ovale down into smaller strands~I really prefer the Trame weight silk for long & short stitch and needle painting on the scale I am used to working. To further expand my colour palette of available threads, I use Soie Ovale and just piece it down to match my other Trame weight silks.