Monday, August 21, 2023

What Are YOU Waiting For?

 Time Waits for NO ONE

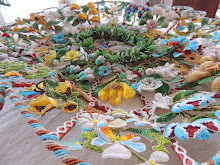
I finished the front frieze and front panel for my Scenes of Country Life, or Rural Pursuits casket this morning. SUPER chuffed!
I try and post something every day on Instagram...however much or little stitching I get done~ I think there is a link in the sidebar to it. I always get the same messages though....

'Oh, I love your embroidery I need to work on my casket, as soon as I get XXXXXXX finished and some little smalls done'

Is that YOU? Do you keep putting your casket on the back burner until you Retire...or until you finish a sea of endless tiny projects?

Well...let me tell you dearest readers....if you really want to stitch a casket...ya'll got to get on it! 

TIME WAITS FOR NO MAN...OR WOMAN

I will be turning 52 here in a couple of weeks. I used to be fit as a fiddle! No worries...hardly ever sick. Things change. We do not get better with age. PERIOD. Last year could have been my last. year. I am now deaf in one ear. Its hard for me to get up and walk around...I now have macular degeneration making it severely hard for me to see. I see shit that's not even there...and cant see what is. 
I have chosen to prioritize stitching my caskets because they are important to me. You may be one of those folks who love to dream about things and pet their threads and that is enough~ and it is enough if that is your want~ there's absolutely nothing wrong with that. But if you really DO want to stitch a casket....
GET OFF YOUR TUCCAS AND DO IT!
All those tiny little projects you did these past couple of years, could have been tiny bits of your casket. Heck all a casket IS...is a smathering of tiny little projects. Break that sucker down into its components, and just do it! BABY STEPS. Before you know it, your casket will be finished!
I will be starting the final panel of my casket~ the top, here shortly~ hope you stop on by my Instagram to check it out and let me know what you're working on!
HAPPY STITCHING!!!


Saturday, August 19, 2023

Plaid Plaid Plaid

Late 1830s Boy's Fall Front 2pc. Suit

Say hello to our new little friend. I apologize that I did not catch his name, as he does not speak...but he is in there to be sure.  This is a fabulous example of boy's wear of the 1830s for several reasons. It fits into so many different categories, yet, it does not. Boys clothing is always super rare...young man's clothing moreso. Is this toddler-size? No. Is it young man size? No. I'd say grade school, between being breached and yet before 'adult' style of clothing was worn. Is this a skeleton suit? Well...not exactly. Is it a relative? definitely. Boys at this time would have worn a straw hat to keep the sun off and their heads covered...not this beaver type I have on him. But since I don't have an early boy's straw hat in the collection, and I do have a beaver...he chose to wear the beaver. Would he have worn shoes??? Maybe not. 
The suit is made from a lightweight cotton or linen blend plaid, very summer weight. I love early group images as they provide evidence of how current fashions were worn. There are always some who were more fashionable and some who were less...sometimes some eccentric folks, all together in the same picture. The above set of boys are from the late 1850s, not one is wearing shoes.

Here is a nice 1850s school group of girls and boys, with their teachers....if you click and zoom in, some of these boys aren't wearing shoes either...
I digress...why am I talking about the habit of not wearing shoes instead of this suit? It is hard to not sit and daydream about what little chap would have worn it, where did he live? Did he live long? Have a happy life? Grow up to have his own little boy? Sadly, the odds are not in his favour. Clothing such as this usually only survived because it was the little guy's last set of clothes before he passed away, for whatever reason. Otherwise, they were worn until they were worn out, handed down, etc etc. 

Here is a back view, an arm has slipped out of the pocket now.  This is a two-piece suit consisting of a one-piece skeleton and an outer jacket. I date it firmly to the late 1830s from the fall front, a staple on grown men's pants at the time period, the banded-down sleeves, and the ruffle around the hem of the jacket. Younger boys at this point in time would have worn fuller skirts on their jackets, reaching down to the knees. Our lad here is older, he's grown up enough to just have a little hint of the skirts left at the hem of his jacket, in the form of a ruffle. 

This back view shows the jacket removed. You can see the fullness in the booty area to allow him to comfortably bend over and not get, ahem... a 19th c wedgie. There are three buttons that close the back upper. The bottommost button also buttons onto the waistline of the pants, along with 4 additional buttons, two on each side.  They are not visible in this photo, but there are yet more buttons down the sides to allow the back flap to be undone for him to go to the outhouse and not have to take his entire ensemble off, as seen below.


Enjoy this pic~ take a few moments to soak it all in. A fall front flap on such a small child's garment. ::::sigh:::::
Two buttons attach it at the waistline, and there is also a  large side opening pocket to each side of it~ cause hello, boys need space to put things!
The only lining in the entire garment is the linen lining to the body of the jacket as seen above, it does NOT extend into the sleeves.

With the jacket on, the front flap reaches just up under the jacket's waistband.

This is a view of the inside of the front of the suit~ the plaid material extends into the front flap area fully~ so that when the flap is down, he is still covered somewhat. The two ample pockets can be seen....no doubt they once held marbles and all sorts of fun stuff!


Sunday, August 13, 2023

Scenes of Country LIfe Casket Progress...And

 Some Notes on the Importance of Stitch Direction

 The time is flying by~ I spent most of July in Washington State visiting my family there, so not much time for stitching. I am back at it now, working the front frieze, as seen at the bottom of my frame above. Because of the number of panels I have drawn on this piece of silk, the size is too large to comfortably reach the top of the frame, so I have to stitch it upside down...I don't recommend it. Shadows change, and stitching that looks one way upside down, may not look the same right side up, so if you are in the same situation, be sure to check your progress right side up frequently!

 As always, I work all the flat silk stitching first, then will go back and add gimps, then other things like silk-wrapped purls, etc. If I have silk-wrapped purls on a piece, those always get put on last as they are terrific thread snaggers. Especially when using flat filament silk that is so beautifully shiny, thread direction can have a huge impact on the look of the finished piece. Most 17th c satin stitch elements were stitched with the stitches running vertically. Colour choices and shading would add the details.

 If one looks at the finer long & short stitch pieces, you will find the stitch direction flows with the elements themselves~ for example, hair. An entire head of hair can be stitched with just one colour of thread, but by changing the stitch direction within curls etc, the stitches themselves create shadows and movement.  Look closely at the stitch direction of my birds here. Stitches that echo the curving design lines will help to portray a rounder more dimensional object. See how flat and boring looking the cherries are next to the songbird? I have chosen to work the flowers on the frieze in straight satin stitch while using long & short stitch on the creatures for more details and contrast.

 Don't be afraid to mix stitches within an element. I have used both satin and long & short stitches on the turkey


Rarely are 17th c pieces ever just one type of stitch~ whether it be a single panel, or an entire mirror or casket. I like to think of them as samplers of all different kinds of stitches and techniques~ so if you want to use a pile of different techniques, GO FOR IT! It will look amazing!!

Happy Stitching!!