Showing posts with label 17th c inspired stumpwork caskets. Show all posts

Friday, May 02, 2025

Do you have one of These in your stash?

Have you Always wanted To embroider a 17th c Style Fancy Mirror but dont know WHERE oh WHERE to Start???


 Are you one of the many with a Thistle Threads Fancy Mirror Frame base sitting in your stash collecting dust??? You had every intent and dream of a beautiful embroidered mirror gracing your favorite space, but got stuck for whatever reason? Maybe the thought of coming up with a design was too overwhelming.... or you don't have a slate frame big enough??? 

Well my friend~ my Four Seasons Quaternion Class may be just what you need to make your dream a reality!

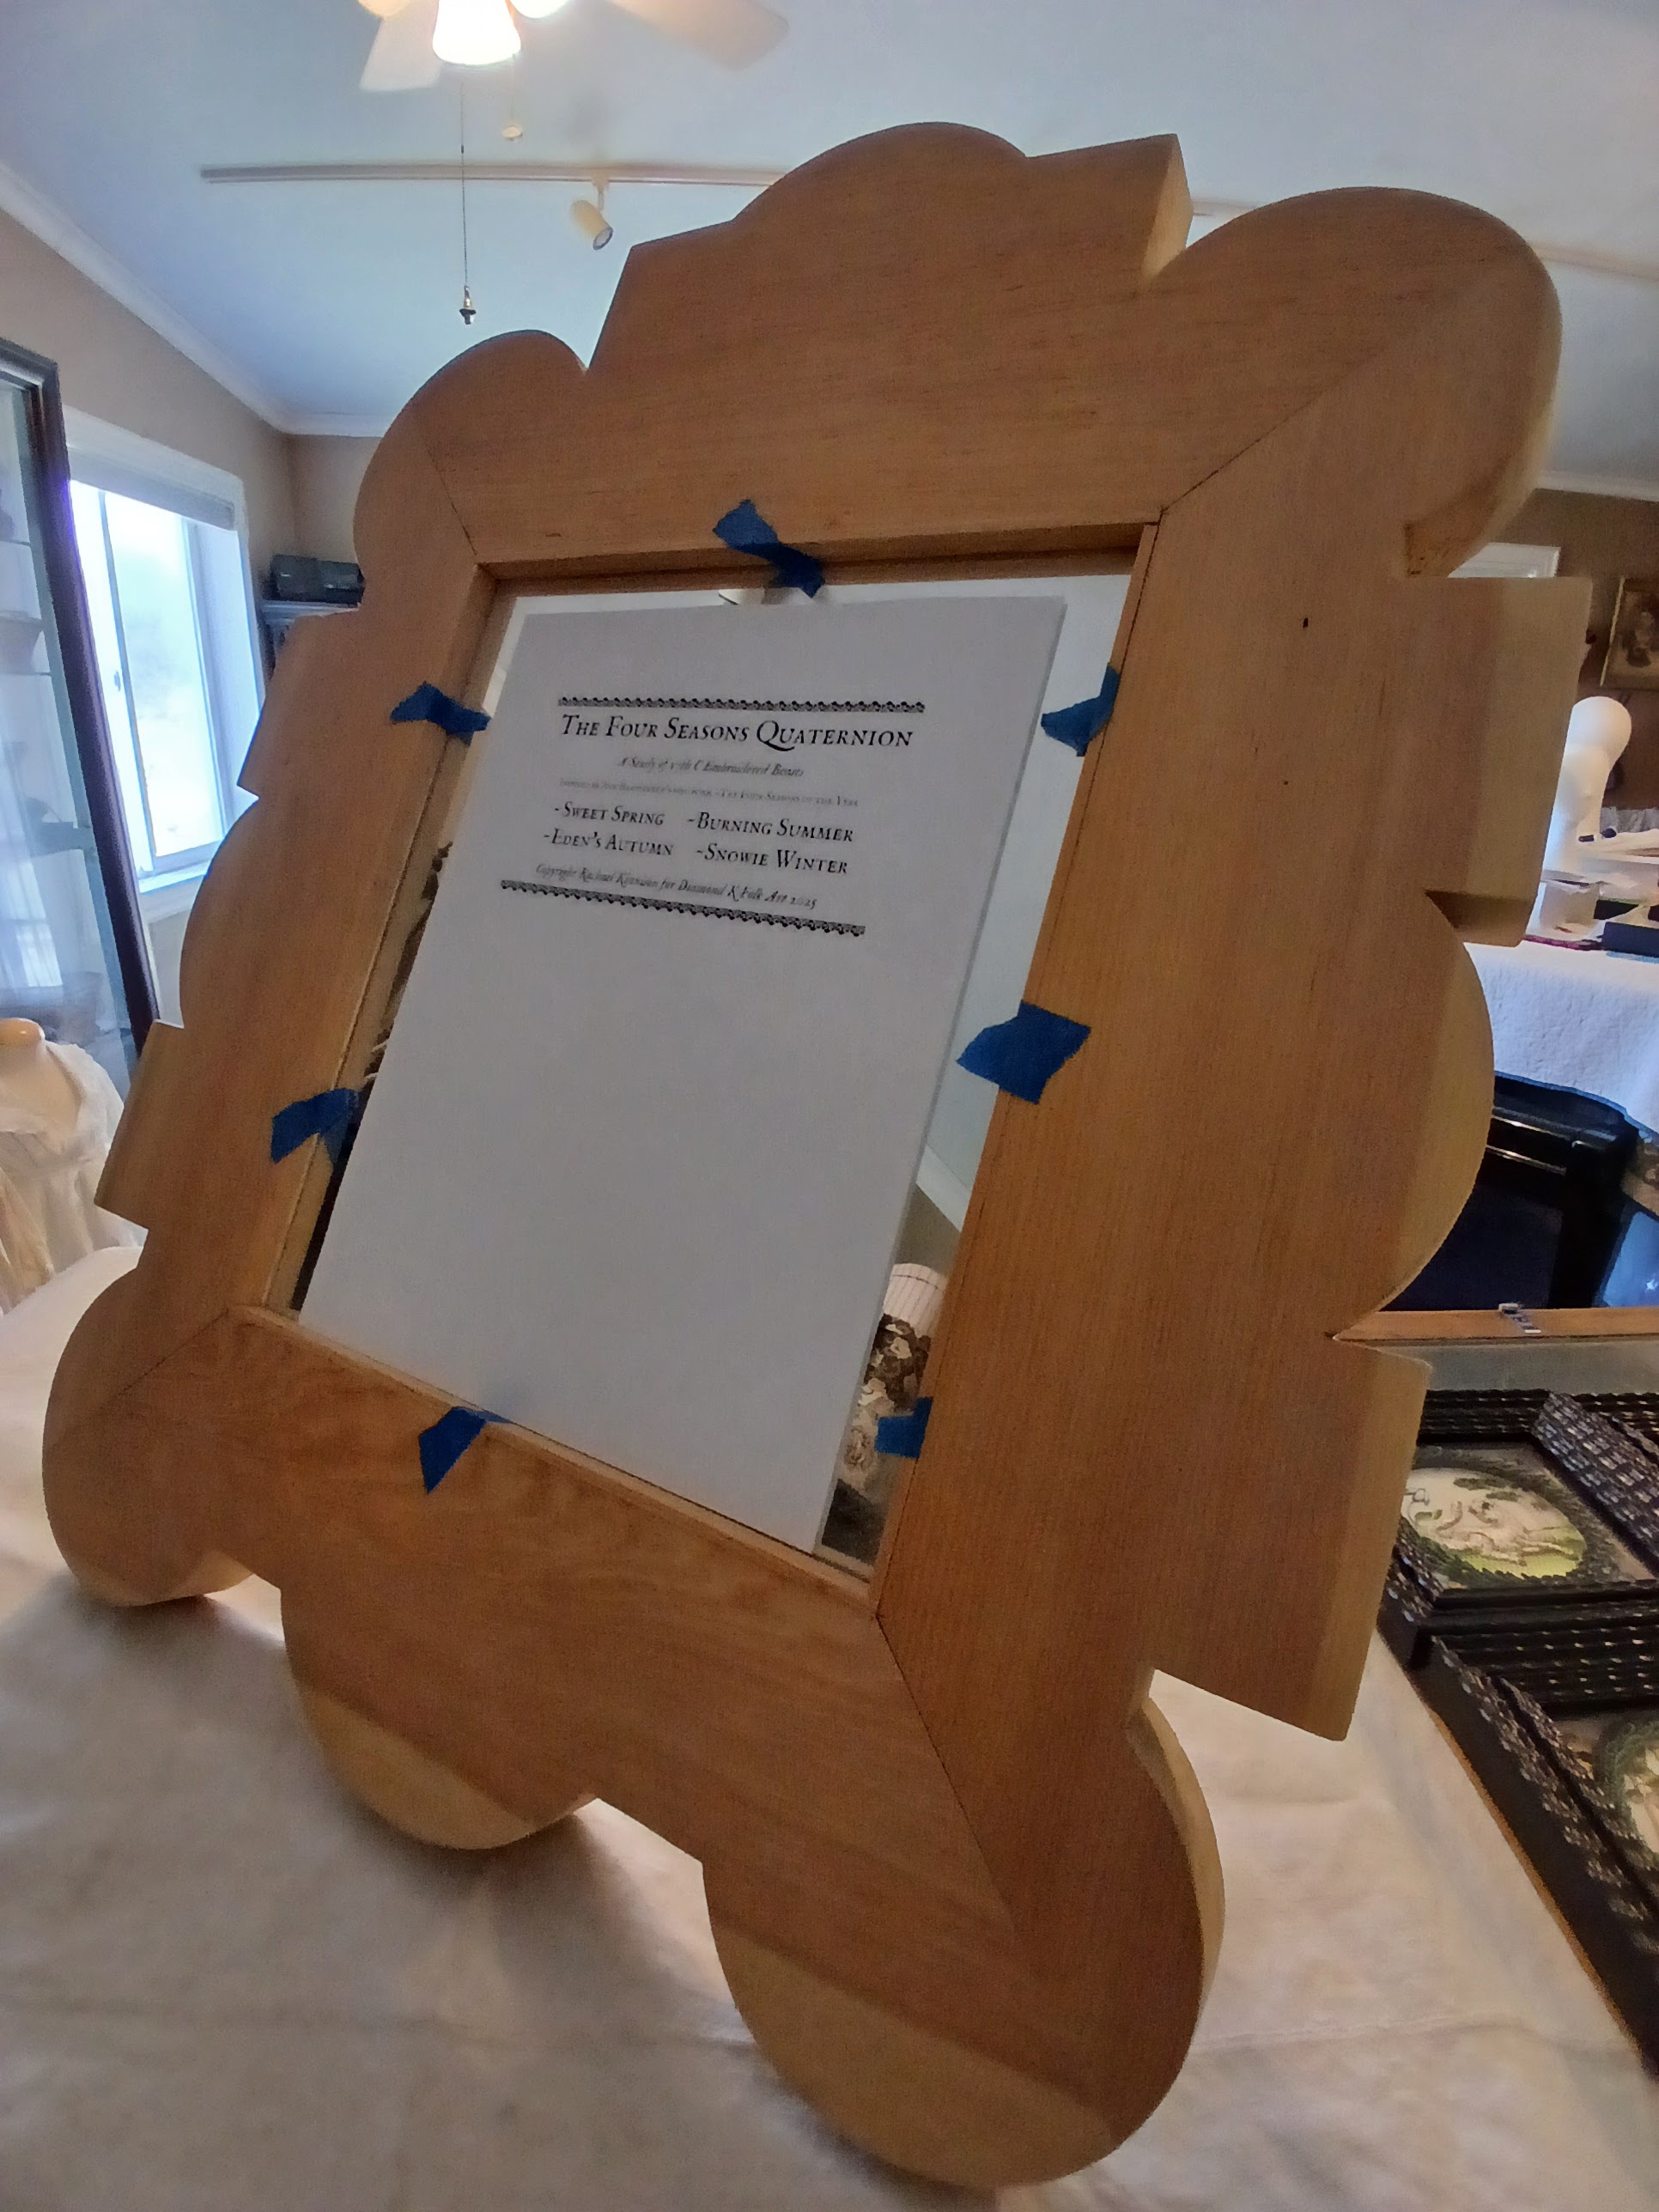
 Several students in class are currently working on their Quaternion pieces to mount onto a Fancy Mirror Frame. When I was designing the pieces for class, I specifically sized them to fit the Thistle Threads Fancy Mirror, just in case anyone wanted to do just that. They are super versatile~ they can be stitched and mounted separately, in pairs, or as a group...they can be incorporated into a box or casket design, and they are a super GREAT way to kick start your Fancy Mirror journey!

 No~ the frame does not come with class. If you don't already have one, you can buy them on the Thistle Threads webstore. But if you do have one, I will show you in class how the cartouches can be incorporated into a mirror design~ as you can see above, they really do fit perfectly! There is enough space left around them to accommodate the traditional tape trim that usually edges the mirror.  

Will I design the rest for you? No, I wont. BUT...I WILL help you with your design, and guide you through the finishing. ....

Which brings me to another point~ I will also share with you my ideas on finishing a mirror in steps~ like a casket. You don't have to have that huge slate frame to work the entire design at once. I'll teach you how to break it down into small, easily digestible pieces so that you can mount and finish your mirror in steps!  

If this interests you, you can learn more about my Four Seasons Quaternion Class here

There are 11 Spots in the fully kitted class remaining.
Class just started on the 15th of April, and its work at your own pace anyway, so you won't be behind. If you want to join us, we would love to have you!


Tuesday, March 04, 2025

Now Open for Enrollment!!

The Four Seasons Quaternion~

A Study of 17th c Embroidered Beasts

   
Would you like to stitch these wee beasties for yourself????

This 8-month fully kitted web-based class at  Diamond K Folk Art Online Academy takes the student on a journey of exploration into 17th century embroidered animals. Each 4"x4" season is viewed within an opulent cartouche of looped glass beads and silk-wrapped plate purls, which the students will make themselves. There is one beast for each season, inspired by Ann Bradstreet's 1650 poem, The Four Seasons of the Year.        

Sweet Spring depicts a cheerful leopard relaxing upon fertile green hillocks..... 

Burning Summer is represented by a stately Bactrian camel......

Eden's Autumn depicts the ever-popular 17th c noble Lion.....

Snowie Winter shows a beautiful 17th century winter landscape

I only plan to run this fully kitted class once due to the difficulty I have had acquiring the materials for it. This class will be limited to 30 students, half of which have already filled from the newsletter sneak peek, so as of my posting, there are only 15 spots remaining!!

Class will begin 15 April 2025 and run for 8 months. 


You can learn more about the class or purchase an enrollment by clicking the Four Seasons Quaternion tab at the top of the blog page directly under the header or by clicking here

Saturday, March 30, 2024

Diamond K Folk Art Online Academy

 Puffed Silkes~ 17th Century Inspired Padded Silk Interiors

Class begins 1 April!

Class Login information was sent last week in the emails, so if you are new to the Online Academy, you should have your particulars in hand. If not, there are links in the body of the email, so check your spam box. If it's still not there, email me and I can resend it. I have had students email me with their excitement to start, and let me say, I am just as excited. I cannot wait to see what ya'll create!


If you are interested, please click the tab for the Online Academy at the top of the page here to learn more about the class. This is a 3 month long course that I keep adding to, because hello~ I want your interiors to look FABULOUS!!!! Not just a casket interior~ but any box interior. The photo above is just an example of what you will be able to accomplish. The box on the left is the box I started out with, and the result is on the right. Some of the bonus lessons include how to make custom compartments, the 17th c technique for integral hinges on interior doors, and making velvet-lined ring compartments.

Class is work at your own pace.

Class starts on Monday~ but you don't have to! You can download and start when you are ready. (Though there is so much eye candy and inspiration in the history lesson one cannot help but get super jazzed about all the possibilities!!!!!!!)

Will this mean I will only be available to you to help you during course time?

Absolutely NOT. I know who is in class. If you download your lessons and get started a month from now~ or a year from now, it makes no difference to me.  I am here to help guide you through your process as long as I am still living!

Course material is written and downloadable in full lesson pdf's, with supplemental videos. I myself have Viasat internet and am not able to stream, so I try to keep videos short and to the point.

This course does not include instructions on how to make an octagon configuration interior.

Octagon interiors will be covered in my upcoming class~ Through The Looking Glafs~ 17th Century Inspired Mirrored Interiors


Sunday, January 28, 2024

Diamond K Folk Art Online Academy

 New Skills Based 2024 Classes


I have several new classes planned for this year at the Online Academy, most are skills-based classes that will help you take your embroidery to an entirely new level.  My goal this year is to offer my students the tools to make their embroidery projects spectacular. While I love project classes, and will indeed have some of those too, a skill-building class can be applied to the thing or what of your own choosing. You can mold the class to fit your particular project now and in the future!
The first class that is open for enrollment now is 

I will show you how to make a custom padded interior to fit whatever receptacle you have on hand, whether it's an old cigar box or fancy casket. No matter how elaborate the embroidery on the outside of a box is, there is always a gasp of excitement when it is opened to reveal an interior just as beautiful(or perhaps even more so) as the outside.

There are a couple of bonus lessons that will include how to make partitions for custom cavities like the ones I made in the casket above for the tiny Penhaligons scent bottles, 

and another on transforming the inside of a drawer into a 17th c style ring holder.

If you are interested in learning my techniques for finishing a padded interior, you can click the link above to learn more about it!

Upcoming 2024 Skills Classes~

*Through The Looking Glass~ 17th Century Inspired Mirrored Interiors

*Windows To The Past~ Frames & Cartouches in 17th C Embroidery & How To Make Them


Thursday, January 18, 2024

A Casket & A Class...

 Scenes of Country Life, or Rural Pursuits Casket Finished!

Its been a whirlwind the past three years. I am a bit surprised that I was able to get this casket done...but on the other hand, as usual, stitching helped me through it. I started the interior in 2021, and thought it was an easy mark of planing it to be finished by the end of 2022. Then I got sick...was already a nervous wreck when dr told me I had a coconut size liposarcoma that needed to come out not next month or sometime in the future...how about the day after tomorrow? So things changed, and I couldn't stitch on it for a while. You have no brain capacity for anything at that moment...at least I didn't. Slowly as I got better and realized I wasn't on the expressway to the other side, I started stitching on it again. At first, stitching gave me something to concentrate on so my mind wouldn't think about other things. Then, stitching gave my mind ease in reflecting and thinking about ...well...all the stuff I didn't want to think about. 

There is a mine of information just waiting to be discovered about the effects of the sounds of a needle and thread moving through a fabric. Perhaps it is that, combined with the repetitive motions of stitching, moving the arms up and down, that relaxes the spirit? I don't know, but whatever it is, I like it. I need it.

 I love how this casket came out. It is my Scenes of Country Life or Rural Pursuits casket, and it is everything I love about my childhood and then some. 

It is stitched on dutchess silk satin, entirely in flat filament silks. There are five cartouches with scenes in them that remind me of special memories. I am on the front sitting on the shore fishing(she also represents my Mother), and in another, milking a cow. Growing up there was many a day spent fishing. Sometimes we were fishing for our supper, so we sat there till we caught something to eat, rain or shine. I never liked going out in the boat to go fishing because one, I always had to pee, sometimes before we even got to the 'spot' to fish...and two, if I sat on shore, I could sit and play in the dirt while fishing. Maybe that's where I first learned to multitask? ha 

I learned to milk a cow at a little dairy farm in the first grade. I loved the sound of the milk hitting the can, and seeing the steam rise up from it. Can't stand to drink milk, but milk the cow, yes!

The surround holds flowers I know well~ my Mom always had the most beautiful iris and tulips in the yard~ I love red tulips and would always pick her a bunch for Mother's Day. She was always so happy that I picked them for her, and looking back on it now, probably secretly a little sad I had picked them. The frieze holds flowers and fruits that are special to me~ the turkey here is a nod to the turkeys I had here on our own farm. The central flower is a sunflower, Pip's favorite. Of course, we didn't have borage in northeast Washington...that is an homage to 17th stitchers


Filament silk is so wonderfully shiny, this really glows from all angles. Here you can see up close the faux tortoise shell trim I made for it. I love 17th c caskets with tortoise trim, and it was a favorite for picture frames as well, the dark colours really set off the embroidery.


The proper right side depicts my Pa hunting(then again, I could be me too). We never hunted waterfowl, this is a grouse that has just flown out over water ;)  There are two wild strawberries on the hillock behind him, and more up in the frieze. I set the traditional 17th c configuration of a dog chasing a rabbit to the center, but in all honesty, we hunted rabbits a different way~ while riding in a Toyota landcruiser with a pistol. The pansy represents all the little violas that always grow in our yard at home and that seem to pop up always without ever being planted


The proper left side is a plough scene. I think of my Great Grandpa Randall, whom I never knew, out in the fields...pretty sure he was on a tractor, but I didn't really want to stitch a green and yellow John Deer tractor on my casket. The little flowers in the frieze to the far right were as close as I could get to a 17th c representation of the matchsticks I loved to pick out in the woods in the spring. There are thistles in the center, a snail cause I adore snails and a rooster...I thought it was fitting he was crowin the sun up in the panel below. 


One of the challenges of this casket is the scale~ everything is so small. I scaled down my threads to get the detail I wanted in my stitching, as well as made others. I made this silk wrapped plate purl in two colours for the snail shell.


The top is a single large cartouche with me sitting under an oak tree...lazing away. I have been picking wild strawberries again and am holding one. Three suffolk sheep graze in the foreground, and my kiko goats Luke(white and brown) & Meisie(black) are relaxing with me. The windmill in the background is not from my childhood. I have always loved windmills depicted in 17th c embroidery, and when I saw some on a trip to Paris in 2017, I knew I was going to include it on something! To the right of us all is a big pond...this represents my most favorite place on earth~Potter's Pond, at home. I also love swans, so you can't have a pond without swans in it


The surround is a mixture of flowers in long and short stitch, and purl work using silkwrapped purls. Two silk wrapped kidskin parchment flowers ornament the cartouche


All of the stitches on this casket are flat stitches~ satin stitch, long and short stitch, French knots, long leg French knots ect

I loved stitching the swans


The back of the casket and back frieze are made of silk wrapped cards~ the figurals on the bottom from left to right top to bottom are green apples, thistle, acorns, single acorn, pink wildflowers, and huckleberries
The interior is dressed in blush pink silk, with secret compartments to the lid and otherwise, with a special portrait that sits behind the mirror. I will be teaching a class this year on mirrored interiors that will include instructions for making the octagon design...

 If you like the look of the padded silk interior and would like to make your own, my new class Puffed Silkes~ 17th C Inspired Padded Silk Interiors is now open for enrollment~ you can click on the header for the Online Academy at the top of the page, or here to learn more about it.


As excited as I am to see this finished, I am also kind of sad. It has been a good friend to me and kept me company for many hours! 


Saturday, December 23, 2023

Embroidery FInished!

 Merry Christmas

Today I stitched on the final two little vellum rosettes on the top panel of my Scenes Of Country Life, or Rural Pursuits casket, so the embroidery is now complete. It was my goal to get it finished this year...well, last year really, that morphed into this year! I will take a few days off and enjoy Christmas and then glue the top, front, and front frieze panels onto the casket. Once that is finished, I can start making the trim, which I am really excited about~ it's gonna look fabulous!


I hope ya'll have a wonderful holiday season. Whatever your special day is, I hope it's filled with love & peace & happiness. If you are missing a special someone, I hope you make time to sit and remember them & the lifetime of memories they left with you. Remembering our loved ones and sharing stories about them with others, is how they live on forever~

Happy Stitching & Merry Christmas!


Thursday, November 23, 2023

Special 2023 Ornaments & Casket Update

 Happy Thanksgiving!

I hope you all are having a wonderful holiday today! I have added six precious hand painted ornaments to the Etsy store this morning. I think she turned out beautifully!
I have been working like mad to get these done in time for this holiday season. There are sooooo many coats of black to get them this dark and dimensional~ there are several 9 hour days of painting represented in this photo. I have had a heavy workload out in the shop. Between the painting and lacquering stages, I have been working on the top panel of my Scenes of Country Life casket.


The center panel is now complete and I have finally started the surround. It seems like I have spent eons on this casket~ its never ending! I'm still not confident that I will be able to get it finished this year, but I'm certainly going to try. You should be able to click on the photo to make it larger~ I love how the Suffolk sheep came out...the black goat is my Keiko Meisie, and her mate Luke is in white with brown splotches. The windmill in the background I saw on a trip to Paris, and swans, well, anyone who knows me knows how much I love swans! I was going to try and draw in a loon as well, but I will save them for another casket. 

If you want to follow my stitching journies, I post daily on Instagram~ just search #diamondKFolkArt or check out my page~  rlkinnison1

Happy Stitching!


Tuesday, October 24, 2023

New Witney Antiques Exhibit of 17th & 18th c Needleworks

 Choice & Precious Work


If you are in England ZOOM to Witney Antiques and check out their current exhibit, Choice & Precious Work. Firstly, it is amazingly FREE, and secondly, it is the first of two exhibits that will be showcasing the Elizabeth Hall suite of 17th c needlework & embroidery. Later pieces from the 18th c have been added to  her collection by her descendants. I cannot stress to my Dear readers enough how very rare these pieces are, and that they have been so well taken care of and passed down through the family together. This is a once in a lifetime change to view such a collection~ if you cant get there, then order the catalogue! It can be had directly from Witney Antiques, or if you are in the US the Attic Needleworks will be carrying it here shortly, so give them a ring and reserve yourself a copy!

Monday, August 21, 2023

What Are YOU Waiting For?

 Time Waits for NO ONE

I finished the front frieze and front panel for my Scenes of Country Life, or Rural Pursuits casket this morning. SUPER chuffed!
I try and post something every day on Instagram...however much or little stitching I get done~ I think there is a link in the sidebar to it. I always get the same messages though....

'Oh, I love your embroidery I need to work on my casket, as soon as I get XXXXXXX finished and some little smalls done'

Is that YOU? Do you keep putting your casket on the back burner until you Retire...or until you finish a sea of endless tiny projects?

Well...let me tell you dearest readers....if you really want to stitch a casket...ya'll got to get on it! 

TIME WAITS FOR NO MAN...OR WOMAN

I will be turning 52 here in a couple of weeks. I used to be fit as a fiddle! No worries...hardly ever sick. Things change. We do not get better with age. PERIOD. Last year could have been my last. year. I am now deaf in one ear. Its hard for me to get up and walk around...I now have macular degeneration making it severely hard for me to see. I see shit that's not even there...and cant see what is. 
I have chosen to prioritize stitching my caskets because they are important to me. You may be one of those folks who love to dream about things and pet their threads and that is enough~ and it is enough if that is your want~ there's absolutely nothing wrong with that. But if you really DO want to stitch a casket....
GET OFF YOUR TUCCAS AND DO IT!
All those tiny little projects you did these past couple of years, could have been tiny bits of your casket. Heck all a casket IS...is a smathering of tiny little projects. Break that sucker down into its components, and just do it! BABY STEPS. Before you know it, your casket will be finished!
I will be starting the final panel of my casket~ the top, here shortly~ hope you stop on by my Instagram to check it out and let me know what you're working on!
HAPPY STITCHING!!!


Sunday, August 13, 2023

Scenes of Country LIfe Casket Progress...And

 Some Notes on the Importance of Stitch Direction

 The time is flying by~ I spent most of July in Washington State visiting my family there, so not much time for stitching. I am back at it now, working the front frieze, as seen at the bottom of my frame above. Because of the number of panels I have drawn on this piece of silk, the size is too large to comfortably reach the top of the frame, so I have to stitch it upside down...I don't recommend it. Shadows change, and stitching that looks one way upside down, may not look the same right side up, so if you are in the same situation, be sure to check your progress right side up frequently!

 As always, I work all the flat silk stitching first, then will go back and add gimps, then other things like silk-wrapped purls, etc. If I have silk-wrapped purls on a piece, those always get put on last as they are terrific thread snaggers. Especially when using flat filament silk that is so beautifully shiny, thread direction can have a huge impact on the look of the finished piece. Most 17th c satin stitch elements were stitched with the stitches running vertically. Colour choices and shading would add the details.

 If one looks at the finer long & short stitch pieces, you will find the stitch direction flows with the elements themselves~ for example, hair. An entire head of hair can be stitched with just one colour of thread, but by changing the stitch direction within curls etc, the stitches themselves create shadows and movement.  Look closely at the stitch direction of my birds here. Stitches that echo the curving design lines will help to portray a rounder more dimensional object. See how flat and boring looking the cherries are next to the songbird? I have chosen to work the flowers on the frieze in straight satin stitch while using long & short stitch on the creatures for more details and contrast.

 Don't be afraid to mix stitches within an element. I have used both satin and long & short stitches on the turkey


Rarely are 17th c pieces ever just one type of stitch~ whether it be a single panel, or an entire mirror or casket. I like to think of them as samplers of all different kinds of stitches and techniques~ so if you want to use a pile of different techniques, GO FOR IT! It will look amazing!!

Happy Stitching!!

Friday, July 07, 2023

Scenes of Country Life Casket

 Progress

It's been a while since I posted about my casket progress...or lack thereof is probably more accurate. I don't know what I do all day long, but whatever it is, it sure goes by quick cause every time I turn around, it's time to go to bed again. 

Whatever happened to the days dragging on like they did when we were little? I might be able to actually accomplish something if I had that kind of time on my hands...

There are two scenes on the front panel~ one of me fishing, and the other milking a cow. Because I have them framed up with the top panel on the same slate frame, the only way I can reach them to stitch is with them upside down...which in itself presents some challenges. One of the best qualities or reasons for stitching with flat filament silk is the effects that the light has on it. A person can stitch with a single colour, and just the position of the stitches and how the light bounces off them creates shadows and illusions of there being different shades of colours there, when in fact it's all the same colour. 

So shadows play an important part in stitching with filament silk...insert stitching tip here...very important.....
Your stitching can look one way upside down, and drastically different once turned right side up! So check it often if you find yourself in my same situation...

I started with the ground as usual, and decided I wanted to work a basketweave pattern for one of the fields, as seen above.

I have to continually remind myself that this is a FLAT work casket that is supposed to be mainly satin stitch. It is very hard. I actually worked the entire forefield and then decided I didn't like it...didn't like the colours, and most importantly, ever so slight as it was, the field stood too proud from the surface. The milk jugs were going to be long and short stitch, so very flat, and hello, you can't have milk jugs in the foreground that sit behind the field that is supposed to be behind them.
So the field got ripped out el mui pronto, which actually made me quite happy as the colours I had chosen for the field were giving me flashbacks to our 1970s kitchen with orange, brown, and green mushroom wallpaper...

I kept the diagonal direction and worked stripes in satin stitch~ love it! It set the field off dramatically from the one in the background without it being too obnoxious.

Once the field was finished I built the fence and planted some long leg french knot trees. Worked the milk jugs next and REALLY HATED them. I mean, seriously close to ripping them out. As I am typing this you can see EXACTLY what I'm talking about with the difference of how something looks upside down....the jugs above are the same ones as shown in the picture below~ I think the ones below that are upside down are much nicer than the ones above....anyways, I decided to leave them and see how they looked after the cow was finished.

Everything is so tiny on this piece, as I was stitching Cow, I had to stitch the milkmaid's head and hat. They are seriously small and the lines were seriously hard for me to see. Am I overusing the word seriously? This should give you an idea of how stressful this panel was for me~ it wasn't much fun. The girl's face is literally half the size of the fishing panel's face, I think 4 mm from top to bottom, and not even that wide. R*E*D*I*C*U*L*O*U*S*L*Y* small. 
Enter stitching tip here: Don't draw things so small you can't stitch them with modern materials available today.

Cow complete, it's on to the costume. 

I wanted to make the costume bright so the girl would stand out against the fields...but not so bright she looked stupid...A farm girl does not dress in her best dress to go out and milk a cow! The addition of an apron and headscarf helped to keep her simple.

Rows of French knots for the foreground in blue-greens set them apart from all the greens in the background. A few strategically placed tiny silk gimps finished off the scene.

 I am actually really pleased with this panel which is odd because I think out of all of them thus far, this one had the most things I was not happy with in it. I ripped a LOT out, but I also left a lot in. One thing is so true with 17th c stitching it can be very easy to become hyper-focused on a single aspect of it~ be it a stitch or a colour etc....but there's so much going on, that once everything is in place, all the glaring things just kind of blend and disappear. 
Sometimes they add just the amount of quirkiness that is needed to make it perfectly 17th c

Whatever your stitching, I hope it brings you joy


Thursday, June 01, 2023

New Beadwork Class Open for Enrollment!

 Fruit of Thy Hands

I am super excited to announce my new 17th c beadwork class at Diamond K Folk Art Online Academy is now open for enrollment. I am so far behind from being sick last year, I am trying to catch up & sincerely apologize to all of my students patiently waiting for the classes I was working on to be ready.   
I designed this project class to teach the basic detached techniques used in making beaded baskets like mine shown above. What is learned in class can be applied to any and all the flowers and fruits and acorns etc I made for my basket!

If you are not familiar with 17th c beaded baskets, I can refer you to read an earlier post on them here. There is a link to the basket above at the Met~ note the wonderful beaded oranges and lemons in the border surround. I will teach you how to make them in this class~ though you will make strawberries, the technique is the same for all fruits/ nuts etc. 


Class starts on 1 July, and the kits will ship mid-June. If you would like to learn more about it or enroll,  you can do so here, or click the Diamond K Folk Art Online Academy PAGE TAB under the header at the top of the page to see the current classes offered.


