Making Up A Knit Pinball...
I you had been following my progress on my knit pinball from last year, here are the steps to making one up. You can follow these steps for an embroidered one too, construction is the same. I had planned on knitting the second side in beads, but my eyes have gotten a bit worse and I stopped as I just cannot see the beads anymore! It is a project for when I get my new glasses, or a microscopic magnifier, one of the two.
If you are knitting your pinball, the first step once both sides are completed, is to block them~ this is done by pinning them face side down onto the iron board, then laying a dampened cloth over them, and steaming with a hot iron. I leave them pin'd to the board to dry overnight
When you pick them off the board, they are wonderfully flat and ready to be made into a pinball.
Recipe for a Pinball:
sides for making up~ 2
thread
needle
wool roving for fill
pencil or pen
cardstock
scissors
The first step after gathering your materials is to cut a circle from your cardstock the diameter you want your pinball to be. In this case, I made mine the same size as my knit design. I like to include little notes and things in all my work(dollys included), so I wrote on the cards, and on one of them, included a bit of MY hair affixed with read sealing wax and my favorite seal.
I like to use natural wool roving in my pinballs, you will need two handfulls, and this is a hand FULL if wool tightly wadded, as you want the pinball stuffed hard
I place a knit side right side down in my hand, then poke in the wadding and quickly cover this with one of the cards. I have my needle threaded and ready to go, and stitch the excess over the card to itself, going around and around, always stitching opposite to draw the knit around the card evenly. example, if I take a stitch from 12 o clock, the next one is at 6 o clock, ect ect
Do this with both sides, they need not look pretty, but do try and keep things as FLAT as possible
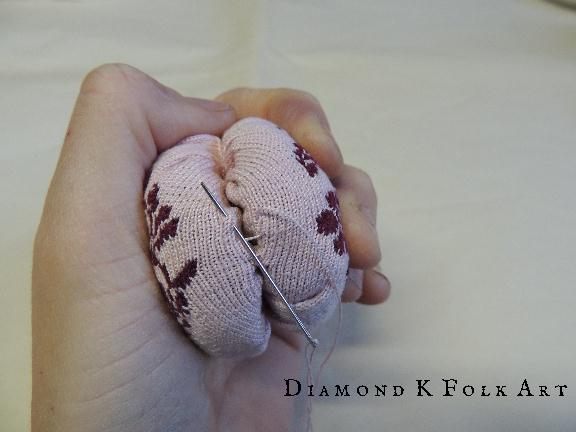
Now you are going to place both sides together, have a care to position your motifs carefully. I like to use the same thread I knit with for stitching them together, a blunt needle works better than sharp here.
Once positioned where you want, carefully squeeze and stitch them together. You need clean hands of coarse, and a good grip, if you look at my fingers you will see how really tightly I am squeezing, as they are turning white!
Again here, I like to stitch around twice. Pinball is nearly complete, save for the trim to cover the center seam.
Colonial Williamsburg offers a wonderful sterling pinball ring, but for 225 dollars. Perhaps when I complete a beaded one I will lavish it with a silver ring and chain, but for now, simple trim will do. I like this burgundy silk...it matches the color in my design perfectly...
I also have some precious 18th c silver braid, I like how this looks too....decisions decisions....
Not being able to decide on just one, I used both of coarse. First I laid on the silk, then the silver braid over. For hanging from a waist belt, I just braided a bit of the leftover cotton and tied round the top.




 aaahhhhhhhhhhhhh. Look at this! What a mess! Yes, I am totally getting what I asked for. More patience. Yes. Need more patience...much more. ::::sigh::::: The above mess is what comes from using too large of beads on too small of knitting. It looked bad...no, not bad, h-i-d-e-u-o-s! I knew when I knit the first bead the beads were going to be too large, but thought, I can make it work. Nope. They are size 15/0, but still way too large for knitting on 6 ought needles. This ball is the only ball of this thread I have, so I unraveled the whole lot, over a weeks worth of knitting, and am going to start over. Have already sorted out those beads and ironed the kinks out of my thread...so ready to try again


 I am not the kind of person that makes 'New Year's Resolutions'....but I do like to identify my goals for the coming year at its start...and usually, I like to start some interesting something I have been meaning to get to, in January. I guess, with starting at the head of the year, in my mind's eye, I will have the next 12 months time to figure out my new whatever-it-is. One of my projects for this year, is knitting more period correct, 18th century fancy pinballs. Now the ones I did last year, were FABULOUS and I absolutely adore them~ and so do my children~ they have all asked me to make them one.....but being....well,me...... I want to make dollye size ones, with precious sayings and mottoes and beads knit into them. yaaaaaaa....right. sounds endearing enough? doesn't it? Above is my start, I am using size 12 DMC coton perle, on 6-ought (000000) lace needles. Evidentally, I have gone absolutely looney, and have a subliminal need to make myself go blind in the process.








