Saturday, November 27, 2021

Dome Top Casket Progress

  & Upcoming 2022 Classes

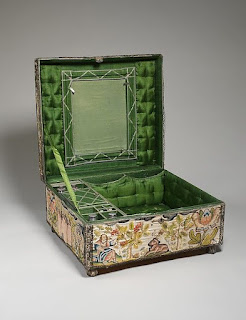
 Today is just a short video to show you the progress of my Dome Top Casket and to reinforce my point that while you do need a good sound foundation for a casket, it need not be an overly fancy or expensive one. It's more about what you do to the box....than the box itself.  Of course, I have not been stretching this project out minutes at a time. Its been finished for a while and SUPER hard to not just share the whole thing. I think overall, from start to finish, it was less than 2 months time from buying the box on Amazon here , to its total outside completion.  BTW, I see that the price of the box has gone up, when I bought it it was 11.00 and now is up to 18.00.  Still an excellent value! You will see the link on Amazon there are three sizes~ I used the large size for my little casket. 

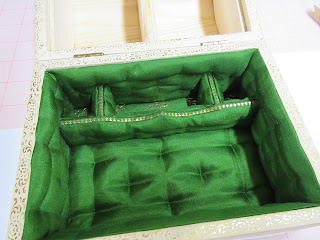
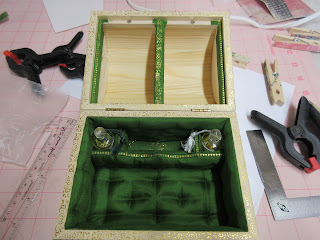
I am working on a new teaching website and am planning on launching 2 new classes at the first of the year. The first will be Puffed Silkes~ 17th c Inspired Padded Box Interiors. 

This class will teach you the skills to make a padded interior for any shape of box or casket, as elaborate or simple as you want. 


The second will be a very exciting class on how to make Gummed Silk~ Gum Worke ~ The Arte of 17th Century Gummed Silk, where I will teach you my technique for making gummed sleeven silk.


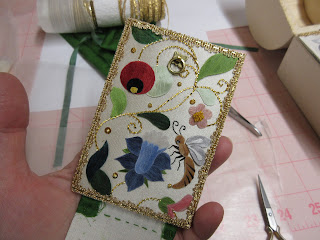
Either class offers skills no one who wishes to make their own casket should be without.  My little Dome Top Casket is a perfect example of combining the two. 

 Traditionally, a picture or casket covered in gummed silk was worked only in gummed silk. It was usually flat...like the closer view of the interior door above. But unlike the 17th c examples I have studied, I like to add silk stumpwork stitches and goldwork to really make the surface come to  life....and wait until you see the outside! While it is amazing as flat work...I will show you how much dimension you can achieve with Gum Worke. It really is a fun and fabulous technique!


Saturday, November 20, 2021

Roll with It

 Dome Top Casket Progress...

Do you ever feel like you are on a roller coaster that won't stop? Lately, I have been desperately trying to get off the one I am on but it never slows down enough for me to leap out. Every time I turn around it seems like it's time to go to bed and my to-do list is not even half-finished for the day. Maybe the sun is on the same schedule? It goes to bed around here by 5pm.  IF anyone has any hints on how to s-l-o-w  t-h-i-n-g-s d-o-w-n a bit, I would very much appreciate it. 
The Dome Casket flew together and I am so happy with how it came out! In the line of progression for today's Floss Tube Finer Finishing Tips YouTube series, I am continuing to prep for the embroidery of the interior doors. What you don't see in the video is the finished padded interior, shown above. Isn't it the most gorgeous shade of green?

 I have a list in my head going of interior colour schemes I want to do, and this green was high up on the list. 


I have always admired the interior of this one at the Met Museum, shown above. Click that link to go to the Museum's page to really check it out! It was the inspiration for my padded interior, except with gold trim. I love my tiny little Penhaligons bottles nestled so snugly into their cubbies. Who am I kidding, I just love padded interiors....and if YOU love them, well I may just have the class you have been looking for coming up soon! It's not a project class in particular. It will teach you the skills to make a padded interior to fit any shape or size box you can dream of! If you think that's something you would be interested in, just shoot me an email (rlkinnison@yahoo.com)to get on the mailing list, I am hoping for a January 2022 start!

Just a quick tip today showing you how I roll the glued paper onto the surface of the silk to glue it on. I use this rolling method for gluing finished embroidery panels as well. Along with the Yes! Paste, one will get no bubbles!

Saturday, November 13, 2021

Happy Saturday!

Floss Tube Finer Finishing Tips 11

The tip for today is how to support the fabric for design transfer after its been laced into the frame.  Just as a building is only as good as its foundation, so is our embroidery. In order to get the cleanest, smoothest pattern lines, the fabric on your slate frame must have proper support, which is the subject of todayƛ video tip

Happy Stitching!

Wednesday, November 10, 2021

Things You NEED to Think About....

  Before You Know You Need to Think About Them....


I was editing videos for my Dome Top Casket series on YouTube today and think that this next tip is just too important to wait until Saturday's usual post. Today's tip is about when to transfer your embroidery design onto your ground fabric. If you plan on mounting the embroidery onto a particular size of something...or the finished size of your embroidery needs to be exact for whatever reason...today's tip is for you! The easiest way for you to not have to cut into that glorious embroidery you just finished because its now magically too big for its intended spot is to watch today's video tip!!


Saturday, November 06, 2021

What's Your Plan?

 Floss Tube Finer Finishing Tips #9


Happy first Saturday of November! Stop by the You Tube today to see the latest video for the Dome Top Casket. I am a firm believer that one should finish the inside of a box FIRST, before the outside. There are several reasons for doing so, but mainly, it is not so easy to manipulate the box in all different directions when a finished embroidery is mounted on the outside! 

That being said, if you are one of my readers who is dragging their feet on their casket....this video is for YOU! Who cares what you are going to put on the outside....DOESNT MATTER. Get up and FINISH THE INSIDE! Then, when you do get the outside embroidery finished, the inside will be done and ready!

Wednesday, November 03, 2021

2021 Flemish Coffer Ornament Kits

 Only 8 left in Stock on ETSY!


If you have had your eye on the 2021 Flemish Coffer Ornament Kit, I have just 8 left in stock on ETSY, ready to ship. I can with all confidence say that there is no way I will be able to restock them before year's end. You can click on the link to my ETSY store in the sidebar if you would like to learn more about the kit.