Showing posts with label inspirations. Show all posts

Sunday, December 22, 2024

Detroit Institute of Arts Sampler Exhibit

 Painted With Silk

The Art of Early American Embroidery

Dec 13, 2024~ June 15, 2025


If you are in the Detroit Michigan area, I hope you will take a moment to visit the Detroit Institute of Arts' current exhibit of early American samplers. It runs through June 15th 2025. The above photo is a link to their website~

Earlier this year, Megan DiRienzo asked me to make a set of Touchable Embroideries to
accompany the exhibit. The main reason was that they wanted people with sight impairments who may not be able to see the embroideries clearly to be able to have something they could touch instead. Many of you know that I have macular degeneration myself, so this was super special to me. 
If you are a stitcher,  you realize how much the sensation of touch is involved in our own appreciation of stitching, no matter how perfect our vision is.....as well as how soothing and relaxing the repetitive sound of the needle passing through the fabric is~ but those that don't may not, so it is super exciting to have something available for anyone to touch!
I worked two identical sets of embroideries so that they may be switched out halfway through the exhibit. 

The curator specifically asked for a house motif. I chose a low-count linen in a neutral tone as a ground fabric in hopes that the cream colour of the ground would not show dirt as quickly as a white one would, and a lower count so that the larger spaces in the weave would allow dirt to pass through instead of collecting on the surface.
The house is worked in DMC cotton thread. 


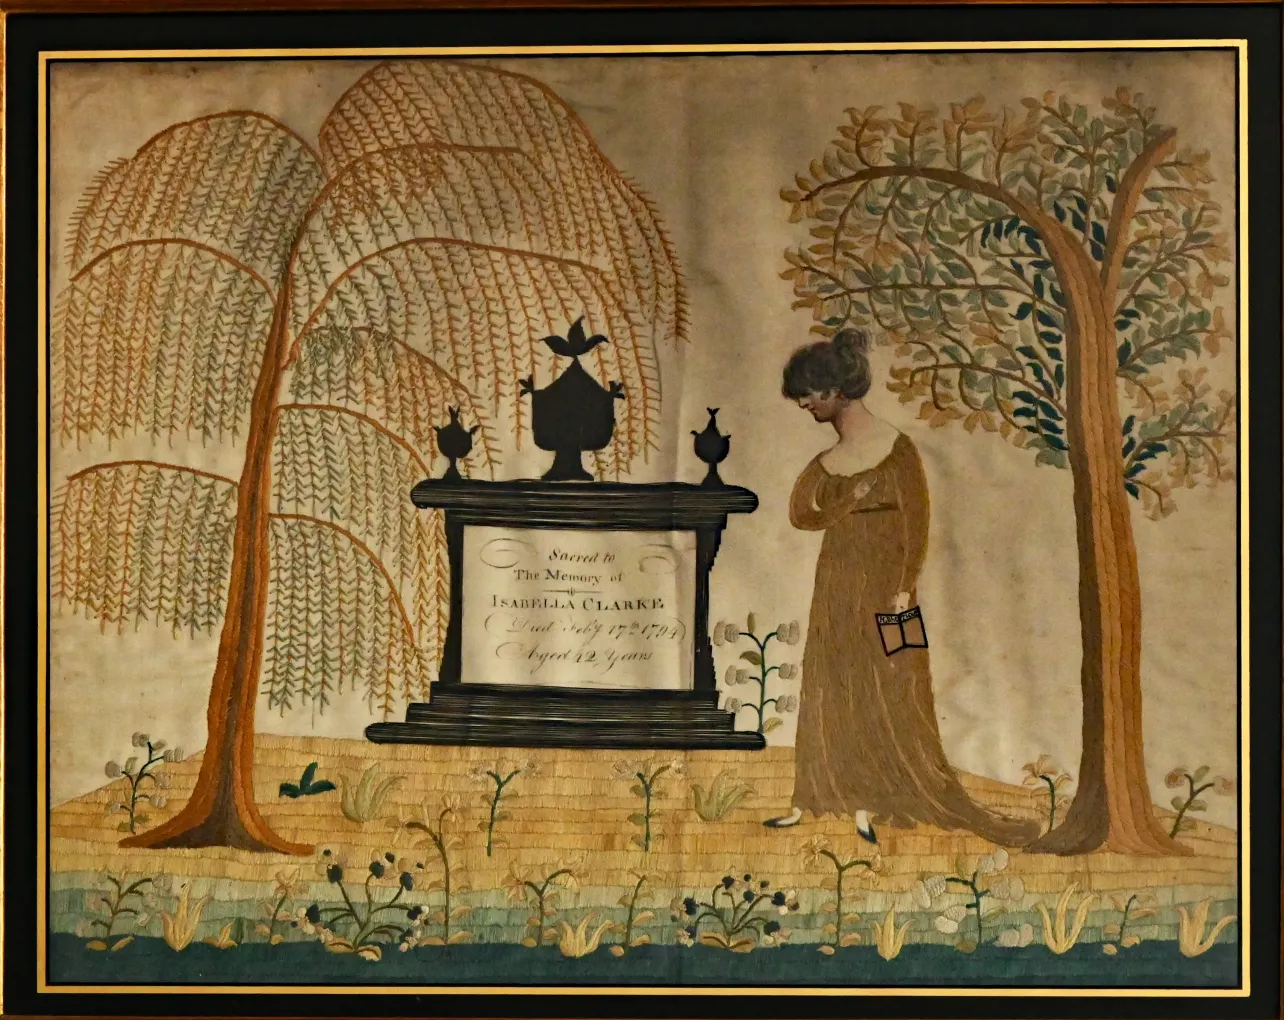
  You may recognize this weeping willow motif~ The Clarke family's 1795 memorial embroidery for Isabella Clarke, shown in the first photo, was my inspiration. It is worked in stem stitch with black perle cotton and really feels wonderful. It was my favorite to pet with my own fingers!

The stitch sampler, seen on the far right in the exhibit grouping above, demonstrates two stitches, satin stitch, and stem stitch. Each stitch is worked (from the top down) in silk, wool, and cotton thread so that the difference in the fibers can be appreciated. 

You can learn more about the exhibit on the Detroit Institute of Arts website~ just click the Isabella Clarke memorial pic to follow the link. 

So after how many years of being told...NO TOUCHING.....and myself telling other folks to NOT TOUCH...
Finally! WE GET TO TOUCH! 

**I hope they keep the samples afterward as a good example and illustration of the importance of not touching embroideries, as I fully expect them to get quite grubby!


Saturday, December 23, 2023

Embroidery FInished!

 Merry Christmas

Today I stitched on the final two little vellum rosettes on the top panel of my Scenes Of Country Life, or Rural Pursuits casket, so the embroidery is now complete. It was my goal to get it finished this year...well, last year really, that morphed into this year! I will take a few days off and enjoy Christmas and then glue the top, front, and front frieze panels onto the casket. Once that is finished, I can start making the trim, which I am really excited about~ it's gonna look fabulous!


I hope ya'll have a wonderful holiday season. Whatever your special day is, I hope it's filled with love & peace & happiness. If you are missing a special someone, I hope you make time to sit and remember them & the lifetime of memories they left with you. Remembering our loved ones and sharing stories about them with others, is how they live on forever~

Happy Stitching & Merry Christmas!


Friday, July 07, 2023

Scenes of Country Life Casket

 Progress

It's been a while since I posted about my casket progress...or lack thereof is probably more accurate. I don't know what I do all day long, but whatever it is, it sure goes by quick cause every time I turn around, it's time to go to bed again. 

Whatever happened to the days dragging on like they did when we were little? I might be able to actually accomplish something if I had that kind of time on my hands...

There are two scenes on the front panel~ one of me fishing, and the other milking a cow. Because I have them framed up with the top panel on the same slate frame, the only way I can reach them to stitch is with them upside down...which in itself presents some challenges. One of the best qualities or reasons for stitching with flat filament silk is the effects that the light has on it. A person can stitch with a single colour, and just the position of the stitches and how the light bounces off them creates shadows and illusions of there being different shades of colours there, when in fact it's all the same colour. 

So shadows play an important part in stitching with filament silk...insert stitching tip here...very important.....
Your stitching can look one way upside down, and drastically different once turned right side up! So check it often if you find yourself in my same situation...

I started with the ground as usual, and decided I wanted to work a basketweave pattern for one of the fields, as seen above.

I have to continually remind myself that this is a FLAT work casket that is supposed to be mainly satin stitch. It is very hard. I actually worked the entire forefield and then decided I didn't like it...didn't like the colours, and most importantly, ever so slight as it was, the field stood too proud from the surface. The milk jugs were going to be long and short stitch, so very flat, and hello, you can't have milk jugs in the foreground that sit behind the field that is supposed to be behind them.
So the field got ripped out el mui pronto, which actually made me quite happy as the colours I had chosen for the field were giving me flashbacks to our 1970s kitchen with orange, brown, and green mushroom wallpaper...

I kept the diagonal direction and worked stripes in satin stitch~ love it! It set the field off dramatically from the one in the background without it being too obnoxious.

Once the field was finished I built the fence and planted some long leg french knot trees. Worked the milk jugs next and REALLY HATED them. I mean, seriously close to ripping them out. As I am typing this you can see EXACTLY what I'm talking about with the difference of how something looks upside down....the jugs above are the same ones as shown in the picture below~ I think the ones below that are upside down are much nicer than the ones above....anyways, I decided to leave them and see how they looked after the cow was finished.

Everything is so tiny on this piece, as I was stitching Cow, I had to stitch the milkmaid's head and hat. They are seriously small and the lines were seriously hard for me to see. Am I overusing the word seriously? This should give you an idea of how stressful this panel was for me~ it wasn't much fun. The girl's face is literally half the size of the fishing panel's face, I think 4 mm from top to bottom, and not even that wide. R*E*D*I*C*U*L*O*U*S*L*Y* small. 
Enter stitching tip here: Don't draw things so small you can't stitch them with modern materials available today.

Cow complete, it's on to the costume. 

I wanted to make the costume bright so the girl would stand out against the fields...but not so bright she looked stupid...A farm girl does not dress in her best dress to go out and milk a cow! The addition of an apron and headscarf helped to keep her simple.

Rows of French knots for the foreground in blue-greens set them apart from all the greens in the background. A few strategically placed tiny silk gimps finished off the scene.

 I am actually really pleased with this panel which is odd because I think out of all of them thus far, this one had the most things I was not happy with in it. I ripped a LOT out, but I also left a lot in. One thing is so true with 17th c stitching it can be very easy to become hyper-focused on a single aspect of it~ be it a stitch or a colour etc....but there's so much going on, that once everything is in place, all the glaring things just kind of blend and disappear. 
Sometimes they add just the amount of quirkiness that is needed to make it perfectly 17th c

Whatever your stitching, I hope it brings you joy


Wednesday, September 07, 2022

Future Class Dates...

 A closer look at my Beaded Stumpwork Casket

Here is a video sharing some closer looks at my beadwork casket. I chose to work my entire casket in beads, but there are literally oodles and oodles of extant 17th c silk embroideries that contain motifs worked in beads.


Registration is still open for my 17th century beadwork class, Beneath Thy Poft Oak. Class starts October 1st, 2022. I have had several folks ask me when I will be running it again, and the answer is honestly, probably not for some while. The class itself runs 12 months, so that puts me at 2024 for the next running. However, I am booked for in person teaching then, and as well my last is graduating from high school, so it may not be 2024, more like 2025 or 26 if I can still get the materials for it. 

You can learn more about it/enroll by clicking the link to my Online Academy classes at the TOP of this page, right under the blog header. 

Happy Stitching!

Thursday, September 12, 2019

This Summer

Where did it go?
  It seems like its been forEver since I was able to work on my casket~ I can't even remember if I have shared my Lion with ya'll?  I got him finished before I left for England...really wanted to give him real teeth...but alas, my tooth drawer did not yield anything his size, or worthy of his stately presence....so he got glass teeth...I hope he doesn't mind.  
For my birthday husband gave me the gift of him cooking supper for an entire month~ I didn't think it would last, but here we are a week and half in, and hes still going, so I have been taking advantage and spending the time I would normally be cooking supper,  working on my casket. It's coming on very slow...a million and one flower petals and leaves...thats where I'm at. 
 I had such a wonderful time in England, words cannot even describe it. I went with my bestie a week early before Summer School and we stayed in London and had a blast.  There was never a dull moment~ the first day, after arriving and getting our things settled at the hotel, we were off to Covent Garden. I wanted to get some paper at Il Papiro....but alas, the Italian Stationer no longer has a store in the Market. The White Lion was beautiful as ever...I think I need to eat supper here the next time I'm in London....

 O.K. now this is a hilarious memory for me that will make me smile until the day I die...and probably afterwards for that matter....anyone who knows me knows I am a morning person and ALWAYS on time...always early...don't ever want to be late~ not me.  Well we had planned on walking across the Thames our first morning in London, and being at the Tower of London a little before 10 am, when it opened. I slept well on my flight, and wasnt feeling any jet laggy at all~ my bestie tho had been up over 24 hours by the time we went to bed....I didn't bother to get out my alarm (you can tell where this is going?) because I wasnt that tired, and well, it was just around 8pm....I would be up in plenty of time, and would wake her up if needed.....so I literally blink my eyes and am jolted awake by a loud slam~ someone had thrust open our door and the little flip lever thingy had caught it so they couldn't come in....about that time, I am wondering what the heck is going on because Im not really awake yet, I see S look at her watch and at the same time she jets out of bed and says 'its 11 o'clock!'  
Oh my golly. I dont think I have ever slept that many hours in a row before! LOLOLOL  I am still laughing about it. So...we were a bit late getting over to the Tower of London, but it was fantabulous, none the less.

 I got to see the crown jewels~ amazing. All the armor in the White Tower....amazing. The Chapel in the White Tower~ Heavenly. It was a beautiful day out, and yes, I even got to see the Ravens. Because we were a bit late, we didnt have time for a proper visit to Westminster Abbey, so I took a quick zip out to Harrods 
 Who knew that LaDuree has a tea salon around the back of Harrods? Well you do now!

 Can you imagine getting to work at this counter? Since when were tea & cakes so blasted gorgeous?
You must make a reservation for Afternoon Tea tho~ if you are thinking of going~ you can reserve online at Harrods' website

I have been plugging away at roses...trying to get all the flowers finished that are drawn on my panel first...then will work on foliages and see if I need more flowers. I am afraid that I will get these sides finished, and then go back and look at the top or the front, and decide they are too sparse and get sucked into a never ending vortex of adding more flowers and leaves until every bead I own is on here somewhere.....

Friday, August 03, 2018

Blessed Beads!

Expanding my Flat Top Casket's Colour Palette

   My Flat Top Casket has been gently tugging at my heartstrings all summer....poor thing had to be set aside for me to get my class workups done....and the new 2018 ornament done.  (so be watching for it!!!!) ...but.....even tho I had to set it aside, it has still be on my mind....just about every day I would say.  I did finally decide what panel to work next....I think....maybe I will end up working on them all at the same time and skip around....in any case, I cant wait to get my bead needles out again...as in, my tiny. weensie. teensie. bead needles!!!! WOO HOO 
Just look at these beads! I have had a banner summer this year for finding beads....after years literally, of not finding anything. I do love the tiny beads for stumpwork, because they are so tiny, one can get great details. I prefer the microscopic sable beads....40-50 per inch, of which nearly all of these above are that tiny. The whole bead will fit thru the hole in the size 15 Miyuki beads I am using for my classes next year! 

   The only negative aspect of working with beads, is that one is limited to the colors of beads that they have on hand. I have been collecting beads for at least 35 years....perhaps a little longer, so I do have quite a few colors...but it always amazes me how I will have a thought in my head of what I want something to look like, and I still will not have just the right color. Husband says it all the time..."more beads? you need more beads??"    He also calls me a hoarder, to which I vehemently deny...unless of course, we are talking about beads, and then the answer would have to be a huge yes. I cannot pass up tiny beads. no I just cant!  The more colors I can find, the free-er I am to be with my designs and ideas. My casket is going to be awesome!
I was ecstatic earlier this year when I got this box of beads from a yard sale down in Placitas NM....couldn't believe it! There are pounds of weensies here! 

 These beads, from the top picture,  I have been truly blessed to find this year. I go years, literally, without finding any new beads...I think I said that already, but its true.  The little buggers are so blasted expensive now days, I literally spend all my pennies on beads! I have had to pick and choose, and have been focusing on colors that I was void of in my palette.

  There is just something about these little balls of molten sand that make my  heart skip a beat when I see them. And some of these, break my record for tiny. 
The reds next to my finger here...count 65+ to the inch!

 Both my front and back, and well, one side panel too on my casket, have water on them...so I have been searching for different watery colors of blues....

  I got my lil mudhead out...he is lounging in a sea of beads...but I like to think of him as me...I would love to swim in an ocean of beads! I see endless opportunities with all of these colors, I cant wait to see what I can make from them.! I got some really nice skin tones and fleshy colors, so much so that my mind is racing on a new beadwork box...but I have to get my flat top done first!  

Monday, July 31, 2017

17th c Inspirations

Thomas Trevilian & the Folger Shakespeare Digital Library
 Instead of a Museum Monday post today of something from my collection, I thought I would share  a wonderful online resource that is a great study source and  the inspiration for my latest slide top spool box. Thomas Trevilian was born around 1548, his book the Trevelyon Miscellany was published in 1608,. and another work in 1616, so he was at least alive until then. The Tevelyon Miscellany is an absolutely beautiful manuscript ~ to quote the World Cat,  " The third part of the manuscript contains edifying and cautionary verses, with illustrations, on the Twelve Degrees of the World, the Five Alls, the Ten Commandments, the Nine Worthies, the Nine Muses, the Seven Deadly Sins, the Seven Virtues, the Seven Liberal Sciences, and the Twelve Apostles; as well as figures important to Protestant history, the six Gunpowder Plot traitors; Pagan, Jewish and Christian heroes; additional parables, proverbs, and lists of virtues and vices accompanied by scriptural and secular verses"

My favorite part of his work is the embroidery patterns. Within you will find hand drawn patterns for caps and borders, as well as all over repeating patterns for cushions and clothing. They are in infinite source of inspiration, and one can literally spend hours upon hours studying them. So where can you see this amazing work? You need not get out of your chair, thanks to the generosity of the Folger Shakespeare Library~  they not only have Thomas' works, but a myriad of other early and rare books you would probably never have the opportunity to see otherwise, all  happily contained in a large searchable database you can find here . (this link will open the Thomas Trevilian search results for you)


The above page is a pattern that spoke to me, and that inspired the slide top spool box that I finished up today and hope to have on eBay tomorrow.  I am really excited to share it~ so many of my favorite things, all wrapped up in one beautiful box! Until then tho, do have fun~ grab a cup of tea and go check out the Library link obove

Wednesday, November 09, 2016

A Special Gift

There Once was a Little Red House.....
 Yesterday I got such a wonderful surprise in the mail I have to share!  Of my my Dear friends emailed me a bit ago~ 'give me your address' she says....'I found some little beads I want to send'.   So when I opened my mailbox and found it stuffed with a big padded envelope....I didnt know what to think! Janet has sent me a copy of her book along with the precious weensy beads~ Thankyou Thankyou so much Janet!


Janet is a true Kindred Spirit~ she loves to embroider and make dollys~ and has the most wonderful imagination that she loves to share. I love reading her blog~ you can see it here

What is funny is one day we are talking and she says, you know we have alot in common~ we both have a Pierce....referring to the Pierce dollhouse that I got for Christmas when I was little and took me forEVER to get 'finished'....well she has one of her own and is so uniquely 'Janet'! Thats what the Red House book is about~ and its amazing! Her dollys are so full of life and energy...I dont think it possible for her, or them to ever sleep!  She's also making an embroidered casket that is just as ultra fantabulous as her Red House... perhaps we will see her casket as a book one day!
Go grab a cup of tea and head on over to Janet's blog~ the perfect escape from this world!

Tuesday, May 19, 2015

Ladye Water & Some Special Bling


Water side Panel Ladye

  When working stumpwork figures, it is good to study your pattern and visualize it in your head as finished~ get a paper and pencil, and list each element of the design you wish to work, then you can go back and number them in correct order~ for example~ I cant attach Ladye's left hand until I have worked her vessel beneath it...and her right hand cannot go on until I work the fish~ but, the fish cannot go on until I have worked the dress underneath of it~ ect ect. It helps to write down a list, then you can go back over it and make changes as you think things thru. I worked Msr. Fish first because I was bored one day, and just really wanted to make him! He is worked same as the little one in the water, with real fish scales and an antique white opal bead for an eye
 Ladye's shoes were worked in a dark putty ovale over shaped padding, with grey gimp rands and soles on the heels. Little cream silk rosettes with red beads adorn their throats
 The bottom of her skirt was worked in stages like Earth Ladye's
 Once the lower skirt was complete, I worked her vessel, then attached her fish and both hands. Gimp was added to her bodice to define her stomacher and waist tabs
 Sleeves, cuffs and falling band were next, hers I trimmed in gold squiggle plate with antique gold lace on her cuffs
 Even after her hair and string of pearls were added, she still told me she was not quite complete and wanted a brooch...something special she said. I got to thinking....and yes, indeed, something very special ....I had just the perfect 'thing' so I was off to dig thru drawers and boxes until I found it
  This was absolutely perfect. It was one of my Mother's earrings, 14k gold and opal~ I always loved it when I was little, she had lost the other at some point and had this in a jar....when I left home to join the Navy...or perhaps it was when I got stationed back in the States...anyway, at some point I absconded with it.  Several times over the years I have thought it would make a nice dollye brooch, but never the right dolly needed it~ but when Ladye Water saw it, oh yes, she had to have it
~
I snipped the back off and stitched it on with gold silk, its just perfect and makes this panel even more special to me now....so if you have some special little bit of broken jewelry....a button, a single earring....a broken bit of necklace or ring~ you may look at it differently and try and figure out how you could work it into a special piece of your embroidery.

Friday, January 30, 2015

Progress!


   I have made good progress on my flat top casket~ I have the entire inside finished and am ready to start the embroidery! WOO HOO!  I have a few things to tidy up first....tax paperwork and such boring things....but soon, beads will be flying! This is the inside tray covered in hand marbled paper. Pink and gold are my inside lining colors and I love how they go together! Little box in the back will have a pincushion on top of it, the one to the front will be partially lined in velvet with slots for rings
   Silk lining now in place, and the bottom secret drawer finished. I lined the bottle cavities in velvet
  Pin cushion is covered in  pink silk taffeta on the sides, with velvet cushion on the top.  I had the perfect weensie antique gold metal lace for around the edge. Inside is stuffed with a mix of goat hair and sheep's wool to keep any pins nestled within from rusting.
 I like how its come together so far~ I made three separate secret compartments within the lid~ the two doors will be covered with embroidery. I patterned it after one of my favorite caskets at the Fitzwilliam Museum. I just cant say how excited I am to work on it~ but I hope it shows and I hope all my readers making up one will get really jazzed about theirs and post their progress!! There is nothing better than seeing a friends progress to get the creative juices flowing~ thats why stitch along's are so much fun...and so productive! Speaking of productive.....
 Just look at the progress Raewyn has made on her padded mirror case! She is having loads of fun working on it, which makes me so happy too and even more excited to start up my beadwork again!  You can follow her progress on her blog http://recondfab.blogspot.co.nz/ ~ how exciting to know I have padded mirror cases all around the world~ it makes my heart smile!

Monday, December 08, 2014

A Little ol Driver...So Lively & Quick....

No~ It's Not St. Nick!

  But, being the Christmas season, that is what I am saying to myself when I see this last piece of the glass cake decorations.  What a marvelous achievement ~ there is so much going on! A precious pup has run away and is absent from the left side of the horse, but other than that, the piece is Divine~ all made from glass~ the animals, the tack, the reigns, wheels of the carriage~ even the whip!
The longer ones looks at this piece, the more you cannot help but love and admire it~ from a technical point of view, I cannot make out where the lampworker held the pieces to make them~
Everything here is in motion~ there are no lifeless statues. The dog is running~ with legs fully outstretched.  The horse with mane and tail whipping from the wind and legs at a gallop in front of the driver, who is not sitting but standing in the carriage and seems to be 'mid whip'....they must be on their way to a very important celebration!
 If you look closely, you can see part of the horse's harness connecting to the center front of the carriage~ no details were left out! Its just fantastic and utterly amazing that it is not a broken pile of rubble!  I think it is obvious it is my favorite of them all~