Friday, July 30, 2021

How to Separate Soie Ovale


Here is a short video on how to separate Soie Ovale down into smaller strands~I really prefer the Trame weight silk for long & short stitch and needle painting on the scale I am used to working. To further expand my colour palette of available threads, I use Soie Ovale and just piece it down to match my other Trame weight silks.

Sunday, July 25, 2021

New Little Helpers....

  Hand Painted Needle Minders

For those who like to keep track of their needles or pins on their embroidery without having to stab them through the ground fabric, I have a cute selection of needle minders in the ETSY shop today!
They are each handmade and painted by me. 
I wouldn't say these are doodles, as I put a lot of time into them, but I had so much fun! I didn't follow any pattern~just cut out what I felt like and painted what came off my fingers at the time.

In case you are not familiar with a needle minder, it has a magnet on the back and comes with a second. You place the minder on the front of the fabric, and the second magnet behind it on the back of the fabric and this holds the minder in place. The magnets are very strong and hold any pins or needles you put on the front of it in place.


Each one is unique, painted in several layers of transparent watercolours so the beautiful wood grain of the sycamore shines through


They are roughly around an inch and half in diameter...some a little larger, some a little smaller


All are signed and dated on the backs


If you are in need of one, they are available today in my ETSY store, link is to the right in the sidebar.

Happy Stitching!

Wednesday, July 14, 2021

A Few Thoughts on Washing...

 First Quarter 19th c Child's Gown & Cap

 I often get questions on how to wash items, and what I use to wash them with. I cant offer a blanket statement that I use product X to wash with because honestly, every article of early clothing is its own unique situation. Every stain is unique...is it organic? Is it grass? Is it clay? Is it blood? Then one must take into consideration the fibers of the material~ are they natural or synthetic? Cotton? Linen? Silk? You get the idea. But I can offer my recommendation on how to remove overall dinginess from cotton or linen. 

 First I must determine if the textile is strong enough to withstand a wet wash. Textile fibers are very fragile when wet. Just the weight of the water in the fiber can be enough to tear sheer textiles like cotton mull. Does the garment or textile have any metal bits like fasteners or buttons? I never wet wash any item with metal parts. Another thing to consider is trims...for example, early sequins around the turn of the 20th century were made from celluloid and literally dissolve in water.  Does the textile have any colour to it? Be it printed or woven, not all colours are colour fast, so one must check in an inconspicuous place to see if the colours bleed. If I am preparing for a spot check, then I first ask myself what is the purpose of the washing? I usually choose not to wash 95% of the time. Stains are part of the history of a piece. They help to tell the story of how a piece of clothing was worn. Stains can talk! Occasionally I have a piece that could benefit greatly from a freshening up, such as this set here of early Empire period gown and corded cap.  The above picture is before washing. The gown is overall just quite dingy, with a real yellow~brown cast. Only on close inspection could one realize it was made of a woven pink and brown stripe cotton. 
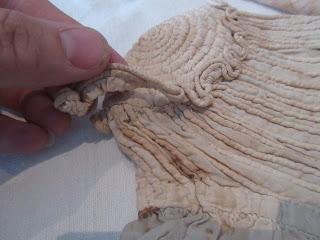
 Because fibers are so fragile when wet, I check for any rips or tears in the piece. If they are able to be stabilized before washing, I will do so.  The rouleaux trim at the base of the crown on the cap was partially detached, as shown above. 
The trim was carefully stitched back in place through the original stitch holes before being washed.

My soap of choice for washing is Orvus Paste. It is a fantastic ionic neutral ph cleaner that is very gentle on textiles. (Its also good for washing cattle and horses...so you may get lucky and find it at your feed store.) It is the best most gentle cleaner on the market~ absolutely conservation grade and can be found on Amazon.
Whenever you wash an early textile, it needs to remain flat so to remain fully supported and to keep it from tangling into knots(which will happen if you put things into a BUCKET).  Don't get me started on the horrors of washing things in a bucket....just ...don't...do..it.
I prefer to dip my clean hand in my Orvus and hold the paste in the stream of water as I fill the basin. For this gown, its so small, I only filled the basin with about 2" of water. Really swish your hand around until all of the Orvus is dispersed in the water.

It is only then that the textiles are carefully placed FLAT into the bath. I gently press down with a flat hand to coax out any air bubbles. There is NO AGGITATION. I put the lid on and let this set for at least 24 hours. 

The picture above is after the first 24-hour soak. The water is now a very dingy yellow...hmmmm the same dingy colour of the gown. To remove, I carefully coax the gown up into a little ball and lift it out of the water, fully supporting the weight of it. Did the same for the little bonnet.  I ran a second Orvus bath and let the two pieces soak again for another 24 hours. 

The Orvus baths are continued until there is no more dirt releasing from the fibers. Then the same thing is repeated but with no soap, just clean water to rinse. This is the third clean water soak. When the water remains clear one can be sure all of the detergents have been rinsed away.
The gown and cap are then carefully taken out of the water, again, by scooping up into a little ball and removing from the water all at once. They are then laid out flat on a towel to air dry. The last thing you want to do is hang up a wet garment to dry if it is fragile! 

This is a photo of the gown and cap after fully dried. It actually has a bit of a pink cast to it. Gone is the dingy yellow overcast. You will see that the stains are still there. If I wanted to remove they could be treated with enzyme detergents, but my goal is not to have a new-looking garment. 

 The goal of washing for me, is to remove the distraction that overall grubbiness presents when mounting. I want people to be able to see the garment for what it was. I want the stains to be there to tell their story.

But to not be so garrish that they attract attention over the construction of the piece, or the fabric, or the overall design. Most of these stains were probably from storage, being laid directly on wood or acidic paper linings in a chest or trunk. 
The few tiny stitches made to reattach the trim are microscopically noticeable, but more importantly, the integrity of the trim on the cap has been restored.

I did add a new drawstring to the center casing. The original cord drawstrings are present at neck and sleeves. She's pretty cute for 200 years old don't you think?

Thursday, July 08, 2021

2021 Heirloom Casket Toye & Ornament Kit

 Flemish Coffer

A Tisket A Tasket.... a lil Coffer for your Casket!  I am so excited to share my new 17th c Flemish Embroidery-inspired Christmas ornament kit with you all! It's not just an ornament either, as it is so tiny it can easily fit into a casket~

Its beautiful dome top coffer shape was inspired by a tiny antique one I saw several years ago. Embroidered in beautiful silks and real gold threads and plates, it will look stunning on your Christmas Tree

Of course, it opens and is finished beautifully on the inside. All the materials you need to make one is included in the kit!

There is space on the back panel to personalize with your initials and date~

It fits in the palm of my hand. This dainty very feminine little coffer measures just 2.5" wide, 1.5" deep and 2.25" tall.

This would make such a beautiful gift box for a special treasure....

Or a special spool of thread!


This sixth edition of my Heirloom Embroidery Kits is available now for preorder in my ETSY shop!

 If you would like to be added to my mailing list for Ornament notifications, please add it to the notes on your ETSY order or email it to me at rlkinnison@yahoo.com. ETSY does not share email addresses of  buyers with sellers!

Monday, July 05, 2021

A Summer Weight Suit

  To Celebrate Summer, 1825-40 Style!

Happy July! I hope all of my US readers had a happy & safe holiday this past weekend. I am now home from a up to see my parents in Washington. It has been over 2 years since I had seen them due to blasted covid! It was HOT.  Pip cooked an egg on the sidewalk on a 105+ degree day...and yes, I have the video to prove, it really does work!  I had planned to put up this year's ornament kit for sale when I got back home, but as usual, I am a little behind. I took work with me on my trip, but just couldn't wrap my brain around it so here I am, behind as always. Hopefully, I'll get it done and up later this week! 

In the meantime, I wanted to share a peek at this stunning little buys suit. I have a wide date on it from 1825-40 as it is so hard to date more everyday wear for boys that dont have fashionable cuts to help date them. The high armscyes, curved back seam, turnback pointed cuffs and faux waistcoat can all be found in garments in that time period window. Straps on petticoats and trousers were very common in 1820-30 periods, and some even crept their way into the 1840s. 

One thing that I love about this particular suit is its condition. It was not worn once on some special occasion and put away. It was a daily use garment and it shows magnificently by the wear and repairs. The above view of the trousers is the backside of them. Note the coarse printed insertions center back...this is not an alteration. The waistband, this back section that would never be seen when worn with the jacket, and the lining of the jacket is all original construction. The plaid fabric has been pieced together from several tiny pieces~ most likey leftover scraps from Mom or Dad's clothing. The trousers are open from the crotch to the waistband in the back, as shown. The cut of the seat is full to allow ample room for the bum when sitting.


Here is a closer view of the piecing in the back. No evidence of back closure, these would have been pinned closed. 


The linen straps have been lengthened. In the above photo at about the 3:15 pm position, you can see the seam of their original length.


The fabric is a summer weight, very light and thin. There are several worn holes to both the front and back of the trousers. Some are mended, some not. 


I love the woven design of the fabric...a woven plaid not printed, but with random streaks of blue that breaks up the pattern and makes it look very organic. 


The tunic or jacket is wonderful. The body and arms are fully lined. No lining to the skirting. Lovely little turn-down collar. Piped seams. All original buttons have been removed. Construction includes an inner faux waistcoat~ meaning that the front closure is basically a double flap so that it looks like the little guy is wearing a matching inner waistcoat. The outer flaps fold back to form a fashionable lapel.


Remenants of original buttons remain on the lining.


The back view~ from shoulder to trouser hem this set is a mere 28" measure. Cute!


Worn in the usual places, bum, knees, elbows....  

Here is a tip when trying to decypher original garments and wear, from 'fakes' (garments made to deceive)...

Elbow wear is nearly never at the actual 'elbow' but below it. When wearing a long sleeve jacket we tend to jet the arms out forward before we bend them, say to rest the elbows on a table. This, along with bending of the arm, hikes the sleeve up the arm...wearing the fabric in an area down closer to the wrist.