Sunday, March 29, 2015

New Life for an Olde Girl


26"  C1850 Kloster V Glass Eye China


When we parted last, as you recall, Olly was merrily trying out eyes. Not shown in my post before, was a set of early pupiless black pinch backs, what she would have originally had most likely.  She does look happy in them doesn't she.

   Both of us really liked these blues ones~ so we decided to give them a try. If set in correctly, eyes can be removed quite easily~ no big deal. Problems arise when dolly has been to Hospital previously, and her Dr. did not know to use plain plaster ~ and instead, used any one of a number of permanent fixatives~ I have seen a mache head filled to the brim with....construction adhesive of all things! There is no getting that out~ not ever~ and it makes an otherwise light head so heavy it endangers its own self, making the doll top heavy and more likely to fall over and break the head or other parts of the doll.
 I use plain ol Plaster of Paris~ not much is needed~ after setting the eyes, plaster is placed over the back of them just enough to hold them firmly in place~
  I use a spoon and puddle the plaster over the back of the eyes, picking up dolly many many times to check and be sure the eyes have not moved. When all is well, she will sit and dry for several days. Now the plaster sets quite rapidly~ within 30 minutes one can pick her up and have no fear of anything moving....but it does stay damp~ so I be sure to let the head set face down on a pillow, with neck open to get as much air flow over the plaster as possible. Before the head is put back on the body,  the cavity is stuffed with tissue paper~ not super hard, but quite firm.
  Here is Olly with her new, olde blue eyes, on her body that she came to me on~ a vintage body~ very nicely made, but quite new. No character what so ever. Above her you will see a wonderful olde all original body that is perfect for her~
  Her replaced china arms are very nice~ quite quite nice actually~ she could have once had china arms and legs, but I dont think I have ever seen a glass eye china with original china arms/legs. The leather ones show years of holding hands and having tea~ they are worn but so full of life still~ I adore them!
  I guess the only thing that really bugged me about her vintage replacement body was the legs~ what can I say, I am a Virgo and little things can drive me absolutely insane!  One can immediately tell the legs are new by the fact there is no wear on the bottom of the feet...no wear on the back of the heels from years of sitting. If you look at the arrows, you will see a tiny bit of wear....on the outside of the shoes~ well...at one point in time they were correctly to the outside~ whoever used them for this body put them on the wrong leg! That is amazing to me and just drives me crazy!  So no question~ this body is history! Out with the new, in with the olde!
  Olly got her new olde eyes, and her new olde body and had a wonderful time chatting it up with the girls for a week or so....but ultimately in the end, she really liked the early pupiless eyes best, so thats what Mommy gave her
  Her delightful little smile is ever so much brighter now, having her olde self back as it should be~

Wednesday, March 25, 2015

So proud of my Graceful Ladies~

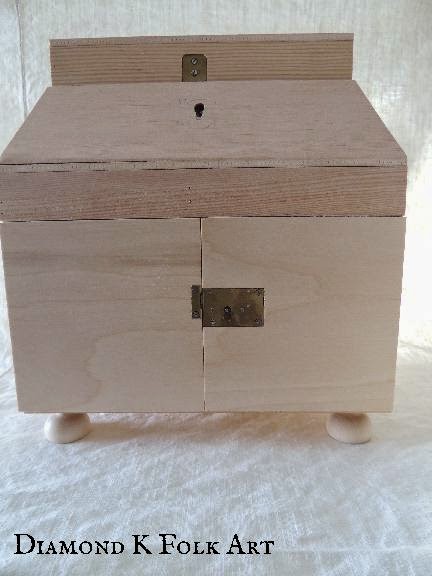
  I am so proud of my new bunn feet! Here is a set while in process of being gilded~ before being burnished~ they are so awesome!
  I have always admired this type of foot~ not big and bold like so many of the bunn feet are, but very graceful and petite~ the most delicate looking of all feet I think. The above casket was sold by Christies in 2010~ I really like its feet~
 And this is a photo of T.98~1967 at the V & A Museum~ I like how the casket looks elevated above the feet~ so my design is kind of in the middle of these last two~ with long graceful neck and curvy body but still retaining a nice fat pot belly base
  Here they are installed on my Thistle Threads Flat Top casket. To me, the feet are just as important as the cabinet, they can either add to, or detract from the overall period impression
  A side view affords a look at their sleek profile. I like a more Roman Gold or matte,aged look to the finish, so did not burnish them to a high gloss after applying  22k gold leaf.
 My daughter thinks they look like chocolate drops, which, I guess they do~ just the kind of chocolates I like~ no calories!  Hand turned from maple and so smooth~ if you decide you would like to have a set, their finish is so buttery smooth, no sanding or gesso base is needed before gilding.  I call them my Graceful Ladies~ so pretty and curvy!
Of coarse my double casket from Thistle Threads is getting a set too~ I may flute these, I havent decided yet~ need to finish my flat top first!
 If you really love them and would like to purchase a set, you can find them in my Diamond K Folk Art Blog shop~ just click the link to the right.

Monday, March 23, 2015

2015 Bead Fest Santa Fe

Heaven on Earth!
What a fantabulous trip! This past weekend I drove down to visit a Dear friend, Janice, and attend the 2015 Santa Fe Bead Fest. To say it was a totally awesome trip would be an understatement~ I had the greatest time! There's nothing like staying up all hours of the night talking about embroidery and stitching! Friday I took my flat top casket in to Better Music Boxes (also in Santa Fe) to have the tempo adjusted~ Rick played the organ for me~ he is such a gifted musician~ what a treat!  Also got a first hand look at the machine Steve engineered that Rick uses to tune the combs, I regret not taking in my camera with me to share it all with you all~ after my appointment there I was off to see Janice before going to the Bead Fest Saturday.  Above is a view of the famed St Francis Cathedral just off the Plaza that was only a block from  Bead Fest. The plaza has been in use since 1601.....so I was right at home in the center of so much history!
 We were one of the first ones in on Saturday morning, which was nice to be able to navigate around before the crowds of people filed in~ in less than an hour, I can honestly say there were so many people, it was like being crammed in a jar of sardines.
 It was really a great show~ there were vendors from all over the world attending. Tables and tables of pearls~ glorious pearls~ with every bead you could imagine someplace amongst them
There were items for all budgets~  from dollar tables to tables like this one, crammed with piles and piles of rare and precious gems. The tray here in the foreground was filled with Laramar~ the large round strands were going for 600.00 each. They were really really gorgeous!
 My most favorite vendor was by far the Kabba Brothers~ based out of Hollywood, they are from Africa and import rare antique beads~ anything from Venetian glass, Baltic amber to African snake vertebrae (my sons favortie~ he brought home a strand!)  Just look at these gorgeous beads~ I could have stayed at his table the entire show
 Speaking of antique Venetian glass~ these are a gift from Janice ~ arent they the most glorious things! Soooo special, weensie little striped Venetian trade beads~ they will hold a special place on my flat top!
 I did pick up a few wonderful, tiny antique beads with my flat top casket and perhaps another beaded basket in mind~ all from the Kabba Brothers.  The tiny green stripe trade beads are so hard to find, I bought all he brought!
 Soo Yummy, here are some blues. He had mostly blues to choose from, which was really a treat, since blues are the hardest colors to come by now days
I cant wait to use these for something wonderful!  I had such a great time on Saturday, got back home around 10 pm that night, totally wiped out....and then got up Sunday morning, packed up the children and went back for another round~ just wait until you see the Chocolate Shop!

Friday, March 13, 2015

New Olde Eyes for Dollye

Some things just really bother me.....

 This olde girl's eyes have driven me crazy from the second we met~  Not only are they set all wrong~
 But they are at least three sizes too small, hastily replaced who knows how long ago along with her body. She is an early girl~ a wonderful  large mid 19th c pressed K.V. china head, nearly 7" tall with size 14 in black paint inside the shoulders~ and since on a replaced body  I have no bother taking the head off and removing these horrid eyes!  It is insensitive repairs like this that I really don't understand~ how could someone put in such small eyes one can literally see inside her head all the way around them? Poor girl~ Mummy will fix you all up.
  After removing the weensie sleep eyes, on lead  rocker no less.... here is a view of inside her head~ you can see if you look close, the seam where the back of her head was cut out to cut the sockets for her original glass eyes.

 We have spent this cold rainy day inside having some fun, trying on all sorts of different color eyes~ I really like this pair~ all of the eyes we have tried are period correct, antique eyes~ any of which she could have had originally.  We are trying for color~ I am just holding them in with my fingers, while taking a picture with my other hand, so they tend to be a little wonky pupil wise.

  This set is a brighter blue that really makes her look happy and cheerful
 This blue is the latest of the colors, the tone works well with her skin tone, but so many dollys have this color eyes....
  The brown I really like too, one doesnt see many brown eye dollys...  The first picture is the letter A color below~
Here you can see how subtle the color change between them is~ feel free to comment and let me know which color is your favorite!!

Sunday, March 08, 2015

And so it Begins....

The first stitches are In!

   As there seems no sign of Spring in the weather here, at least it is so in my stitching! I am so excited to have finally set the first stitches on my flat top casket!  Now don't everyone go emailing me asking where the beads are! The outside will be beaded, but for the inside lid door panels, I am working them in long & short stitch to keep the work flat and less bulky, otherwise they will not open and may interfere with the top of the scent bottles in the tray. I am using a cream color dutchess silk satin, and so far, love love love it! Its so much easier on my eyes than that wicked beautiful emerald green I used on my trinket box. I like to work this type stitching from the top down, so I am not laying my hand on the finished embroidery.  Its so fun and exciting to start a new project~ as usual all I want to do is work on it...but as busy as I am, it will have to get fit in a few stitches here, a few there, between building cases and making dollies. Keep your eye out for the new issue of Prims coming out in April...hint hint!

Sunday, March 01, 2015

My Needle Box

A little of this, a little of that....

   I have been prepping for starting my flat op casket, and one of the things that really bothers me is my inability to glue a finished piece of embroidery onto 'something' . Anything.  The originals were glued and I find that whenever I try and glue an embroidery to a flat surface, its absolutely riddled with bubbles in the background.  Of coarse the easiest thing would be to cover the background with embroidery and avoid the whole situation, but I want my background to be unworked~ the dutchess silk satin absolutely glows and is so beautiful! So I designed this little project for more practice, and to try out some different techniques...not to mention I wanted something pretty, something more fitting, to keep my needle in, instead of this~

  A hideous plastic zip bag! I have a few needle books, but I like to keep my needles in their original packages~ this way I can keep better track of if I am getting low on a certain one or not, and I know who made it and what size it is....and a zip bag...well how ugly is that!?

  I am planing all sorts of techniques for my flat top casket~ one being silk wrapped parchment strips. If you are familiar with 17th c stumpwork or caskets, you will probably recognize the silk wrapped parchment loupes often used in the borders of cartouches~ but above here, there are silk wrapped parchment elements included in the lace of this 17th c gown~ I love the little flowers!
 First I made my box from a thick board and covered it with hand marbled paper...I love making boxes!

 Next, a simple embroidery was worked, I wanted lots of open background showing. Two little roses inspired by a favorite antique sampler went center of the cushion, and the waves were worked in 4 silver smooth passing. Real silver spangles added some quaint bling!
 I used wheat paste to glue the silk satin to my box, and of coarse~ STILL full of bubbles and not quite flat~ but better. I try so hard to keep the back of my embroidery FLAT, and am thinking, since doing this little experiment, that perhaps backing the silk satin with paper before working the embroidery, would help with the bubble issue. You can see my trinket box in the background~ and may be asking, well, that was flat~ so what is your problem??? Well... I cheated on my trinket box. I guess its not really cheating....but I didn't glue the panels on~ I tacked them on over a light padding, like in upholstery.  When it comes time to mount the embroidery to my casket, I do not want to still be experimenting with techniques.  I like how the cushion turned out, like it aLOT actually~ but see on the side~ there are bubbles. One cannot just add more glue, or it will soak thru the fabric.
  I love my parchment flowers! I am planing many parchment elements on my flat top! Cant wait to start!!!
 There is lots of room for my needles now, so all in all, it was a good learning experience, and tho my background still has bubbles and I'm not happy with that...I have a pretty little needle box I didn't have last week.