Friday, December 29, 2023

Atheneum for Dec...1828


A Farewell To The Year


 One of my favorite pastimes is to read a periodical for whatever year, as close to the calendar month/day that I am in at that time~ if that makes sense. I have a large library of early periodicals and enjoy being in the moment and reading something that so many others were reading on that same day, just a hundred or more years earlier. Last night I sat, had a cup of almond spiced tea, and read the December 1828 issue of The Antheneum, or Spirit of the English Magazine, published by John Cotton in Boston. The individual issues could be saved through the year, and then bound for a price of $3.50. If you did not want the six coloured plates of female fashions included, the price was only $3.00

I came across a very fitting poem I would like to share~ I have found many of the phrases quite relatable, and though you may enjoy reading it as well~ I wish all of my readers a very happy & healthy 2024~


A Farewell To The Year

Hark, friends, it strikes: the year's last hour:

A solemn sound to hear:

Come, fill the cup, and let us pour Our blessing on the parting year.

The years that were, the dim, the gray, Receive this night, with choral hymn,

A sister shade as lost as they, And soon to be as gray and dim.

Fill high: she brought us both of weal and woe, And nearer lies the land to which we go.

On, on, in one unwearied round~ Old Time pursues his way:

Groves bud and blossom, and the ground Expects in peace her yellow prey:

The oak's broad leaf, the rose's bloom, Together fall, together lie;

And undistinguished in the tomb, Howe'er they lived, are all that die.

Gold, beauty, knightly sword, and royal crown, 

To the same sleep go shorn and withered down.

How short the rapid months appear Since round this board we met

To welcome in the infant year, Whose star hath now for ever set!

Alas, as round this board I look, I think on more than I behold,

For glossy curls in gladness shook That night, that now are damp and cold.

For us no more those lovely eyes shall shine, Peace to her slumbers! drown your tears in wine.

Thank Heaven, no seer unblest am I, Before the time to tell,

When moons as brief once more go by, For whom this cup again shall swell.

The hoary mower strides apace, Nor crops alone the ripened ear;

And we may miss the merriest face Among us, 'gainst another year.

Whoe'er survive, be kind as we have been, And think of friends that sleep beneath the green.

Nay, droop not: being is not breath; 'Tis fate that friends must part,

But God will bless in life, in death, The noble soul, the gentle heart.

So deeds be just and words be true, We need not shrink from Nature's rule;

The tomb, so dark to mortal view, Is Heaven's own blessed vestibule;

And solemn, but not sad, this cup should flow,

Through nearer lies the land to which we go.


Saturday, December 23, 2023

Embroidery FInished!

 Merry Christmas

Today I stitched on the final two little vellum rosettes on the top panel of my Scenes Of Country Life, or Rural Pursuits casket, so the embroidery is now complete. It was my goal to get it finished this year...well, last year really, that morphed into this year! I will take a few days off and enjoy Christmas and then glue the top, front, and front frieze panels onto the casket. Once that is finished, I can start making the trim, which I am really excited about~ it's gonna look fabulous!


I hope ya'll have a wonderful holiday season. Whatever your special day is, I hope it's filled with love & peace & happiness. If you are missing a special someone, I hope you make time to sit and remember them & the lifetime of memories they left with you. Remembering our loved ones and sharing stories about them with others, is how they live on forever~

Happy Stitching & Merry Christmas!


Thursday, November 23, 2023

Special 2023 Ornaments & Casket Update

 Happy Thanksgiving!

I hope you all are having a wonderful holiday today! I have added six precious hand painted ornaments to the Etsy store this morning. I think she turned out beautifully!
I have been working like mad to get these done in time for this holiday season. There are sooooo many coats of black to get them this dark and dimensional~ there are several 9 hour days of painting represented in this photo. I have had a heavy workload out in the shop. Between the painting and lacquering stages, I have been working on the top panel of my Scenes of Country Life casket.


The center panel is now complete and I have finally started the surround. It seems like I have spent eons on this casket~ its never ending! I'm still not confident that I will be able to get it finished this year, but I'm certainly going to try. You should be able to click on the photo to make it larger~ I love how the Suffolk sheep came out...the black goat is my Keiko Meisie, and her mate Luke is in white with brown splotches. The windmill in the background I saw on a trip to Paris, and swans, well, anyone who knows me knows how much I love swans! I was going to try and draw in a loon as well, but I will save them for another casket. 

If you want to follow my stitching journies, I post daily on Instagram~ just search #diamondKFolkArt or check out my page~  rlkinnison1

Happy Stitching!


Tuesday, October 24, 2023

New Witney Antiques Exhibit of 17th & 18th c Needleworks

 Choice & Precious Work


If you are in England ZOOM to Witney Antiques and check out their current exhibit, Choice & Precious Work. Firstly, it is amazingly FREE, and secondly, it is the first of two exhibits that will be showcasing the Elizabeth Hall suite of 17th c needlework & embroidery. Later pieces from the 18th c have been added to  her collection by her descendants. I cannot stress to my Dear readers enough how very rare these pieces are, and that they have been so well taken care of and passed down through the family together. This is a once in a lifetime change to view such a collection~ if you cant get there, then order the catalogue! It can be had directly from Witney Antiques, or if you are in the US the Attic Needleworks will be carrying it here shortly, so give them a ring and reserve yourself a copy!

Sunday, October 22, 2023

Taking a Gap Year?

  Did you Miss a Year?

I am very disappointed to announce that I will not be offering a new heirloom ornament kit this year. There are several reasons, none of which matter to get into because it will not change the outcome! I have had a really glorious kit planned for this year, so will be pushing it forward to 2024, and hopefully I will be able to get it out earlier than later. In the meantime, I guess this means Im taking a gap year~ so if there are any of the kits of previous years you haven't got yet, here is your chance!  

My kits from 2016 to 2020 are limited edition kits. Meaning, that once my kitted quantity iss sold, they will not be sold again. 

Kits from 2021 on are still somewhat limited editions, meaning that they will be sold for as long as I am able to source the materials for them.  2021's Flemish Coffer is a good example~ I am currently awaiting materials to come in for that one before I can restock it, so it is currently unavailable.

If you are interested in purchasing a kit, just drop me an email at rlkinnison@yahoo.com and I can send a Paypal invoice. 

2016 Flemish Fantasy~ SOLD OUT
2017 Winter Queen: 9 available ~340.00 USD + shipping
2018 Peaceful Kingdom~ SOLD OUT
2019 Ort King: 2 available ~ 250.00 USD + shipping
2020 Fanciful Story~ SOLD OUT
2021 Flemish Coffer~ Out of Stock
2022 Skarlet Ladye: 19 available~ 315.00 USD+shipping

Monday, August 21, 2023

What Are YOU Waiting For?

 Time Waits for NO ONE

I finished the front frieze and front panel for my Scenes of Country Life, or Rural Pursuits casket this morning. SUPER chuffed!
I try and post something every day on Instagram...however much or little stitching I get done~ I think there is a link in the sidebar to it. I always get the same messages though....

'Oh, I love your embroidery I need to work on my casket, as soon as I get XXXXXXX finished and some little smalls done'

Is that YOU? Do you keep putting your casket on the back burner until you Retire...or until you finish a sea of endless tiny projects?

Well...let me tell you dearest readers....if you really want to stitch a casket...ya'll got to get on it! 

TIME WAITS FOR NO MAN...OR WOMAN

I will be turning 52 here in a couple of weeks. I used to be fit as a fiddle! No worries...hardly ever sick. Things change. We do not get better with age. PERIOD. Last year could have been my last. year. I am now deaf in one ear. Its hard for me to get up and walk around...I now have macular degeneration making it severely hard for me to see. I see shit that's not even there...and cant see what is. 
I have chosen to prioritize stitching my caskets because they are important to me. You may be one of those folks who love to dream about things and pet their threads and that is enough~ and it is enough if that is your want~ there's absolutely nothing wrong with that. But if you really DO want to stitch a casket....
GET OFF YOUR TUCCAS AND DO IT!
All those tiny little projects you did these past couple of years, could have been tiny bits of your casket. Heck all a casket IS...is a smathering of tiny little projects. Break that sucker down into its components, and just do it! BABY STEPS. Before you know it, your casket will be finished!
I will be starting the final panel of my casket~ the top, here shortly~ hope you stop on by my Instagram to check it out and let me know what you're working on!
HAPPY STITCHING!!!


Saturday, August 19, 2023

Plaid Plaid Plaid

Late 1830s Boy's Fall Front 2pc. Suit

Say hello to our new little friend. I apologize that I did not catch his name, as he does not speak...but he is in there to be sure.  This is a fabulous example of boy's wear of the 1830s for several reasons. It fits into so many different categories, yet, it does not. Boys clothing is always super rare...young man's clothing moreso. Is this toddler-size? No. Is it young man size? No. I'd say grade school, between being breached and yet before 'adult' style of clothing was worn. Is this a skeleton suit? Well...not exactly. Is it a relative? definitely. Boys at this time would have worn a straw hat to keep the sun off and their heads covered...not this beaver type I have on him. But since I don't have an early boy's straw hat in the collection, and I do have a beaver...he chose to wear the beaver. Would he have worn shoes??? Maybe not. 
The suit is made from a lightweight cotton or linen blend plaid, very summer weight. I love early group images as they provide evidence of how current fashions were worn. There are always some who were more fashionable and some who were less...sometimes some eccentric folks, all together in the same picture. The above set of boys are from the late 1850s, not one is wearing shoes.

Here is a nice 1850s school group of girls and boys, with their teachers....if you click and zoom in, some of these boys aren't wearing shoes either...
I digress...why am I talking about the habit of not wearing shoes instead of this suit? It is hard to not sit and daydream about what little chap would have worn it, where did he live? Did he live long? Have a happy life? Grow up to have his own little boy? Sadly, the odds are not in his favour. Clothing such as this usually only survived because it was the little guy's last set of clothes before he passed away, for whatever reason. Otherwise, they were worn until they were worn out, handed down, etc etc. 

Here is a back view, an arm has slipped out of the pocket now.  This is a two-piece suit consisting of a one-piece skeleton and an outer jacket. I date it firmly to the late 1830s from the fall front, a staple on grown men's pants at the time period, the banded-down sleeves, and the ruffle around the hem of the jacket. Younger boys at this point in time would have worn fuller skirts on their jackets, reaching down to the knees. Our lad here is older, he's grown up enough to just have a little hint of the skirts left at the hem of his jacket, in the form of a ruffle. 

This back view shows the jacket removed. You can see the fullness in the booty area to allow him to comfortably bend over and not get, ahem... a 19th c wedgie. There are three buttons that close the back upper. The bottommost button also buttons onto the waistline of the pants, along with 4 additional buttons, two on each side.  They are not visible in this photo, but there are yet more buttons down the sides to allow the back flap to be undone for him to go to the outhouse and not have to take his entire ensemble off, as seen below.


Enjoy this pic~ take a few moments to soak it all in. A fall front flap on such a small child's garment. ::::sigh:::::
Two buttons attach it at the waistline, and there is also a  large side opening pocket to each side of it~ cause hello, boys need space to put things!
The only lining in the entire garment is the linen lining to the body of the jacket as seen above, it does NOT extend into the sleeves.

With the jacket on, the front flap reaches just up under the jacket's waistband.

This is a view of the inside of the front of the suit~ the plaid material extends into the front flap area fully~ so that when the flap is down, he is still covered somewhat. The two ample pockets can be seen....no doubt they once held marbles and all sorts of fun stuff!


Sunday, August 13, 2023

Scenes of Country LIfe Casket Progress...And

 Some Notes on the Importance of Stitch Direction

 The time is flying by~ I spent most of July in Washington State visiting my family there, so not much time for stitching. I am back at it now, working the front frieze, as seen at the bottom of my frame above. Because of the number of panels I have drawn on this piece of silk, the size is too large to comfortably reach the top of the frame, so I have to stitch it upside down...I don't recommend it. Shadows change, and stitching that looks one way upside down, may not look the same right side up, so if you are in the same situation, be sure to check your progress right side up frequently!

 As always, I work all the flat silk stitching first, then will go back and add gimps, then other things like silk-wrapped purls, etc. If I have silk-wrapped purls on a piece, those always get put on last as they are terrific thread snaggers. Especially when using flat filament silk that is so beautifully shiny, thread direction can have a huge impact on the look of the finished piece. Most 17th c satin stitch elements were stitched with the stitches running vertically. Colour choices and shading would add the details.

 If one looks at the finer long & short stitch pieces, you will find the stitch direction flows with the elements themselves~ for example, hair. An entire head of hair can be stitched with just one colour of thread, but by changing the stitch direction within curls etc, the stitches themselves create shadows and movement.  Look closely at the stitch direction of my birds here. Stitches that echo the curving design lines will help to portray a rounder more dimensional object. See how flat and boring looking the cherries are next to the songbird? I have chosen to work the flowers on the frieze in straight satin stitch while using long & short stitch on the creatures for more details and contrast.

 Don't be afraid to mix stitches within an element. I have used both satin and long & short stitches on the turkey


Rarely are 17th c pieces ever just one type of stitch~ whether it be a single panel, or an entire mirror or casket. I like to think of them as samplers of all different kinds of stitches and techniques~ so if you want to use a pile of different techniques, GO FOR IT! It will look amazing!!

Happy Stitching!!

Friday, July 07, 2023

Scenes of Country Life Casket

 Progress

It's been a while since I posted about my casket progress...or lack thereof is probably more accurate. I don't know what I do all day long, but whatever it is, it sure goes by quick cause every time I turn around, it's time to go to bed again. 

Whatever happened to the days dragging on like they did when we were little? I might be able to actually accomplish something if I had that kind of time on my hands...

There are two scenes on the front panel~ one of me fishing, and the other milking a cow. Because I have them framed up with the top panel on the same slate frame, the only way I can reach them to stitch is with them upside down...which in itself presents some challenges. One of the best qualities or reasons for stitching with flat filament silk is the effects that the light has on it. A person can stitch with a single colour, and just the position of the stitches and how the light bounces off them creates shadows and illusions of there being different shades of colours there, when in fact it's all the same colour. 

So shadows play an important part in stitching with filament silk...insert stitching tip here...very important.....
Your stitching can look one way upside down, and drastically different once turned right side up! So check it often if you find yourself in my same situation...

I started with the ground as usual, and decided I wanted to work a basketweave pattern for one of the fields, as seen above.

I have to continually remind myself that this is a FLAT work casket that is supposed to be mainly satin stitch. It is very hard. I actually worked the entire forefield and then decided I didn't like it...didn't like the colours, and most importantly, ever so slight as it was, the field stood too proud from the surface. The milk jugs were going to be long and short stitch, so very flat, and hello, you can't have milk jugs in the foreground that sit behind the field that is supposed to be behind them.
So the field got ripped out el mui pronto, which actually made me quite happy as the colours I had chosen for the field were giving me flashbacks to our 1970s kitchen with orange, brown, and green mushroom wallpaper...

I kept the diagonal direction and worked stripes in satin stitch~ love it! It set the field off dramatically from the one in the background without it being too obnoxious.

Once the field was finished I built the fence and planted some long leg french knot trees. Worked the milk jugs next and REALLY HATED them. I mean, seriously close to ripping them out. As I am typing this you can see EXACTLY what I'm talking about with the difference of how something looks upside down....the jugs above are the same ones as shown in the picture below~ I think the ones below that are upside down are much nicer than the ones above....anyways, I decided to leave them and see how they looked after the cow was finished.

Everything is so tiny on this piece, as I was stitching Cow, I had to stitch the milkmaid's head and hat. They are seriously small and the lines were seriously hard for me to see. Am I overusing the word seriously? This should give you an idea of how stressful this panel was for me~ it wasn't much fun. The girl's face is literally half the size of the fishing panel's face, I think 4 mm from top to bottom, and not even that wide. R*E*D*I*C*U*L*O*U*S*L*Y* small. 
Enter stitching tip here: Don't draw things so small you can't stitch them with modern materials available today.

Cow complete, it's on to the costume. 

I wanted to make the costume bright so the girl would stand out against the fields...but not so bright she looked stupid...A farm girl does not dress in her best dress to go out and milk a cow! The addition of an apron and headscarf helped to keep her simple.

Rows of French knots for the foreground in blue-greens set them apart from all the greens in the background. A few strategically placed tiny silk gimps finished off the scene.

 I am actually really pleased with this panel which is odd because I think out of all of them thus far, this one had the most things I was not happy with in it. I ripped a LOT out, but I also left a lot in. One thing is so true with 17th c stitching it can be very easy to become hyper-focused on a single aspect of it~ be it a stitch or a colour etc....but there's so much going on, that once everything is in place, all the glaring things just kind of blend and disappear. 
Sometimes they add just the amount of quirkiness that is needed to make it perfectly 17th c

Whatever your stitching, I hope it brings you joy


Thursday, June 01, 2023

New Beadwork Class Open for Enrollment!

 Fruit of Thy Hands

I am super excited to announce my new 17th c beadwork class at Diamond K Folk Art Online Academy is now open for enrollment. I am so far behind from being sick last year, I am trying to catch up & sincerely apologize to all of my students patiently waiting for the classes I was working on to be ready.   
I designed this project class to teach the basic detached techniques used in making beaded baskets like mine shown above. What is learned in class can be applied to any and all the flowers and fruits and acorns etc I made for my basket!

If you are not familiar with 17th c beaded baskets, I can refer you to read an earlier post on them here. There is a link to the basket above at the Met~ note the wonderful beaded oranges and lemons in the border surround. I will teach you how to make them in this class~ though you will make strawberries, the technique is the same for all fruits/ nuts etc. 


Class starts on 1 July, and the kits will ship mid-June. If you would like to learn more about it or enroll,  you can do so here, or click the Diamond K Folk Art Online Academy PAGE TAB under the header at the top of the page to see the current classes offered.

Thursday, May 25, 2023

Process

 Enjoying The Many Steps


I have always been told I have a lot of patience. I'm not so sure...I think I just enjoy the heck out of the process of making things from nothing. A doll from a lump of clay..an embroidered casket from a pile of paper and silks..a cozy quilt from a pile of fabric scraps...or pretty tools from chunks of wood. I enjoy the process of *creating*.  Heck, this week I have really been enjoying the process of making lilac jelly, but that's a whole post in itself.

I know I'm not the only one who enjoys the process of making things, and then there's a whole group of folks who have no interest in making anything, but they just like to see how it's done, so I thought I would share my process for making my latest scissor holders in the ETSY shop.

It all starts with a gorgeous piece of wood. For these scissor holders, I chose hard maple so that the turning would be nice and crisp. You can see a piece behind the two scissor holders above. It's first cut into a long block, then I cut the corners off on the table saw so the rough turning doesn't break the cutting heads on my tools.

I drew out the design I wanted and worked with my son at the lathe to get just the right shape. Josh rough-turned the blocks for me. 

They were a wonderful maze of cuts and angles...sometimes the wood chipped out or broke. We just went with it and created. After turning, I cut them apart by hand~ LOTS of careful sawing! 

Here are three...to the left above is a little dude that broke halfway through turning, so Josh just went with it and I turned it into a candle holder. Once the holders are cut apart, they get sanded and then drilled in the center for the scissors. The holder on the right still has a flush top. I wanted these to gracefully dip down to the hole in the center, so they get carved out, by hand(holder in the middle). Carving on the end grain is extremely difficult~ it took some while, and I had to be very careful to not cut off any of my fingers. Funny story, I did slice a huge chunk out of one of my fingers on the drill press. It's always when you least expect it!

After sanding and sealing the piece, the design is drawn on by hand in pencil. For this particular holder, my design was inspired by a pair of 18th c hand painted silk dress sleeves in the Colonial Williamsburg collections. (The finished piece is shown in the first photo)

Next, I draw the design and add details with a steel tip pen and India ink, just like it was done in the early 19th c. I do not use waterproof pens or Sharpies like other folks. I use drawing ink and a dip pen, that's it. 

I usually sign it someplace within the design. This holder is going to be blackwork, inspired by 17th c blackwork embroidery designs, and painted only in black. I love painting in a monochromatic palette. It's a challenge to see how much depth and movement one can make with just shades of a single colour. These are particularly challenging to ink because of the compound angles. In order for ink to flow from a steel tip pen, the little channel through the center of the tip must open with downward pressure. This is done by pulling the tip toward you. The angles on this piece greatly limit the design. For example, on the Williamsburg holder, I was planning on writing on the bottom lip, but ultimately I could not get the ink to flow thru the tip because of the weird angles so drew vines there instead. 

Colours are built up over several layers. This is two separate coats of black so far. I paint only with watercolours. The first shading is done on what will become the light parts of the design.

Same flower after 5 more cycles of black and lacquer.


Finally, tiny hints of white are added to pop little details. In watercololurs, all colours are transparent, except white. White is opaque so it really pops and jumps out of the design. love it

I added some faded bands of black to finish it. I wish I had some of the blackwork slate frames & other tools I have painted over the years to photo with it~ these look smashing as a set. It's available in the ETSY store if you are interested in it. I think there are still a couple of needle minders in blackwork left from the group of tools I listed last week. 

Happy Stitching!

Monday, May 15, 2023

In the ETSY shop

 New Tools Available!


There are some pretty new tools in the ETSY shop today.  Link is to the right in the sidebar. I have been working on these blackwork pieces for a while. I am still working on it, but will also have a blackwork scissor holder to match soon. I love painting a monochromatic palette and showing how much depth can be achieved with just a single colour. I also really love 17th c blackwork embroidery, which I think you can tell, was the inspiration for these.

Tuesday, May 09, 2023

10 Spots Available

 Beneath Thy Poft Oak

Beneath Thy Poft Oak, The Art of 17th c Beadwork is a wonderful class that will teach you all about 17th c beadwork. It is a 12 month class that I am now running individually, so you will not have to wait for a class to fill if you are interested in taking it!  I have just 10 class spots available.

You can learn more about all the particulars and/ or enroll here. You can also click the tab at the top of the blog page here for the Diamond K Folk Art Online Academy to see all the classes currently offered.

For those of you who keep asking me about teaching here in the USA,  this is the perfect opportunity for you to do so right from your own stitching chair! This is the most comprehensive class I have ever offered, and like all my classes, all materials you need to complete Beneath Thy Poft Oak are included in the class kit. All the student need to provide are a few tools and a slate frame. The class is divided into 12 easy-to-complete monthly lessons. Each lesson contains a slew of pictures, step-by-step photos, instructions, and videos for completing this pastoral Texan scene.  This is not just a class to work the shown picture~ it is a class aimed at teaching you all you need to know about 17th c beadwork techniques and how to apply them to other projects you have milling around in your head.

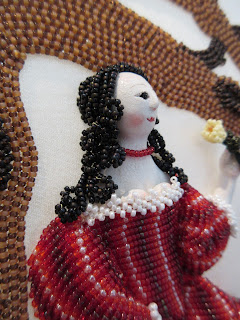
As you can see above, my scenes are complete. Ladye is not just sitting under a tree with a one-dimensional top of a skirt draped over her lap....she has beautiful legs, shoes, stockings, and garters under her gown. 

Each kit comes with a one of a kind 3 piece hand sculpted papier mache figure set (bust and two arms)
.
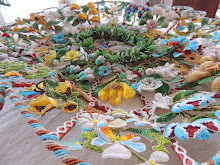
Along with flat and looped cartouche treatments, speckling, grounded and in-hand peyote stitch, flat and curved couching, French wired leaves and flowers, detached hair and lace techniques, netted overlays, designing and working clothing, and bead history, I will also teach you how to make these gorgeous fully detached yellow roses. The same technique can be applied to any flower~ known to nature or contrived of your own imagination.