My Enchanted Grotto
It always feels great to get a project finished~ and committing to work an entire casket is no small undertaking. It can be so overwhelming, some who want to make one, will keep waiting for the right day....for the stars to magically align in the universe....for them to get that last project done first...that they will never ever even start their dream project. It's true. If you want an embroidered casket, your going to have to make it a priority in your life, and just do it already! To lessen the overwhelming impact of it all on my psyche, I have broken it down into several smaller projects.... first was to finish the inside...but within that goal, was to install the music movement...install the mirrors....finish the tray....make the doors and hidden compartments in the lid....embroider the inside doors....so many little projects that one can celebrate getting FINISHED!
The outside is no different. Within each panel~ Lid, Front, Back, Side 1 & Side 2, and Friezes, ...I break them down into their elements, and focus just on that particular thing....before you know it, the entire thing is done!
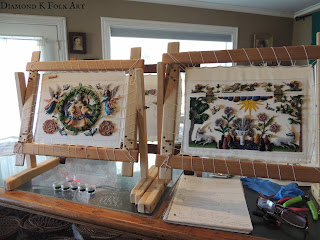
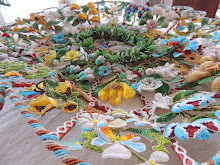
I always work stumpwork from top to bottom, so my threads don't get caught on previously worked things. The trees came first, and in the case of the oak on the right, I worked all the acorns and leaves when I worked the trunk, then set them aside to attach pretty close to last. As always...I ended up with twice the amount of leaves as I originally planned.
I have already posted about the grotto, so other than that, I have been dreaming of these unicorns for years, literally. Not so much bead wise, but their horns, I have always had a specific picture in my mind of what I wanted them to look like. It was very difficult to make it happen tho. Those blasted horns gave given me grey hairs trying to get them just right. I wanted to use a spiral sea shell, a tiny baby tibia fusus. But I just could not find one small enough...let alone a matched pair. I considered carving my own from some old piano key ivories....but the 'small' problem kept creeping in on me~ which was that I could not hold something so small and that hard, tight enough to carve it with any accuracy. Yes, I tried. And , No, I'm not posting pictures. I made wood horns wrapped with a spiral of wire, then wrapped over that....which didnt come out too bad actually, they were sized perfectly and looked nice, except they were gold....and I didnt want gold horns..I wanted a natural, white spiral horn blast it!
I finally found what I wanted kind of by accident actually....I found a necklace pendant of carved mother of pearl, and cut off what I needed for my horn. I cut a tab on one end and drilled it so I could attach it to wee beastie's head, and Thank You Jesus! my quest was over.
I prefer to work all my animals in hand, and then attach them as a slip. After they are attached, they get their ears, mane and tubular peyote tails.
I love the colors and how they all work to compliment each other. And...since they are worked in beads, antique beads colored by the elements they are made from, and not dyed like modern beads....I can be confident that this panel will look exactly the same as it does now, for hundreds of years to come (if it survives that long)
The last two little creatures to land on my panel were two little itsy bitsy bees, one hovering over each rose.
I left this picture big so you can enlarge it~ theres those blasted stormy clouds that gave me so many fits. I do really like the colors tho. Mounting your panel and its accompanying frieze on the same slate frame, helps to keep all a cohesive unit. When I work my double casket, I will have side, frieze 1, slope and frieze 2 all on the same slate frame so I can work all together as one side.
So to date, I have completed all four friezes, the top of the lid and the back. On to the front panel next, which is the opposite end of the enchanted grotto.
Happy Stitching all~


1 comment:
The scenes are so beautiful
Post a Comment