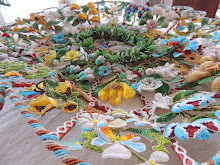
Beautiful, Amazing 'Margarites'
I have been motoring along on the back panel of my casket, and finished the grotto & fountain this weekend. I have always been fascinated with the idea of a grotto~ so mystical and fantastic~ and very popular in 17th c embroideries. My back panel contains the back side of my grotto, with the beautiful fountain and cute fishies frolicing about and the opposite end of the grotto is on my front panel. I have been dreaming of this grotto for years, literally, and it has been exciting and fun to actually get to finally make it happen. I have been hoarding these particular blue cut beads for the falling water for as long as I have dreamt about this grotto!
I have scoured museum databases and the internet for 17th c worked examples, and have so many ideas zooming around in my head~ every time I find a new piece, there is something wonderful on there I want to try! Grottos are alot of fun because there is alot going on in a tiny amount of space~ lots of colors and lots of movement.
During a study session last year at the Clothworkers Center I had the chance to study one of my all time favorite mirrors from the Victoria & Albert Museum up close and personal,
you can see it here T-17.1955
One of the reasons I love 17th c embroidery, is that the longer one stands and looks, the closer one gets to the piece, the more fine, amazing, details one sees. Looking from afar, its just another 17th c embroidered mirror...right? Next...moving on~ but wait! Go check out the link above and look at it, BEFORE you watch my little video I took here~
It is impossible to capture the essence of this piece in a still, flat photograph. The maker wanted their grotto rocks to sparkle, like they were wet~ so using an animal based glue, they smothered the embroidery with a mixture of glue and crushed mica flakes. There looks to be glue over the surface of the mica, so perhaps they applied the glue first, sprinkled the mica over, and then pushed it into the glue with their fingers.... in any case~ just take in that sparkle! I LOVE it and from the moment I saw it, I was trying to figure out how I could do that with beads on my casket.( I am seriously excited to start my silk embroidered casket...cant wait!!!!)
To get a wet, sparkly effect using beads, I worked my grotto rocks, or mounds, in antique Margarite beads. The creme de la creme of all antique seed beads.
They are often referred to using the French term, Charlottes, but I prefer to use the term the Venetians called them when they made them, which is Margarites.
Margarites were not made until the early 1830's, but I know if they would have been around in the 17th c, they would have adored the subtle sparkle they have. Venetians first made regular seed beads, then sent the beads to Bohemia where they were strung on a wire, and held onto a grinding stone to add a single facet, or cut, into each and every tiny bead. Once they were 'cut', they were sent back to Venice to be packaged and sold, making them the most expensive of all seed beads, regardless of color. Of the over 800 different colors of antique seed beads that I have, I have just around 30 colors of Margarites...they are wonderous little gems!
I left this picture large so you can click on it to see the single ground facets in each bead.
The dimmer the light, the more my grotto sparkles! Am super loving how it came out.


No comments:
Post a Comment