Let the Bead Stabbing Commence....
I love the 18th c kitchen gardens with their little white picket fences, and it does seem most probable and fitting they were a carry over from earlier times, when families grew their own food. Why waste time and energy walking out to a field garden, when you could have it right close to the kitchen. When you wanted a carrot, you just went and picked one....and more importantly, one could keep their EYE on it and be sure no one, human or animal, was helping themselves. This is what the bead work on the Corning Museum reminded me of~ a little white lattice between the panels of pretty flowers and such. It was quite easy, just time consuming to stab all the beads, one by one, onto the wire. I had no want to use a bead spinner~ and if I did, there would be now way to count each and every bead that went on there! I like knowing these types of things....just
exactly how many beads would it take to make one of these???? I know now ;)
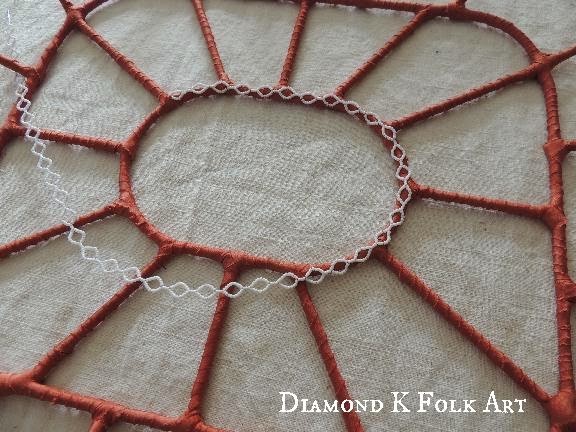
I used the exact pattern from the Corning~ 18 beads for the loop, with 3 beads between each. To attach I simply wound the tails around the upper edge of the basket, where they would be covered by the spiral wrap. The opposite end with no tail, I stitched down with thread, and worked my way up each piece tacking it down at every large loop.
At this point, I was quite...quite excited to start the spiral wrapping......until I realized before I could wrap the edge, alllllllllllllllllllllll those beads had to be strung on the wire. AK!! So there I stood, literally for DAYS, stabbing beads and counting...stabbing beads and counting. Well, actually, when I first started I was gingerly threading them on....but by the time I was done, Pip remarked at how I was 'stabbing' those beads on.

Here is a silly picture of me stabbing away. What else can one do, standing at a counter for 8+ hours a day....stabbing beads onto wire~ leg lifts of coarse! We were given 32 g galvanized wire with the kits, but it was so delicate, for this, I opted to use a bit thicker floral wire for a few reasons~ the holes in these beads were a bit large, so the thicker wire was not only stronger, but they didn't flop around on it as much, and it was a nice dark green, so where you could see the wire peeking out, it wasn't shiny to catch your eye. I also didn't want the bulk, as well as the difficulty of starting and stopping a bunch of times, so, I only used a single length of wire.

The spiral wrap is GORGEOUS on these baskets. I loved the Holburne basket's outer edge, loved those colors, so matched them in my beads, and which the red, a sort of pumpkin red, matched my hand dyed silk exactly so how cool is that! Providence to be sure. There is no need to count out how many beads to make a pattern, the colors are wrapped on at the same time, each being threaded onto their own wire. The Holburne's pattern was two wraps of each color, so I threaded two wires of cream, 2 wires of pumpkin, and 2 of blue. The tails are left long and wound round the edge of the basket. I started with the handles first
The beads are threaded onto their wires, and very carefully, each color at a time, wound round in a loose spiral
As you can see, I started with the cream, then added the pumpkin and then the blue. I would wrap the cream up a ways, then wrap the pumpkin about the same length , leaving all a bit loose, then when I wrapped the blue, would tighten all as I went so they fit together perfectly with no spaces
Here I have wrapped the entire handle and have excess. I was careful to count exactly how many beads I removed so my bead count wouldn't get messed up. This was the first handle so I didn't know exactly how many it would take. The other 3 were very close in count, within 10 or so beads each color. So after the excess beads were removed, I wound the tail around the basket edge, just like when I had started.
Now....VERY important! Enlarge this picture to see that the two lengths of wire I have wrapped around themselves right up to the beads~ this is to keep tension on the beads so the wire is solid beads, with no spaces. Now...see there is a tail length and then what I am holding is knotted, and knotted again! You simply MUST give yourself a long tail when wrapping a spiral edge~ as you wrap there will become more and more tension on the beads~ they will become so tight that they will literally
explode and shoot off the end of the wire~ no matter how many times you wrap them around themselves~ this is where the knot comes in at the end. It will keep the beads on the wire! Yes, I had two said explosions~ the first time I thought I had just not wound them together enough times (10)....the second, the very end of the wire was knotted into an absolute mess of a knot and it worked perfectly.
After the handles were wrapped, I started the edge~ from the beads it took to do the handles I was able to calculate how many I would need to go the length I needed for the outer edge....and this is but a fraction~ the length actually goes from the basket, down to the floor on the other side of the counter, loops back up and the ends are there at my feet. If you are saying crazy, you are correct...but at the time, and even now, it seems more logical to me to do it in one length, than to have to start and stop and try to hide ends of wire!
I love how the handles turned out
At center bottom of this photo my 'master knot' can be seen. When I came up on where I started, instead of trying to weave the ends into the beads, I twisted all the lengths together and snipped the tail at about an inch and a half...and
left it sticking out. I didn't want it messing up my pretty spiral wrapped edge, and put it in a place where I knew a part of the panel design would cover it. I marked it on my template as well, and it really helped in locating north, south, east and west of my basket when I was beading the panels.
Speaking of panels....what one to do first???? As is usual for me, I picked what I thought would be the most difficult and take the longest, the center panel
This is a side view of a casket in the Burrell Collection. I have loved this angel for forever~ She was planned for my casket, which, she may also get onto...but she was for sure to be the delight of my center panel


4 comments:
Only YOU would have patients enough to do all this AND count beads!!! Can't wait to see the panels and finished basket. BTW.......CONGRATULATIONS!!! Miss Grand Prize Winner!!! I guess I can say that now that the winners have been chosen and published. We're so proud of you!!
LY, Mom
Your finished basket is AWESOME!!!!! When do we get to see it on here??
LY, Mom
In my 30 years of beading, your basket is at the very top of my list of top beadwork. My hat is soooooooooo off to you.
It's not many artists of your skill that would take the time to take photos and write about your process in a nearly step-by-step manner. I can't tell you how much I appreciate this.
I've been keeping track of a (so far) 1200-hour grandmother's flower garden quilt, counting fabrics, stitches, hours, spools of thread, etc. all along the way, and sometimes blogging about it. So I know a little of both the motivation for doing so and the extra time it takes. Your account is over the top special! Thank you.
Thanx Mom!!
&
Thank you Robin, I am honored and so glad you enjoy the blog xoxox rachael
Post a Comment