Friday, February 18, 2022

Don't Forget ....

 Your Wallet!

I'll be on my way to Colonial Williamsburg this next week and am thinking about what bags I need to drag out from the depths of the closet. I almost can't remember the last time I flew someplace. It would be so much easier to open the drawer and pull out a few wallets instead. Much softer. Much more portable! I bet if I asked you what an 18th c wallet looked like you would describe a tri-fold shaped object made of leather, or perhaps even linen, and possibly decorated with flame or tent stitch embroidery.  

Nope. That's more of a pocketbook, not the huge linen gorgeousness seen below. 
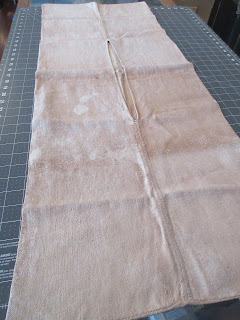


Often referred to nowadays as a 'Market Wallet', in the 18th c and before, it was simply called a wallet or bag.  They are somewhat rare, being such a utilitarian object. Of course, that is what really attracts me to add objects to my collection. I like the common everyday use things that weren't saved because they got used until they fell apart, and then their parts were reused for other things. 

Just look at the expanse of good linen there is here! I have photographed it on a cutting mat marked with one inch squares. It measures 15" across, and 39" long.  The center opening is 14" long.  I can think of a million things I could make out of this wallet, especially since it is constructed from a single piece of cloth. 


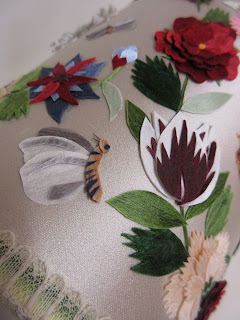
The back is plain, there are no markings save for the once red initials, " JM ", stitched at the base of the center opening (shown in the very first photo). 


The construction is simple.  A rectangle of cloth is folded over itself, with the long edges touching. The edges are stitched together, leaving a 14" opening to the center to allow for objects to be placed within. 


                           The ends are then stitched together and finito, you have a wallet!


                     The edges along the opening are finished so there are is no fear of raveling.  Objects could be placed in either or both ends of the wallet, and it was carried over the shoulder. Some early illustrations show it just slung over the shoulder with the opening visible and others...


including the above 1760-ish painting by Francoise Duparc, shows how it could be twisted to conceal the opening for more security. Both men and women put food, clothing, personal belongings, even animals into these bags... If you can name it and it fit through the opening, it could be carried in this bag. 


The early 17th c painting above shows a woman, to the center foreground, with a similar wallet over her arm. If you click the photo or link to the Fitzwilliam's Museum page, you can see her better.
 
Reusable, eco-friendly, biodegradable, and recyclable bags....not a new concept by any means. 

Thursday, January 27, 2022

Last week to Enroll & A Finish!

 Do you want to Learn how to make THIS?

There is but a mere 4 days left to enroll in my Spring 2022 class Gum Work~ The Art of 17th Century Gummed Silk. You can learn more about it and enroll here. It is such a beautiful and fun technique, and class starts on Feb 1st!

I also am so proud to share with you one of my student's finishes~

Patti was in my 2020 class Beneath Thy Poft Oak. Over the span of a year, I teach both surface and detached beaded stumpwork techniques, all combined into this beautiful sampler. I am so proud of Patti~ this is her first beadwork! 


I knew she wanted to incorporate her class piece into a casket when she started but did not realize it would be the focal point, as in, the work on the outside.  I think her vision was inspired and the result is a stunning example of less is more


She has worked her initials and date alongside, and due to forethought in backing preparations, her final mounting of the silk satin onto the wooden casket is just beautiful.


Her casket has such an elegant and classic aura, the interior fittings just as splendidly finished as the outside. I really love her use of blank space to create a peaceful & serene feel to it overall. 

Do not think that every nook and cranny of your casket's stitchable areas need be filled to the max, and I hope that you will let yourself be inspired by Patti's example!

I will be running this class again later this year, if you would like to be put on the mailing list, just send me an email or comment. Comments are moderated, so if you send your email address, it will not be published. 

Happy Stitching!!


Wednesday, January 12, 2022

My New Teaching Website!

 Diamond K Folk Art Online Academy


It gives me much pleasure to announce the opening of my new teaching website,

 Diamond K Folk Art Online Academy

All of my online classes will be hosted here from now on, so save the link! Some classes will be digital-only, some will be more traditional with associated physical kits. I have new classes in the works, and will be adding some from previous years as well. Classes are fully paid up front, and content is released at the first of each month for however long the course runs. I will announce classes here on my blog, and link to pages where they may be purchased.

 If you are in Colorado, please email me to enroll and I will invoice you directly to include applicable taxes, if not, I will have to send an additional invoice with added tax.

I am planing the second running of my 2020 Beneath Thy Poft Oak class later this year. This is an in-depth 12 month long course covering 17th c surface beadwork embroidery techniques. A project kit is included with the class. If you missed the first running and would be interested in the waitlist for this class, just shoot me an email. 

Gum Work~ The Art of 17th c Gummed Silk

Class Starts Feb 1, 2022!

My new Gum Work class is now open for enrollment and will be starting on the first of February. This class is three months long, and is a digital only class, meaning there is no associated class kit. A full list of required materials with link to where they can be purchased online is included in the first lesson. You may already have much of what is needed, or be able to find them locally.
If you are unfamiliar with 17th c gummed silk, I will invite you to click on the tab on the right sidebar 'Silke Gum Work' to learn a little more about it....and if you want to learn how to make beautiful gummed silk carnations like the ones shown above, I hope you will sign up for the class!


Traditionally, items decorated with gum work only contained gummed silk, such as the top of my dome top casket shown above. But in class, I will show you how to elevate this dainty craft to a new level by adding goldwork stitches and some bling to it!


You will learn both flat and curled techniques. Even the lion's mane shown above is gummed silk

You can learn more about my Gum Work class & Enroll here


Saturday, December 25, 2021

Finished

 17th c Inspired Gum Work Casket


Here is a tour of my finished Gum Work casket. I hope you enjoyed following along on YouTube! If you haven't already got on the mailing list for my new 2022 classes, just drop me a line at rlkinnison@yahoo.com to be put on the list. 

Friday, December 24, 2021

The Last Step...

 To Casket Finishing: Trim!


Casket 1070-1873, shown above at the Victoria & Albert Museum in London is one of my favorite caskets because I just love its unique trim. You can see it here. It's not the only extant casket that has lace over ribbon for trim, but it's my favorite. The lace makes for such a feminine look. This is the casket that was inspiration for the trim on my little dome top casket. 

I hand stitched lace over ribbon to make my trim, and my last Finishing Tips video on YouTube below shows how I apply the trim~ which is the same for ANY type of trim I am wanting to apply. Hope ya'll have a wonderful Christmas and come back tomorrow for a little video tour of the finished casket


Friday, December 17, 2021

Floss Tube Finer Finishing Tips 15

 Things to Think about when Looking for Trims for a Box or Casket


Happy Friday! I hope you are having a great stitching week...or perhaps getting ready for a great stitching weekend. I will be at a craft show with Pip all day tomorrow, so my usual Saturday video is a day early this week. The only thing left to share of the making of my little Dome Top Casket is how I apply the trim, but before I get to that, I first wanted to have just a little chat about the trim itself, and what you should take into consideration when searching out the perfect trim for your own project. 

Check back next Friday to see how I apply the trim to the box, and then on Christmas Day I'll post a video of the finished casket. I cannot convey enough how much fun this little project was and that I hope it has inspired you to continue on your own project, or maybe even start up a new one!

I do believe this is the first peek you will get to see at the completed Gum Worke~ if you like it and want to learn how to do it for yourself, I will be having a class starting in January~ just drop me a line to rlkinnison@yahoo.com to get on the mailing list. 

Saturday, December 11, 2021

Floss Tube Finer Finishing Tips #14

 Gluing A Finished Panel Onto The Box

So.....you have laboured for perhaps years on your embroidery and it's finally finished. All that is left is to glue it onto your box or casket. Easy right? You may be surprised to learn that the majority of folks I know when they get to this point, they panic. Some don't even get as far as opening the glue pot, just the thought of glue on their embroidery is overwhelming enough for them to stop and make the thing live unappreciated in a drawer for the rest of its life. 

I am here as a calming voice to assure you, it's really NO. BIG. DEAL. 

Take a deep breath, gather your tools, and watch this week's YouTube video on how to do it below!


Each panel is glued on in the same way, one at a time, no matter what you have worked onto the panel itself. It could be cross-stitch, crewelwork, stumpwork, or beadwork...no matter, they all go on the same way. Come on back next week for a fun video on choosing trim!