Thursday, February 13, 2014

Utterly Overwhelmed & Honored

And a Contest!


  My basket won Grande Prize in the contest, and was revealed yesterday on the Thistle Threads blog~ you can go and read about it and the other wonderful winners here .
  I am so thrilled and so honored and just down right overwhelmed at the response it has gotten~ thank you all so much for your kind comments and emails 

 I have kept exact count of each and every bead, and every minute of work that has gone into the making, and thought it would be wonderful to have a little game of fun~ like guessing how many jelly beans are in a jar~ only now, Lamora of Access Commodities  has donated wonderful new embroidery threads for the prizes~ so follow the link above and send Tricia an email~ (dont send them to ME~ they wont count!!) and try and guess how many beads you think there are...or how many hours and minutes of work it took to complete!
 
 I have also added special order miniature sculpted figures for Stumpwork over on the Diamond K Folk Art Shoppe blog for those of you who have emailed me and asked for them~  

Monday, February 10, 2014

Beaded Stumpwork....

Just Don't Think About It....
So how does one wrap their mind around a 17th c stump work angel...but instead done in beads....when they have never done bead work or stump work before. Easy. You just don't think about it. If I would have stopped to think over how to do everything, well I probably wouldn't have even started.  My best advise to anyone, and I say it all the time is "Just do it!" 
  To make my design for the center panel, I first took a pen and traced around the lines of the angel I wanted to keep~ the major points of her face, her hands, arms and gown. Heck just studying her gown became very confusing..and then, do I give her feet? No feet? and what exactly is she doing with her arms outstretched???  I needed her to fit into the context of my basket....I wanted her to look like she was at home there...not cut out of a magazine and pasted in like a collage
   This is a first draft of my design~ I just wanted to get the elements in that I knew I wanted drawn on there~ herself, and secondly, the smiling sun we see on 90% of 17th embroidery....I am always cold and love when springtime comes and I can go sit out in the warm sun....the sun is a happy place for me.  I also love rainbows, and wanted to keep the idea of a encompassing wreath, like the Corning basket had a scant bit of....it is also a feature I adore on the casket lids, the central ladye surrounded by a needle lace or silk purl wrapped wreath of a zillion little pieces.  I went back and forth quite a bit trying to decide should she have feet or not, as you can see
  Stumpwork, weather it be embroidered or beaded, looks crazy intimidating and horribly difficult...but if you think of it not as a finished piece, but as a bunch of little puzzle pieces to make and put together, its really thrilling and mad fun to do. That's how I decided to tackle it, one thing at a time, and in that moment, what I was working on was the whole plan...when I got that finished, on to the next puzzle piece.  Stumpwork is a series of elements added to a background, and built up over many layers to achieve a wonderful three dimensional effect. But I was not using thread and needle on a satin background fabric....I was using beads.      I needed some sort of something in the background I could attach my pieces to, to make up my center panel. To keep it airy and light, I chose to make a netted background that would blend in with the clouds behind my angel, and wouldn't be too horribly gaudy noticeable.
  To start, I took my pattern I drew out, and beaded a wire the width of it~ I started in the center, and worked my way out to the tapered oval ends.  Its just a basic lattice, once I got the first one done, I did one the same, but every other blue bead I passed the wire thru the blue bead of the previous row, to connect them all together.
  I used the 32 g wire from the kit for this, which passed thru my antique pearl beads nicely, but I had to dig around a bit to find a light blue bead I liked that had a large enough hole for two passes of the wire. I went up a couple of bead sizes as you can see, before I found one that would work, and one of the neat things about these early baskets is that they are not made all from the same size of bead...they are a hodge podge of all different types and sizes that really makes them interesting
    This is the first two, the center two rows complete.  The little loops I added to the ends to stitch it to my basket, as I didn't want the ends to show if I wrapped them around the center ring, over the lattice and silk wrapping

  While I was beading the lattice, my pretty girl was drying. I sculpted her head and hands from mache a little larger than my pattern, as it shrinks when it dries. She has two tiny black glass beads for eyes.
    Every so often, I would stretch and bend my lattice to the right shape, and lay it over my pattern to keep track of where I was and how large to make it. When I got to the oval ends, I just omitted the overlap to keep the pattern even
 The complete background netting, ready to go. It was set aside to wait for the clouds, sun, rainbow and angel to be completed before adding to the actual basket. For those, my plan was to use a vellum or card base shape, and couch rows of beads down flat onto that, a technique used on several 17th c baskets.

Thursday, February 06, 2014

Garden Lattice & Spiral Edge Wrapping

Let the Bead Stabbing Commence....

 I love the 18th c kitchen gardens with their little white picket fences, and it does seem most probable and fitting they were a carry over from earlier times,  when families grew their own food. Why waste time and energy walking out to a field garden, when you could have it right close to the kitchen. When you wanted a carrot, you just went and picked one....and more importantly, one could keep their EYE on it and be sure no one, human or animal, was helping themselves. This is what the bead work on the Corning Museum reminded me of~ a little white lattice between the panels of pretty flowers and such. It was quite easy, just time consuming to stab all the beads, one by one, onto the wire. I had no want to use a bead spinner~ and if I did, there would be now way to count each and every bead that went on there!  I like knowing these types of things....just exactly how many beads would it take to make one of these????  I know now ;)
   I used the exact pattern from the Corning~ 18 beads for the loop, with 3 beads between each.  To attach I simply wound the tails around the upper edge of the basket, where they would be covered by the spiral wrap. The opposite end with no tail, I stitched down with thread, and worked my way up each piece tacking it down at every large loop.
  At this point, I was quite...quite excited to start the spiral wrapping......until I realized before I could wrap the edge, alllllllllllllllllllllll  those beads had to be strung on the wire. AK!!  So there I stood, literally for DAYS, stabbing beads and counting...stabbing beads and counting. Well, actually, when I first started I was gingerly threading them on....but by the time I was done, Pip remarked at how I was 'stabbing' those beads on.
  Here is a silly picture of me stabbing away. What else can one do, standing at a counter for 8+ hours a day....stabbing beads onto wire~ leg lifts of coarse!  We were given 32 g galvanized wire with the kits, but it was so delicate, for this, I opted to use a bit thicker floral wire for a few reasons~ the holes in these beads were a bit large, so the thicker wire was not only stronger, but they didn't flop around on it as much, and it was a nice dark green, so where you could see the wire peeking out, it wasn't shiny to catch your eye.  I also didn't want the bulk, as well as the difficulty of starting and stopping a bunch of times, so, I only used a single length of wire.
 The spiral wrap is GORGEOUS on these baskets. I loved the Holburne basket's outer edge, loved those colors, so matched them in my beads, and which the red, a sort of pumpkin red, matched my hand dyed silk exactly so how cool is that!  Providence to be sure.  There is no need to count out how many beads to make a pattern, the colors are wrapped on at the same time, each being threaded onto their own wire. The Holburne's pattern was two wraps of each color, so I threaded two wires of cream, 2 wires of pumpkin, and 2 of blue. The tails are left long and wound round the edge of the basket.  I started with the handles first
  The beads are threaded onto their wires, and very carefully, each color at a time, wound round in a loose spiral
 As you can see, I started with the cream, then added the pumpkin and then the blue. I would wrap the cream up a ways, then wrap the pumpkin about the same length , leaving all a bit loose, then when I wrapped the blue, would tighten all as I went so they fit together perfectly with no spaces
 Here I have wrapped the entire handle and have excess. I was careful to count exactly how many beads I removed so my bead count wouldn't get messed up. This was the first handle so I didn't know exactly how many it would take. The other 3 were very close in count, within 10 or so beads each color.  So after the excess beads were removed, I wound the tail around the basket edge, just like when I had started.

 Now....VERY important!  Enlarge this picture to see that  the two lengths of wire I have wrapped around themselves right up to the beads~ this is to keep tension on the beads so the wire is solid beads, with no spaces.  Now...see there is a tail length and then what I am holding is knotted, and knotted again!  You simply MUST give yourself a long tail when wrapping a spiral edge~ as you wrap there will become more and more tension on the beads~ they will become so tight that they will literally explode and shoot off the end of the wire~ no matter how many times you wrap them around themselves~ this is where the knot comes in at the end. It will keep the beads on the wire! Yes, I had two said explosions~ the first time I thought I had just not wound them together enough times (10)....the second, the very end of the wire was knotted into an absolute mess of a knot and it worked perfectly.
 After the handles were wrapped, I started the edge~ from the beads it took to do the handles I was able to calculate how many I would need to go the length I needed for the outer edge....and this is but a fraction~ the length actually goes from the basket, down to the floor on the other side of the counter, loops back up and the ends are there at my feet.  If you are saying crazy, you are correct...but at the time, and even now, it seems more logical to me to do it in one length, than to have to start and stop and try to hide ends of wire!
  I love how the handles turned out
 At center bottom of this photo my 'master knot' can be seen. When I came up on where I started, instead of trying to weave the ends into the beads, I twisted all the lengths together and snipped the tail at about an inch and a half...and left it sticking out.  I didn't want it messing up my pretty spiral wrapped edge, and put it in a place where I knew a part of the panel design would cover it. I marked it on my template as well, and it really helped in locating north, south, east and west of my basket when I was beading the panels.

 Speaking of panels....what one to do first???? As is usual for me, I picked what I thought would be the most difficult and take the longest, the center panel
This is a side view of a casket in the Burrell Collection. I have loved this angel for forever~ She was planned for my casket, which, she may also get onto...but she was for sure to be the delight of my center panel

Monday, February 03, 2014

Learning to Listen

Many Years Ago.....

     I used to chuckle to myself and smile when my Great Grandmother's hearing aid would start to 'whistle'....it would take her a bit to realize it was whistling and turn it down....and I would wonder, it must be really noisy in there to her, for her to not hear that horrid whistle!  I could talk regular voice level and she always heard  me and understood what I said....so it wasn't like she was deaf.   Sometimes I think I get the same way~ there are just so many voices with an opinion of what I 'should' and shouldn't be doing....some my own, some not....others, I don't know where they come from but they are there none the less...

   I have wanted to do a peddlar dollye for a long time~ I have done several, but I want one for 'me'.  I carved out a bunch of little poupards last year, as she will be a doll seller...but I always have so much going on for others...she always gets put on the back burner and must be content to watch other dollys come and go. She is always such a good listener~ she just sits there and smiles at me with never a harsh word
   She will be my first all body solid mache dolly, and I am quite excited with her.  Here I am holding her, the dowel is going thru her hip joint holding her legs on. They are very crude as of yet~ I am waiting for the mache to dry fully before I carve them to final shape. As you can see, I sculpted her to be a painted eye girl.  The past few weeks however, she has not been content to just sit and listen to my ramblings gleefully......she has been doing everything to get my attention, even resorting to being down right frumpy at times....not at all like her normal self. Night after night she appeared in my dreams telling me the same thing, over and over....until I would listen.
   O Happye Daye! it is for me when dolly is in favorable temperament again. She did not want to have painted eyes....how could I not appease her plea to see?
 Doesn't she look so much happier now? I think yes!  It wasn't easy tho~ I have never inset eyes after sculpting....but actually, it was rather fun. We tried on several different color eyes~ light light blue....dark clear blue...a gorgeous pair of green but she didnt like those, so we settled on an early pair of very dark cognac brown glass eyes. First I cut out where I wanted her eyes to be on her face... this is the intital set of coarse, I will go back later and clean them up
 I then turned her over and carefully cut out the back of her head~ now most dollys have their pate at the top of the head, but shes mine, so why not make it where I could most easily get at the back of her eyes to set them in?  I hollowed out her head and after setting her eyes filled in behind them with more mache.
  I am thinking I need to write a little note...or perhaps put a dollar or something fun in there before I seal her all up again.  Once her wig is on, no one will ever know she had eye surgery ;)
 She is unique to her own self, and I wouldn't have it any other way.  When one learns how to listen to what drives them, great things can come of it. A soul can be living and getting by, but still be lost..until they listen to that 'something'...that 'it'...and then...well watch out world!

Sunday, February 02, 2014

17th c Beaded Basket~ Wrapping the Frame

My kind of 'Getting Dirty'

   I had a clear picture of my basket in my mind's eye~ but just could not find the right shade of silk to wrap my frame with~ and heck, even if I could, have you priced hand dyed silk ribbon???? Good grief!  6 and 7 dollars a yard and UP!!!  utterly ridiculous~ I bought a spool of undyed bias cut silk ribbon from Dharma Trading in Washington~ fabulous place she has~ the spool of ribbon I am holding I bought for 8.00....well, I think perhaps it was 8.70 ~ and how many yards you ask????  62!  YES~ sixty two yards!!  (yes, of coarse I counted) I bought two just to be sure I had enough~ especially when you are hand dying, you simply MUST do all needed for a project, and a little extra, because even if you write down your recipe to a T....you will never get the same color twice!

   So into my little bucket the silk went, carefully unrolled.  I used Procion dyes~ also carried by Dharma~ a little tan...a little ecru.... a little golden brown for earthiness

  Swishing every few hours carefully, so not to make a huge knott......  this was after about 3 hours and was as much dye as the fibers of the silk would hold, so a little rinse and as it came out, instead of waiting for it to dry, I cheated a little and ironed it to dry it~what can I say I get a little impatient sometimes!

   After I got it all ironed, which took longer than dying it altogether I think....I held up a little sample of lattice to see how it looked~ good enough!
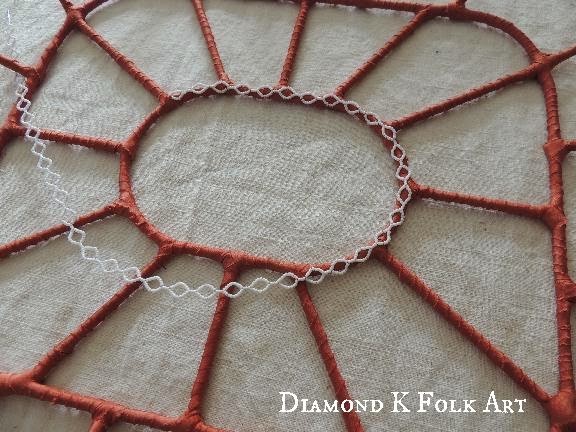
  To make wrapping a bit easier, I wound one roll of the silk into a tight wad that I could hold in my hand and pass thru the spokes of the basket easily as I wound it round.  I tacked the end with a couple of stitches in matching thread and decided to do the spokes first. You will note that the very top edge is left bare~ this edge will be spiral wrapped~ no 'dirt' there!
  So here you can see my little stitches~ wrapping first with the wool gave the silk something to grab onto, and also made it much easier to pass my needle thru.  I wound round and round and round again, until all was covered
 At this point I started to freak out a little, as alone, like this, the silk really looked orange to me~ not brown anymore at all. If I remember right, I lamented for about 3 days, going from ' it looks OK'....to 'nope~ its getting ripped off and I will re~dye another batch'... and back again.  I was thinking too much of coarse, and finally just listened to the little voice in my head saying, 'no~ leave it well alone, all will be as it should'.

  Finally~ let the 'bead stabbing' commence!

Thursday, January 30, 2014

Making a Beaded Basket~ Where to start?

   I took this picture about an hour after my mind told me I was making a beaded basket~ I have never beaded a thing, aside from stringing beads for necklaces!  This is probably not the way to do it, but I figured, if they could bend a wire to make a neat basket shape in the 17th c, I could do it....right now.... and in my living room ;)   So first, I wanted to make a pattern of some sort~ I didnt have any paper large enough, so I grabbed a spare sheet of foam core and drew it out with a sharpie. No measure, just eyeballed it.  I am glad now I used that foam core, I used it thru the entire process, from making the basket itself, so using it for my template to fit my beaded designs to.   For the basket frame, I used lengths of brass brazing rod.  They are not so stiff you have to use tools or heat them to bend~but you do have to use quite a bit of elbow grease.  For the handles, I sketched my pattern on a scrap wood board and then pounded it out with nails every little bit, then I took about a 25" length of rod and bent it carefully around the nails for my handles
   Here is what my frame looked like after the little spot welds to get it together~ you can see the one required element for the competition in the center~ I used the smaller of the two ovals from the kit.  My Idea at this moment, is for an angel in the center, and to reproduce the floral panels from the Corning basket in each of the surrounding sections.  So she will be watching over her Garden~ the inner panels will be treated like the Corning with the white lattice between, but the outside and handles will be wrapped spiral like the Holburne basket.
   Underneath the white lattice, I want the basket to look like 'dirt', so am planing on wrapping it with silk I will dye to the right dirt color~ and so that the wraps are nice and tidy and all the same size, I will wrap the basket first with wool~ this will give the sections a bit of a cushion under the wrapping and give my needle and thread something to dig into.  I have loads and loads of wool for my dolls, this is from a handsome ram named 'Leo'
 I just grab a little and stretch it out and wrap it round on itself. The wool has been washed, but there are still wonderful little seeds and sticks here and there~ that I like to leave in~ it gives character!
  Here is the basket frame all wrapped~ you will notice alot of my pictures will be at night~ cause I literally worked day and night on this basket~ from August till the last day of December it took to get it finished~ I wont tell you how many hours, because I am planing a little giveaway later for you all to guess that, but yes! I kept track of every  minute of work, and YES! Every bead! So be keeping track in the back of your mind!

Thursday, January 23, 2014

Queen Anne Doll on eBay this week!


Stubborn as a Mule & on eBay this week!


  Wrestling Heart~ she certainly does live up to her name. It is known all girls of society and grace simply must must must have their heads covered at all times!  But no! all I hear is
  ' please Mum~ I hate wearing that bonnet!!!! Please don't make me wear it~ it makes my head itch horrible and now Jacob thinks I have the lice!!! Do you even know how embarrassing that is????'
  What to do when they are so cheeky...and one such as I am feeling such under the weather....  I let her have her way of coarse~ she is on eBay this week so please click on the eBay specials to see super huge detailed pictures of her wooden legs....latchett tie shoes....and that horrible silk brocade bonnet she hates so much!