Thursday, May 21, 2020

Working Along....

Boxes Boxes Everywhere..
  I have been keeping busy busy as always~ pandemic or no pandemic, there's never enough hours in the day for me.  Been steadily working to fill orders for slide top boxes I sold at the end of Feb in Williamsburg~ these take soooooooooooo long. Making them is the easy part.

  Before I can paint them, each has to be prepped first~ finish sand and then not one, or two, but three full coats of varnish. I can only do one side at a time, and they must cure between each coat, each side, so this is when this work gets painfully slow.  Not hours of varnish...not days....weeks!

  This box is a special, only available at Williamsburg, and what makes them super special and exciting is, that each person got to choose what they wanted painted on it. What was special to them in Colonial Williamsburg. Each box has 7 scenes on it, so many possibilities! I designed the box after two kerchiefs in the collections there, and all are lined with Virginia Gazettes that were printed at the Williamsburg Print Shop on the big press.  I first draw on the design with India ink using a steel nib pen, same as what was used in the 18th c.  Sometimes I use quills, but for things this detailed, I use a steel nib.  I use watercolour paint to then paint the scenes~ in this case, all are monochrome blackwork, my favorite to paint.  In the pic above, you can see the difference between the lined box above, and my finished on below. 

I love love love to paint blackwork, anyone who knows me will know! On this box this particular side is the same as mine...but I'm having loads of fun getting to paint just about every other building in Williamsburg on these boxes!

Sunday, May 10, 2020

For Mother's Day~

 18th c Christening Basket &  Quilted Silk Satin Cover 1127.2020.19
 How fitting for the last blogpost about this wonderful Christening Basket, than to have it on Mother's Day? This would certainly be a perfect Mother's Day gift!! Honestly speaking tho, I acquired this set for the basket you see above, the first picture I saw of it looked just about like this. I didn't give a thought or care to what else was in it. In past years, I have seen 3 different basket covers...billed as 'cushion covers',  sometimes without the skirting that hangs over the basket's edge....never have I found one still stitched to its original basket. It measures 17.5"x14.25" and is 5" tall.

 The cover is made from the same cream silk satin as the gown and cushion and bearing cloth, with same louped gimp fringe & fly braid trims.

This picture is a good view of how firmly the quilted silk top piece has been pulled down and stitched to the corners of the basket that is underneath. It is firmly attached and not loose in any spot at all.

 The quilting design is a pretty basket of flowers, with a scrolling border of the same. No dates or initials, but who cares, this thing is fantabulous. The other 3 covers I have studied have all been quilted to a plain linen backing , and I have no reason to doubt this one is any different. 

  Pretty little stitches, the silk satin has held up remarkably well over time with no holes or worn spots...tho I believe this entire set was placed into a trunk in the attic of the estate and just plain ol forgotten. The light has not reached its surface to degrade it....no folks to see it and cut it off the basket to make it into a pillow cover.

  I was very careful to pull each item from the basket one at a time, and found loose pins hanging onto several items, so no surprise to find some that had sifted to the bottom of the basket. Perfect proof for the method of construction~ a nice tight fitting quilted cover that would keep all these little pins from escaping!

 I was extremely excited to see the basket underneath (many know I have somewhat of a 'thing' for early baskets)...but upon lifting the skirts, found it to be completely covered in silk.  It's a very tight covering, the silk fitting it like a lampshade~ stretched very tight.  The side strip's edge was folded over about an inch or a little more, before being whipped over the very bottom of the basket. This is what you see flipped up at the base~ the bottom friction wear has worn thru this edge, allowing a  little peek at the sides of the basket. 

  Flipping it over to admire the bottom of the basket~ it is so clean and fresh, like the day it was made. The basket itself is most likely made from willow.

 Sneaking a peek at a side thru a worn area, the side construction very simple, the same as the bottom.  No fancy or even robust weaving is needed, as the basket was made for and always meant to be covered.  If you enlarge the picture, you will notice as well, there is a layer of paper between the basket and the quilted cover. It feels as tho there may also be a slightly wadded fill, which would give more reason for the paper lining to be there~ to keep any wadding contained where its supposed to be. 

  This is a view of a corner on the bottom of the basket~ the corner skirtings have been attached to the basket with these long threads that pass not just around the slats, but pierced thru them as well.

A last little interesting that may help me to date and place where this silk was made~ there are  red silk threads woven thru the selvedge edge, as well as silver plate.

I hope you have enjoyed exploring the basket with me, I have certainly enjoyed sharing it with you~

Tuesday, May 05, 2020

Back to that Basket.....

18th c Bearing Cloth 1124.2020.16
   We are down to the final two items in our amazing basket, and I have been getting alot of questions regarding its provenance, so here it is.   If you haven't guessed by now, the set is English. While I do prefer to keep American pieces, beggars cant be choosers when studying early baby things.  This set belonged to Lady Margaret Basset of Tehidy, in Cornwall, U.K. Tehidy house itself has an amazing history that can be appreciated here. This set has filled many holes in the collection's assortment of 18th Christening items.   Nearly the most important, is today's subject, the Bearing Coth. 

 Seen here with the other items in the basket, its massive size can be appreciated. It has been stitched from three loom width lengths of cream silk satin, the same as that of the Christening gown, each 18.5" wide by 60" long. The total measure is 55&half by 60".

 It is trimmed with the same cream silk gimp fringe and fly braid as the other pieces in the set.  At each corner the trim has been arranged to resemble a heart shape.

 The bearing cloth is fully lined with a gossamer fine tissue silk backing. As you can see, the silk trim has been stitched on thru all layers.


The backing so thin, that the metallic threads woven thru the selvedge edges of the silk, can be seen thru it.


 Do enlarge the pictures to appreciate the details in the trim~ 

  Wonderful "fly braid' or fly fringe, dangles have been slipped into the trim at various spots. 

For those interested in provenance,  Lady Margaret's daughter, also named Margaret, married John Rogers of Penrose, in 1776.  The above photo is Penrose Estate today, in Porthleven, Cornwall~a National Trust property.  All families seem to have their problems, and the Rogers' were no exception. When the last of the heirs passed in 2016,  (you can read about that here), the contents were auctioned, including the Christening set used by Lady Basset's daughter, Margaret Rogers for her children. (different than this set, and unfortunately I was unable to acquire)
And yet, the best is still yet to come!

Saturday, May 02, 2020

This Just In......

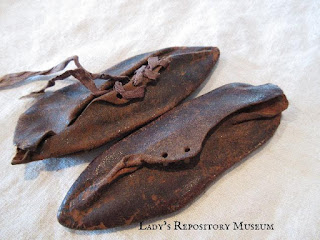
  1801 Baby Shoes 1143.2020.35

 I have to interrupt my regularly scheduled blogpost of the next item in the basket to share this little pair of shoes we just received this morning. If I have learned anything over the years, it's to recognize a crumpled heap of whatnot, for what it really is. These cunning little shoes were kept inside an paper envelope for years and years. Flattened them right out.

 Flatter than a pancake, actually.  I was super happy to feel how soft and supple the leather was, so thought ya'll would enjoy a peek at my minimalist approach to conservation.  They really do need to be stored fully supported, and not flat like this. They are extremely lucky the leather has not turned hard or brittle over the years.  

  Inside the envelope, they were wrapped in a wide silk ribbon that the original owner had written the provenance on,  worn in the year 1801 and by all appearances, that is a good date for these little beauties.  I put the envelope in an inert poly sleeve, and have already wrapped the silk ribbon round a tube to avoid any folds. Poly stuffing and nylon stockings will be used to make stuffing blocks to fill the shoes. 

 The upper most half of both back seams have popped open~ the holes are easily visible, and because the leather is still intact, I felt confident in placing a few stitches thru them, to bring the backs together again.

  I never do any work to an object that cannot be undone. Natural linen thread was threaded thru a smaller-than-the-hole size needle, and carefully, the backs were stitched closed from halfway point up to the tops.


 Pulling the thread super tight could stress the leather, so it was only tightened enough to join the back seam~ just enough to do the job, no more.
  With the back seam joined, the shoe can be properly stuffed. Poly fill is placed inside a section of nylon stocking and placed into the shoe. It's already looking better, but I don't like the rolling of the leather on the split vamp.

  I dug around in my box of silk ribbons, and picked one that most matched the colour of the original ribbon on the other shoe.  It's not important to me that it matches exactly, I just wanted something similar, that was not distracting.

 Studying the other shoe and how it was laced, I laced this one exactly the same way. There are 4 sets of punched out eyelet holes for lacing.

 Once laced and tied, this shoe has a lot of character~ filling out the shoe form has made the slight toe spring(the slight upturn of the tip of the shoe) visible again.

 Love this before and after pic.  From tired and deflated in the back...to standing tall and proud in the front.

 The other shoe.  I carefully loosened the ties on this one for stuffing, but was super careful to not remove them. This one got a few stitches up the back seam as well, but just 3 stitches at the top, because the original thread was still in the popped holes below that. 

Aren't they just the cutest lil things?
I hope you enjoyed them, and will go back now, to the next item in the basket on the next blogpost!