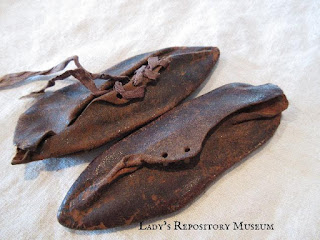
1801 Baby Shoes 1143.2020.35
I have to interrupt my regularly scheduled blogpost of the next item in the basket to share this little pair of shoes we just received this morning. If I have learned anything over the years, it's to recognize a crumpled heap of whatnot, for what it really is. These cunning little shoes were kept inside an paper envelope for years and years. Flattened them right out.
Flatter than a pancake, actually. I was super happy to feel how soft and supple the leather was, so thought ya'll would enjoy a peek at my minimalist approach to conservation. They really do need to be stored fully supported, and not flat like this. They are extremely lucky the leather has not turned hard or brittle over the years.
Inside the envelope, they were wrapped in a wide silk ribbon that the original owner had written the provenance on, worn in the year 1801 and by all appearances, that is a good date for these little beauties. I put the envelope in an inert poly sleeve, and have already wrapped the silk ribbon round a tube to avoid any folds. Poly stuffing and nylon stockings will be used to make stuffing blocks to fill the shoes.
The upper most half of both back seams have popped open~ the holes are easily visible, and because the leather is still intact, I felt confident in placing a few stitches thru them, to bring the backs together again.
I never do any work to an object that cannot be undone. Natural linen thread was threaded thru a smaller-than-the-hole size needle, and carefully, the backs were stitched closed from halfway point up to the tops.
Pulling the thread super tight could stress the leather, so it was only tightened enough to join the back seam~ just enough to do the job, no more.
With the back seam joined, the shoe can be properly stuffed. Poly fill is placed inside a section of nylon stocking and placed into the shoe. It's already looking better, but I don't like the rolling of the leather on the split vamp.
I dug around in my box of silk ribbons, and picked one that most matched the colour of the original ribbon on the other shoe. It's not important to me that it matches exactly, I just wanted something similar, that was not distracting.
Studying the other shoe and how it was laced, I laced this one exactly the same way. There are 4 sets of punched out eyelet holes for lacing.
Once laced and tied, this shoe has a lot of character~ filling out the shoe form has made the slight toe spring(the slight upturn of the tip of the shoe) visible again.
Love this before and after pic. From tired and deflated in the back...to standing tall and proud in the front.
The other shoe. I carefully loosened the ties on this one for stuffing, but was super careful to not remove them. This one got a few stitches up the back seam as well, but just 3 stitches at the top, because the original thread was still in the popped holes below that.
Aren't they just the cutest lil things?
I hope you enjoyed them, and will go back now, to the next item in the basket on the next blogpost!


No comments:
Post a Comment