Tuesday, May 09, 2023

10 Spots Available

 Beneath Thy Poft Oak

Beneath Thy Poft Oak, The Art of 17th c Beadwork is a wonderful class that will teach you all about 17th c beadwork. It is a 12 month class that I am now running individually, so you will not have to wait for a class to fill if you are interested in taking it!  I have just 10 class spots available.

You can learn more about all the particulars and/ or enroll here. You can also click the tab at the top of the blog page here for the Diamond K Folk Art Online Academy to see all the classes currently offered.

For those of you who keep asking me about teaching here in the USA,  this is the perfect opportunity for you to do so right from your own stitching chair! This is the most comprehensive class I have ever offered, and like all my classes, all materials you need to complete Beneath Thy Poft Oak are included in the class kit. All the student need to provide are a few tools and a slate frame. The class is divided into 12 easy-to-complete monthly lessons. Each lesson contains a slew of pictures, step-by-step photos, instructions, and videos for completing this pastoral Texan scene.  This is not just a class to work the shown picture~ it is a class aimed at teaching you all you need to know about 17th c beadwork techniques and how to apply them to other projects you have milling around in your head.

As you can see above, my scenes are complete. Ladye is not just sitting under a tree with a one-dimensional top of a skirt draped over her lap....she has beautiful legs, shoes, stockings, and garters under her gown. 

Each kit comes with a one of a kind 3 piece hand sculpted papier mache figure set (bust and two arms)
.
Along with flat and looped cartouche treatments, speckling, grounded and in-hand peyote stitch, flat and curved couching, French wired leaves and flowers, detached hair and lace techniques, netted overlays, designing and working clothing, and bead history, I will also teach you how to make these gorgeous fully detached yellow roses. The same technique can be applied to any flower~ known to nature or contrived of your own imagination. 


Friday, April 28, 2023

Scenes of Country Life Casket Progress

 AKA the What Was I Thinking Casket....

I have had such a large workload in the shop I haven't had much stitching time. Well, I probably have had a good amount of stitching time, but struggles with my health have prevented me from being in the happy zone that allows me to stitch. I am soldiering through hoping I will bump into my former self sometime soon. I have just three panels left on this casket, the front, front frieze, and top. I am working the front panel next, which has a smaller cartouch scene on either side of the front keyhole. I try to post on Instagram at least once a day, and if you have been following along, you will already know why I am now referring to this casket as the What was I thinking? casket. If you have no idea what I'm talking about, let me offer you this advice. Just because you can draw it that small, doesn't mean you can stitch it that small! This panel is an ode to my many days spent fishing for supper as a child...didn't like it then, don't like stitching it now. I started with the background~ the tree trunk is several hundred French knots in 4 or 5 shades of brown, I can't remember off the top of my head (probably blocked it out)


After the trees, I stitched the bridge, the water, the fishing pole, and the fish. The fish were a nightmare in themselves. I had always planned on using some microscopic metal spangles for the fish scales~ TINY, less than 2mm in diameter... I stitched them on the fish and they were way too huge and hideous, so the fish got worked in satin stitch, which I actually really like. But I wasted at least 3 days stitching dinner plate sized spangles onto microscopic fish and then unpicking it all off again because my brain would NOT let go of wanting to use them. 
Then came the ladye & my descent into HELL

I can fit this entire scene into the palm of my hand...and I have pretty small hands. I am not holding a giant pencil...nope, this is a standard size pencil eraser. It looks HUGE compared to her tiny face. 

I ended up stitching her face and unpicking it THREE TIMES before my final fourth try(which is just ok). This is her second face. I call this one the burn victim. Poor girl. HORRIBLE.  So I will remind you that I have macular degeneration....on top of having to wear regular glasses cause my ass can no longer SEEEEEEEEEEEE.  It is beyond frustrating. My first try was satin stitch...didn't like it so I thought I would stitch directionally. My eyes were tired, sooo tired. I have to have magnifiers on and even then, I am trying to focus and what I am focusing on will literally just disappear from my vision. Its gone. nothing, and I have to start all over....then maybe the lines of stitching will literally move, right as Im looking at them, and Im not moving. Enlarge this poor thing and say a prayer for my eyes, please. She didn't look that bad really, until I took a picture and looked at it on the computer. OH MY Golly. What the heck happened!? These stitches couldn't come out quick enough~they took forever to unpick cause they are so small. 

I put this picture on because I took it to show the fourth try at her eyes...not bad~ again though, it went all down hill from there. The only reason I did not unpick it and try again was that the ground fabric just could not handle another unpicking (neither could I)

I chose some really great taupes for her gown, purple but not too purple. I really wanted to give her a yellow dress, but who in their right mind goes fishing in a yellow dress??? At this point, I am hoping that the gimps will relieve some of her massive homliness. Enter Hell 2.0

What a person wants to use and what is available are not even close to the same thing when working at this scale. I used Jenny Adin Christie's Very Fine size gimp for her gown, which actually came out really nice. Thanks to my guardian angel for having mercy on my soul and letting her have just the colour. Now traditionally the hands and hair and face would have also had couched gimps for the defining details....but not here. Everything I had was too big. For her hands, I used  HALF of a single PLY of soie ovale. (first, separate a strand down into six plies, then separate a single ply in half~this will grant you entry to Hell 3.0) 

 No gimp currently on the planet is small enough for her hair...nor silk-wrapped wire. All too huge. I finally ended up digging through my silk-wrapped purls, finding the tiniest one and straightening it out. I like her hair a lot actually, as long as I don't look directly at her face shes great. 


 So here is the finished fishing panel, and now I am on to the milkmaid panel...Lord help me her face is HALF the size of this one.

Friday, March 24, 2023

I am now offering Bespoke Scrimshaw for

 Jackie Du Plessis's "A Sailor's Valentine" class

Jackie includes two precious printed paper inserts in the kits, but for those who want to add a little extra 19th c flare to their projects, I have been asked to make scrimshaw cabochons for the centers of the two panels.  As shown above, I measured a completed panel from last year's class while at Williamsburg. I have made the cabochons 2 mm smaller so they nestle perfectly within the circular center, with room for the chenille to be couched neatly around them. 

19th c Sailor-made scrimshaw is beautiful. It was made from whalebone, whale's teeth, and ivory. For my scrimshaw, I have sourced the most authentic ivory substitute made today. It is absolutely gorgeous. It replicates the grain and Schreger lines of real elephant ivory so perfectly that the manufacturer processes it with a fluorescent that glows under UV light so that it cannot be sold as real ivory.
Here you can see how beautiful and transparent it is. The grain of each piece cannot be replicated. It is made in the manufacturing process, and changes throughout the large bulk pieces. 

It is actually pretty exciting because the grain cannot be seen until the pieces are sanded smooth~ so I have no idea how they're going to look until I have sat and hand-sanded them for yes, literally over an hour. I do everything by hand the old-fashioned way~ NO POWER TOOLS ARE USED WHAT SO EVER. It takes me about 4 hours of work to make a single set from start to finish. First, the shape is cut, then sliced into coins. From there each piece is hand-sanded from 120 grit to start up to 420 wet sanding to finish.

Once the pieces are super smooth, I draw the design on with a pencil and then hand scratch it into the surface, as shown above. These are super tiny, so I actually place them on sandpaper to hold them still while I'm working them as my hands get super crampy

Now...in the period, the most popular thing used to get the etching to show up was tobacco spit. I don't chew tobacco, so I use India Ink, which actually was also used back then ;)

There is more sanding to remove excess India from the surface, and then they are polished with wax for a nice, natural shine. Again, only hand polishing.


The cabochons are drilled thru the edge for stitching onto the panels.


There are two designs, a sailing ship and Sailor's heart/anchor. I can fit TWO initials within the heart if you would like to personalize your set. 

If you are interested in purchasing a set, you can do so by clicking the "Scrimshaw" tab at the top of my blog header, or click  here to go there now.  Ordering info is at the bottom of the page


Tuesday, February 21, 2023

Casket Side Panels Finished!

 No Glamorous Spaces Here


I often get asked what my stitching space looks like. I am usually a pretty organized person, I'm a Virgo so I do like everything to be in its place. When I am 'creating' though, things tend to get pretty hectic. We are always bombarded with pictures of Women's creative spaces looking so clean and glamorous...I personally don't know a single person whose space looks like those in the magazines. In case yours doesn't either and it bothers you, don't let it! This is a picture of my stitching counter, you can just see the corner of my slate frame in the bottom left there.  

See, I usually set aside January for doing my business tax papers....but doing so takes up my entire counter. I used the excuse that I would work on my stitching in January, and start my tax papers on 1 Feb. Well.....I was so close to finishing this current slate frame worth of casket panels, that I convinced myself that it would be a total waste of time to clean off my counter for tax papers, and then have to set everything else back out again. I mean. LOOK at it. I got EVERYTHING I need, right where I need it. It looks like a huge mess to the untrained eye, but it's what I call my 'working mess'. I stand to stitch, and everything I need is right where I can grab it.  You don't even want to see my doll room when I'm working on a doll. Just, no.

Anyways, I am also a numbers person and keep track of everything. I know how much time is WASTED getting stitching things out, and then packing them up again. Just think how much stitching you could get done in the time it takes you to set up and break down your stitching area every time. So this is my tip of the day for getting some serious gains on stitching progress~

Make yourself a dedicated stitching area. It doesn't have to be an entire room. Or an entire counter. A side table, the top of a dresser....just someplace you can have your stitching at the READY and not have to haul everything to and fro all the time. Portable rolling carts are great~ keep all your stuff for your current project in there, and then when you want to stitch all you have to do is roll it aside you. You may be surprised how much progress can be made with just 20 or so minutes of stitching a day!

Speaking of progress, yes! I have progress to share on my Scenes of Country Life or Rural Pursuits casket~ WOO!


I actually 'finished' them twice LOL. Above is a picture of the first time, with the original configuration of the silk-wrapped purl flourishes. Up close they looked good, but from across the room, they looked like a sideways crab or spider clutching onto the cartouche! It kept me up at night, literally. HUGE design flaw for me. I wanted the ovals to be within the center of a block of stitching....not hovering between two crabs in a rectangular negative space. So while I was sleeping I thought of all sorts of things I could do to remedy the situation. Just leaving it was not an option for me. What I decided to do was to make the one-sided flourishes into leaves. I drew them in with a pencil first, as can be seen in the bottom half. Then couched yellow silk over the lines to match the rest, as seen in the top portion. I just needed to get the rectangular angles out of this white/negative space of the ground.

A few silk-wrapped purls later, and bam! YES! Finished for the second (and LAST) time!  I am very happy with them now. 

I have now cleaned off my counter and started my tax papers like a good girl. This slate frame is ready to get cut up and glued to the casket, but I am saving that for when I get back from a trip to Colonial Williamsburg. Cant wait to see them on the casket!

Did you stitch some today???! DO IT!!!!!


Tuesday, February 14, 2023

Casket Progress

 Hunting & Ploughing Side Friezes Complete!

I guess its been a while since I made a blog post, I apologize! It is so easy for me just to stick a picture on the Instagram, I forget I have not blogged in a while. I have been baby stepping along on my Scenes of Country Life, or Rural Pursuits casket, and just completed both side friezes today. 

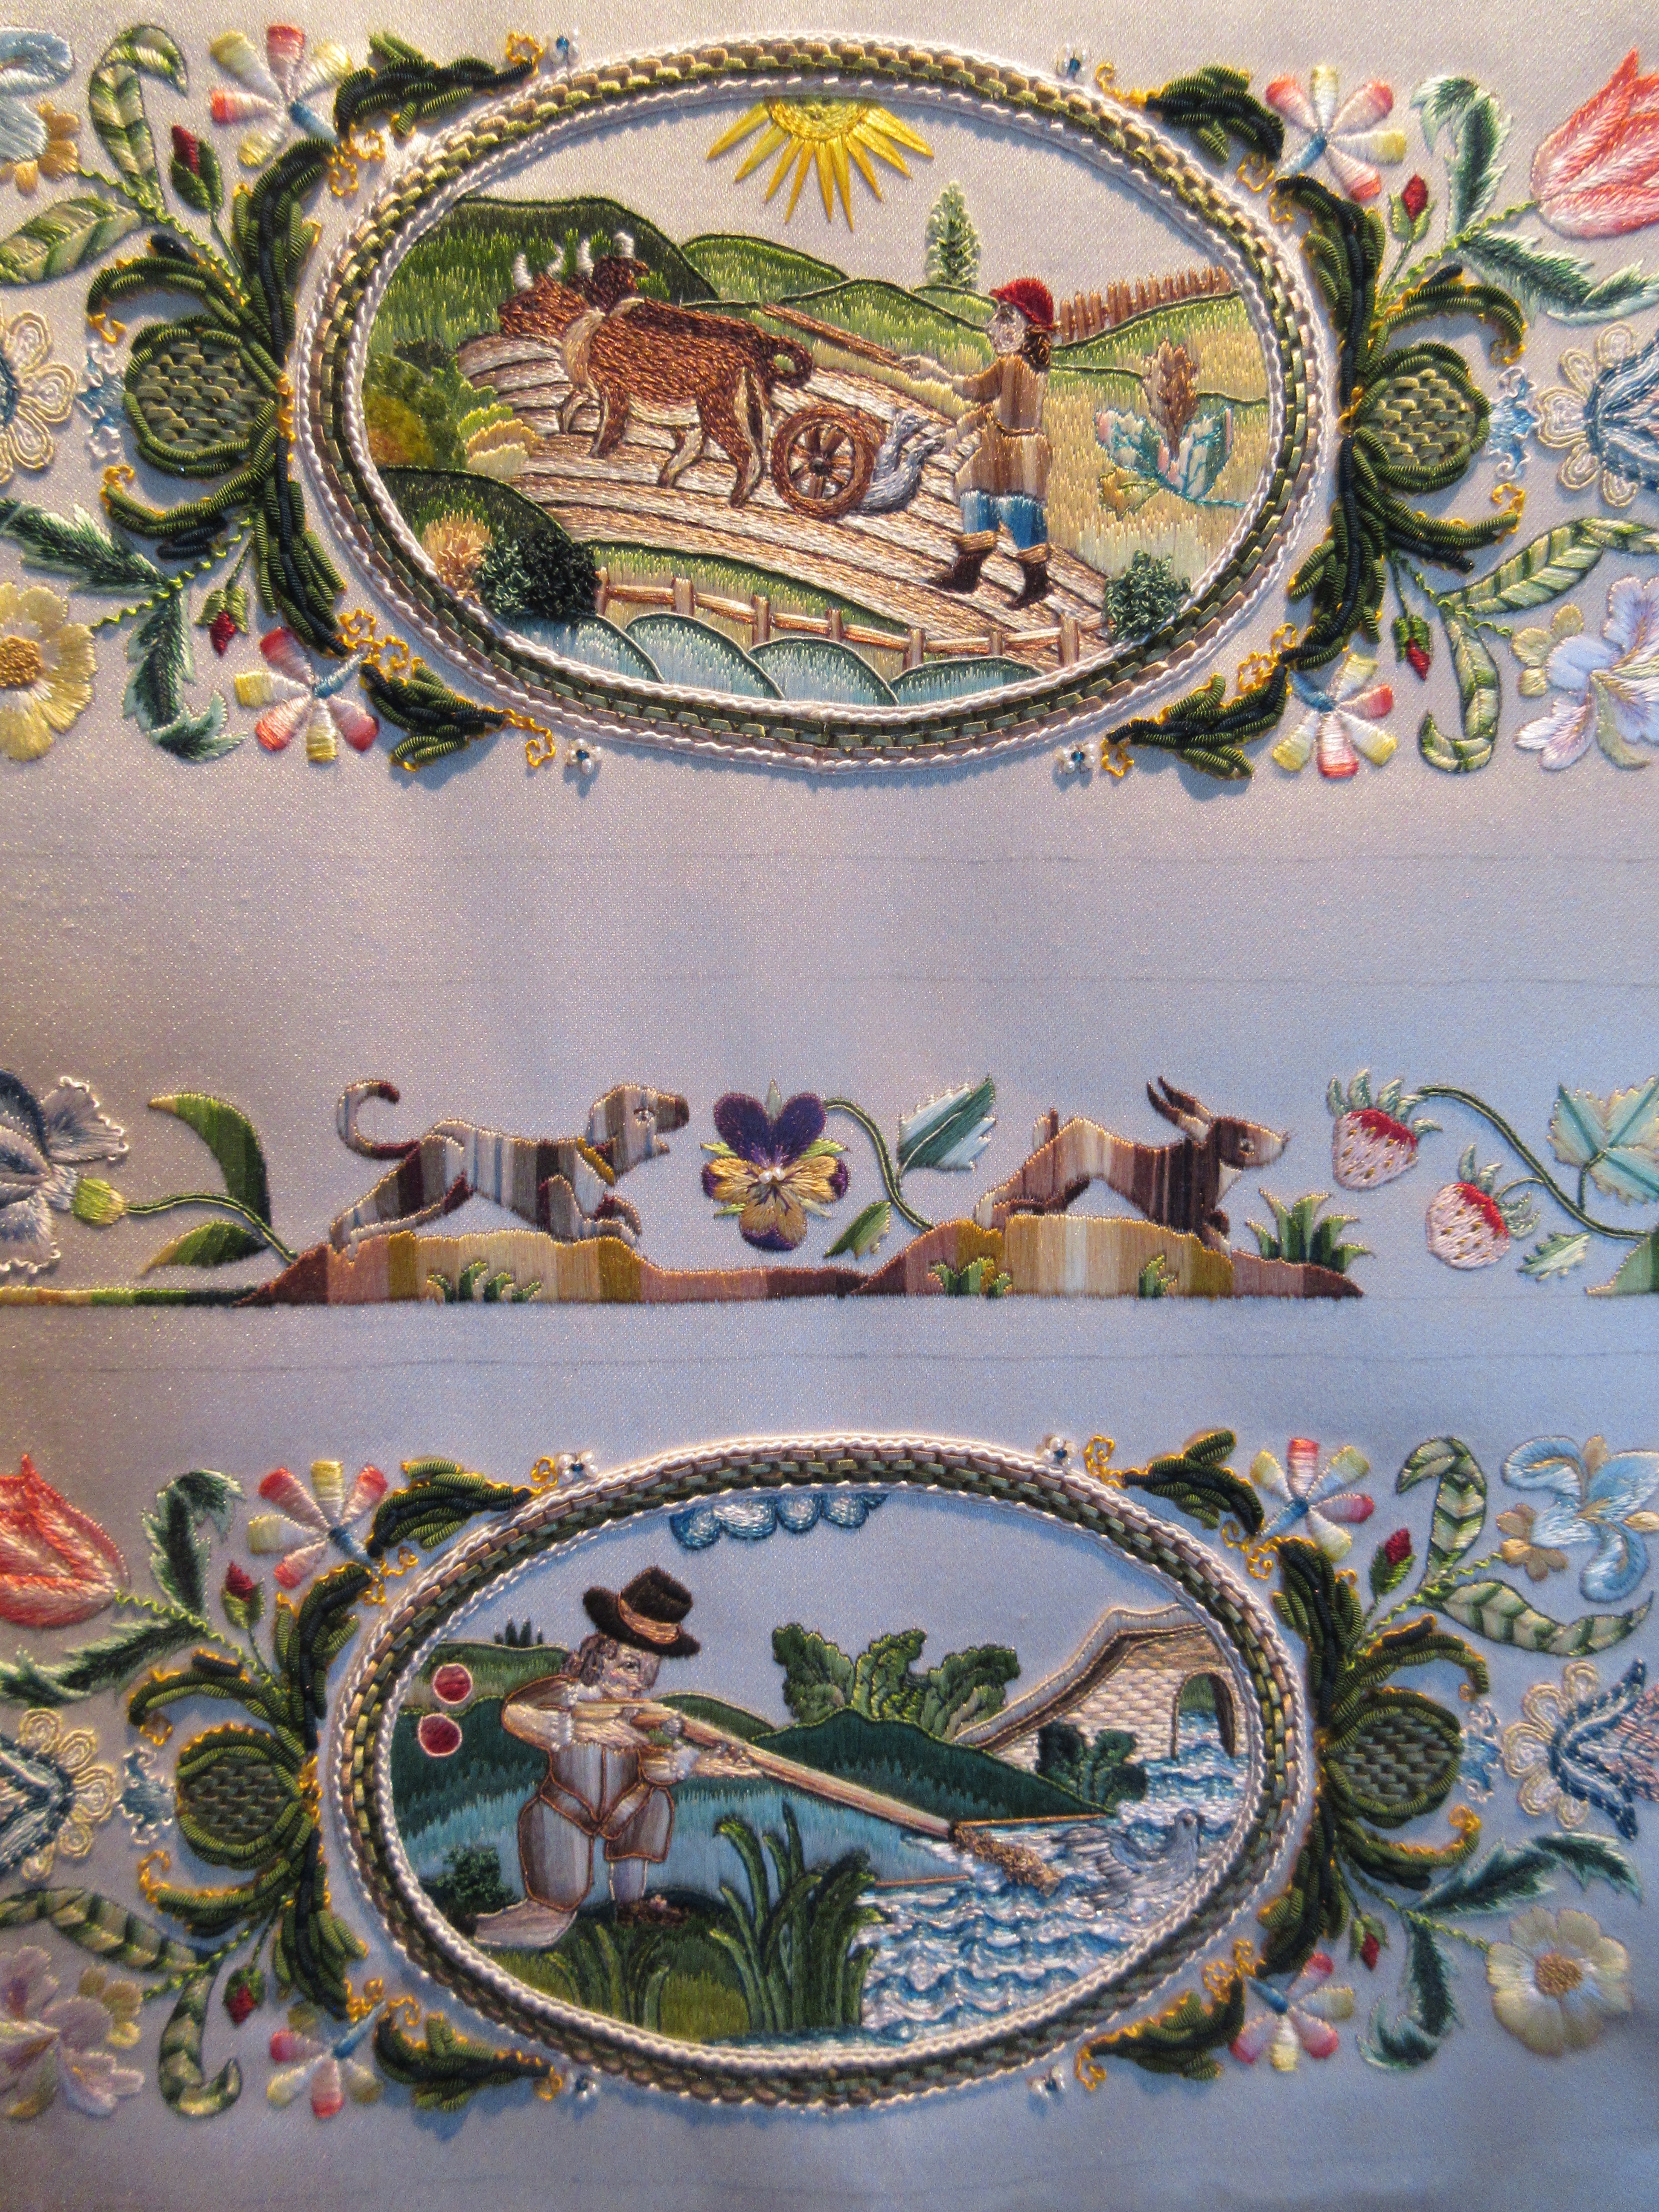
These first few pictures are close views of the plough side. Love my rooster! This casket has been a challenge in so many ways. I have said a million times I hate satin stitch, loathe even more Soie Ovale or flat filament silk....but blast it I really love how they look and wanted to make a flat work casket. I picked the smallest I had thinking it would be a good thing...less area to stitch on. WRONG. Oh my golly was I so wrong.

 I want to stay true to 17th c design and colour, but also the actual stitching techniques used then. I cannot even guestimate the amount of hours I have spent studying period stitching and caskets. I have literally traveled the globe to lay my own retinas on microscopic stitches from so long ago. And they really are microscopic. If you have only ever seen 17th c period stitching from books or a computer screen, you will be amazed at how tiny the motifs and figures are in person.  For example, the photo above. Ok you know its for a frieze...but how tall do you think the hillock under the thistle is? 
Less than 1/16 of an inch!

Stitching on this scale one must think outside the box and scale down ready available materials, as everything other than tram weight silk is just too huge to use.  If there is interest I will make a blog post on the different gimps available and how they compare to each other. For every period embroidery that uses gimp to outline satin stitched motifs, there is equally one that does not. Outlining with gimp can hide a ragged or unsightly edge, and it does look very nice, but I want to highlight another 17th c stitching practice that I have labored very hard over to achieve

Not 
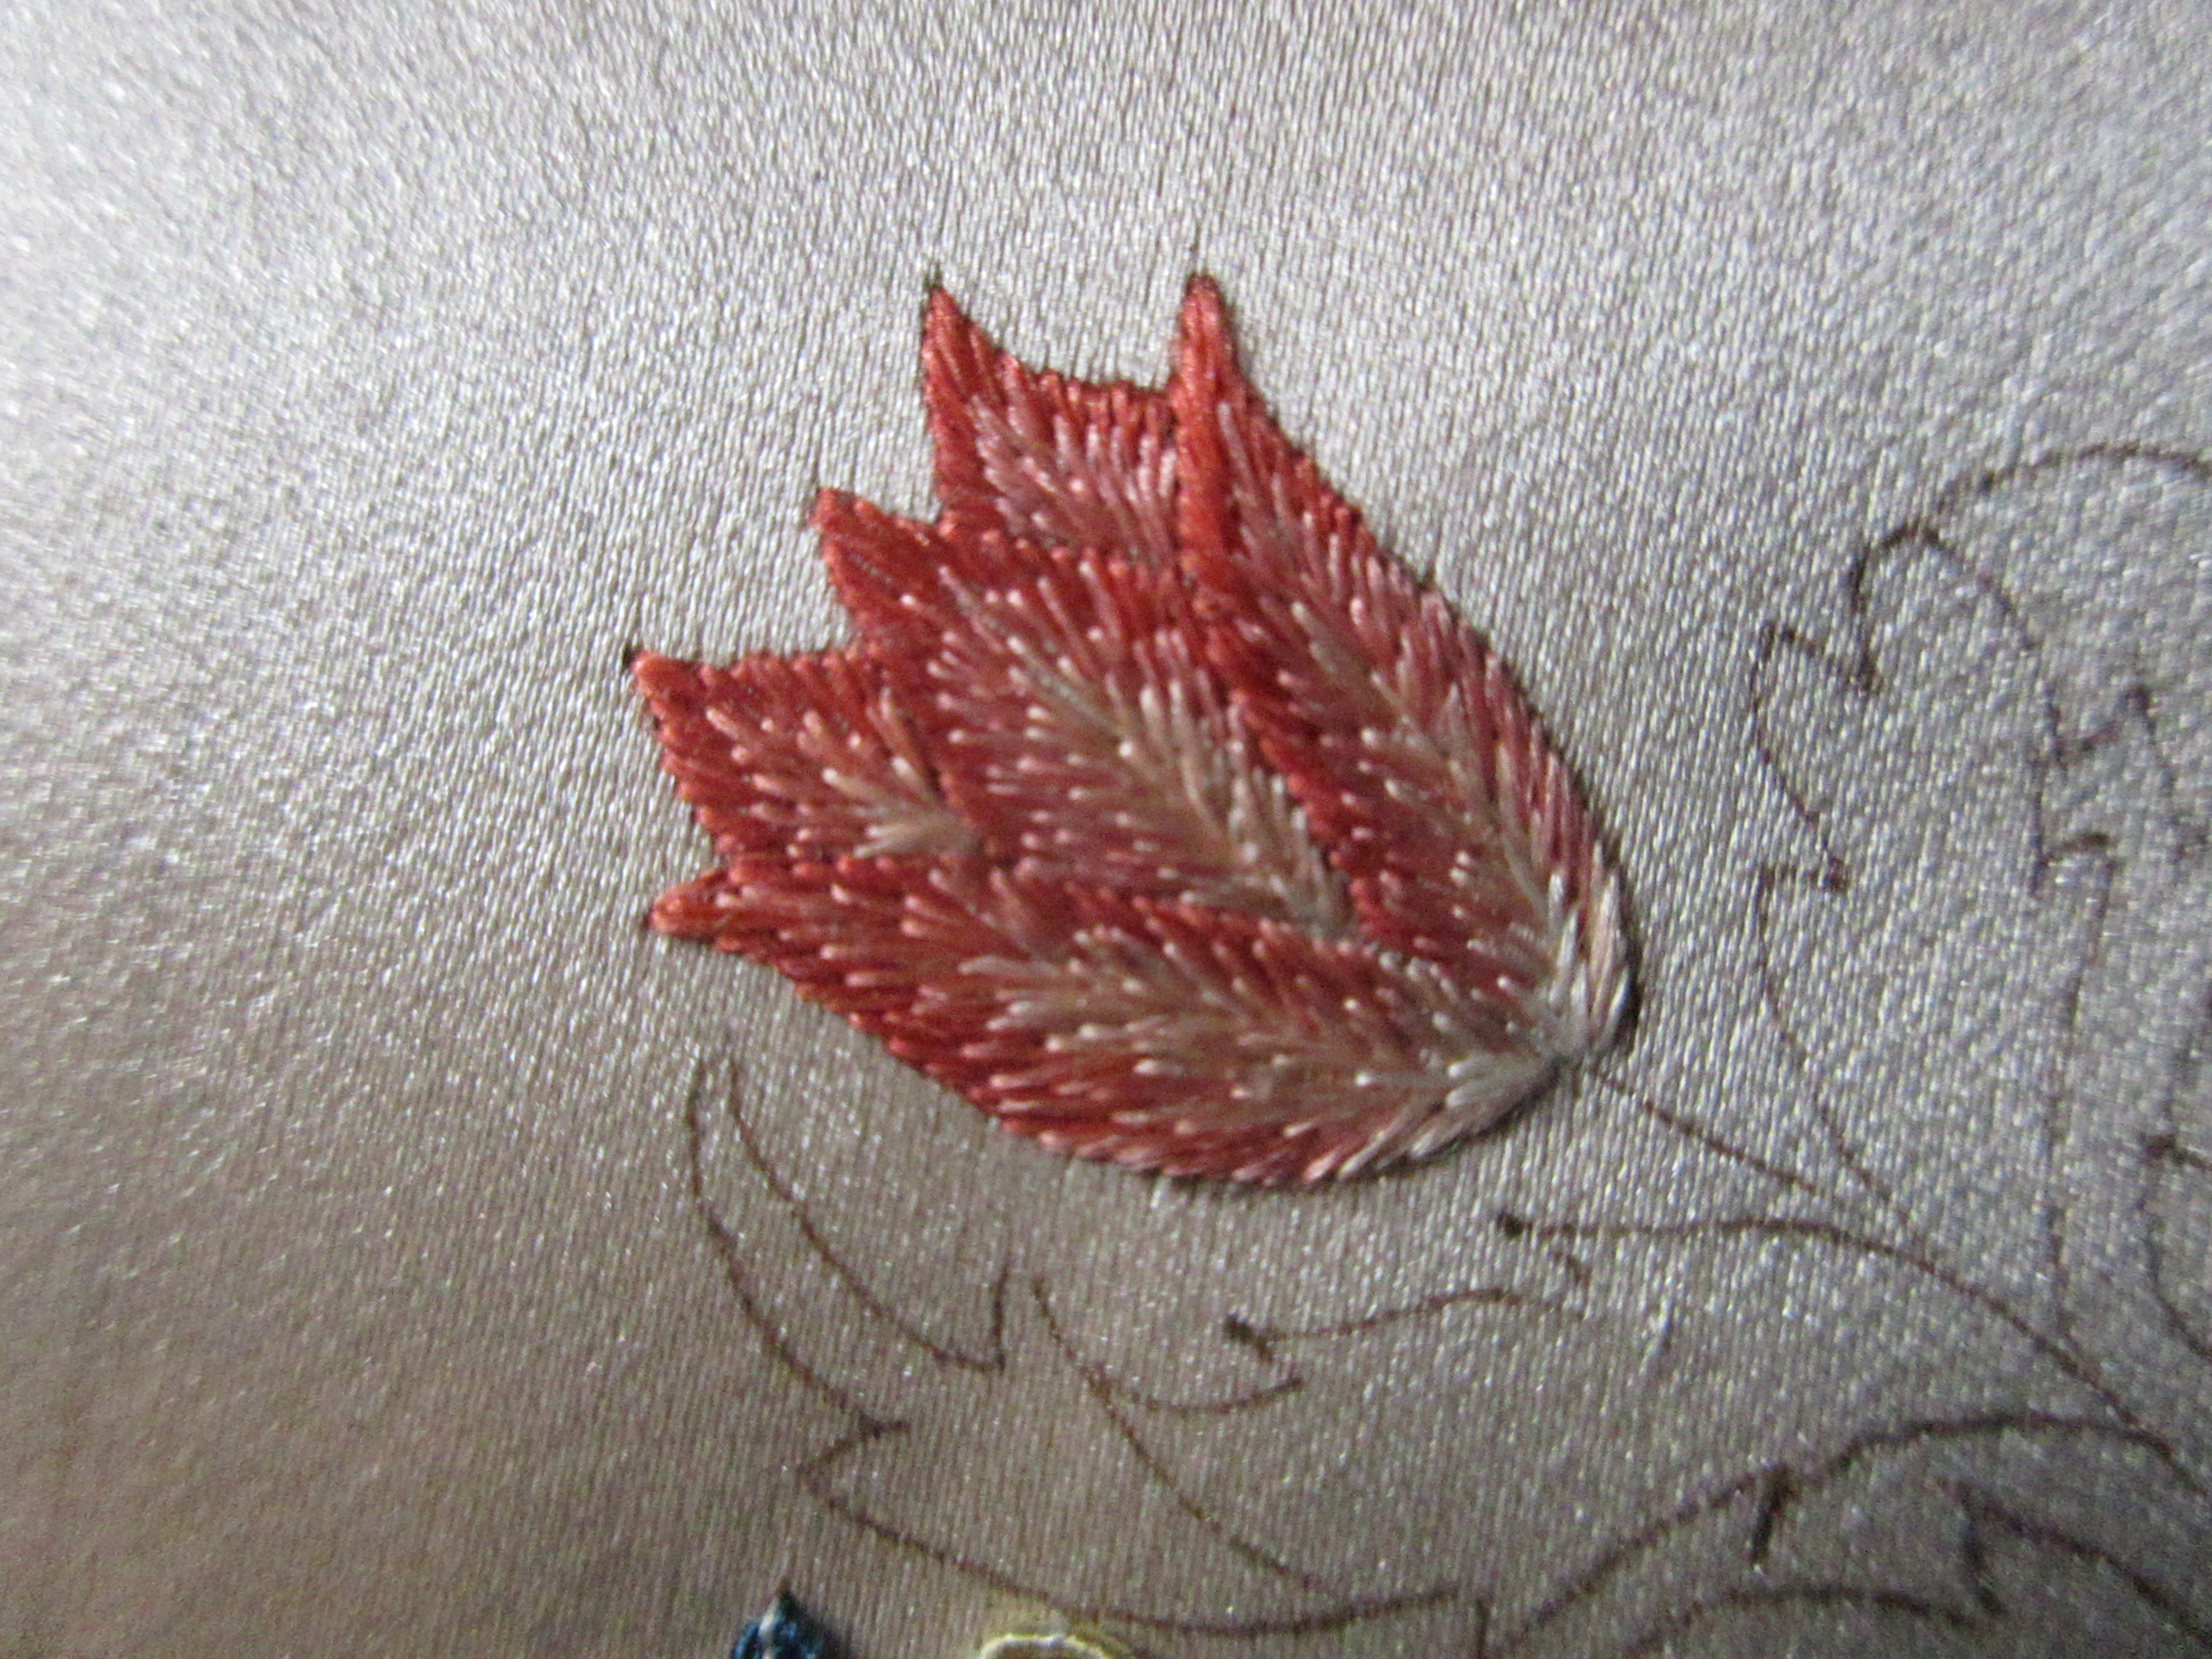
outlining or split stitching the pattern line before satin stitching over it. Today, stitchers will usually do so in a matching/ coordinating thread to help hide gaps between each stitch, giving a nice solid edge to the motif. I actually prefer to not stitch any kind of outlining under my satin stitch. Not only does it add greatly to overall stitching time, if you are a sloppy stitcher, you can also distort the motif. You become a slave to the underlying stitching. One does have to be very careful and place each and every stitch right along side each other, but after a few hundred stitches, one doesn't even think about it. I stitched the iris above with a single ply of Soie Ovale ( there are 6 plies to a strand)...Id say there are well over 50 stitches width wise to the inch. Basically, I would move over a single thread on my satin ground with each stitch. 


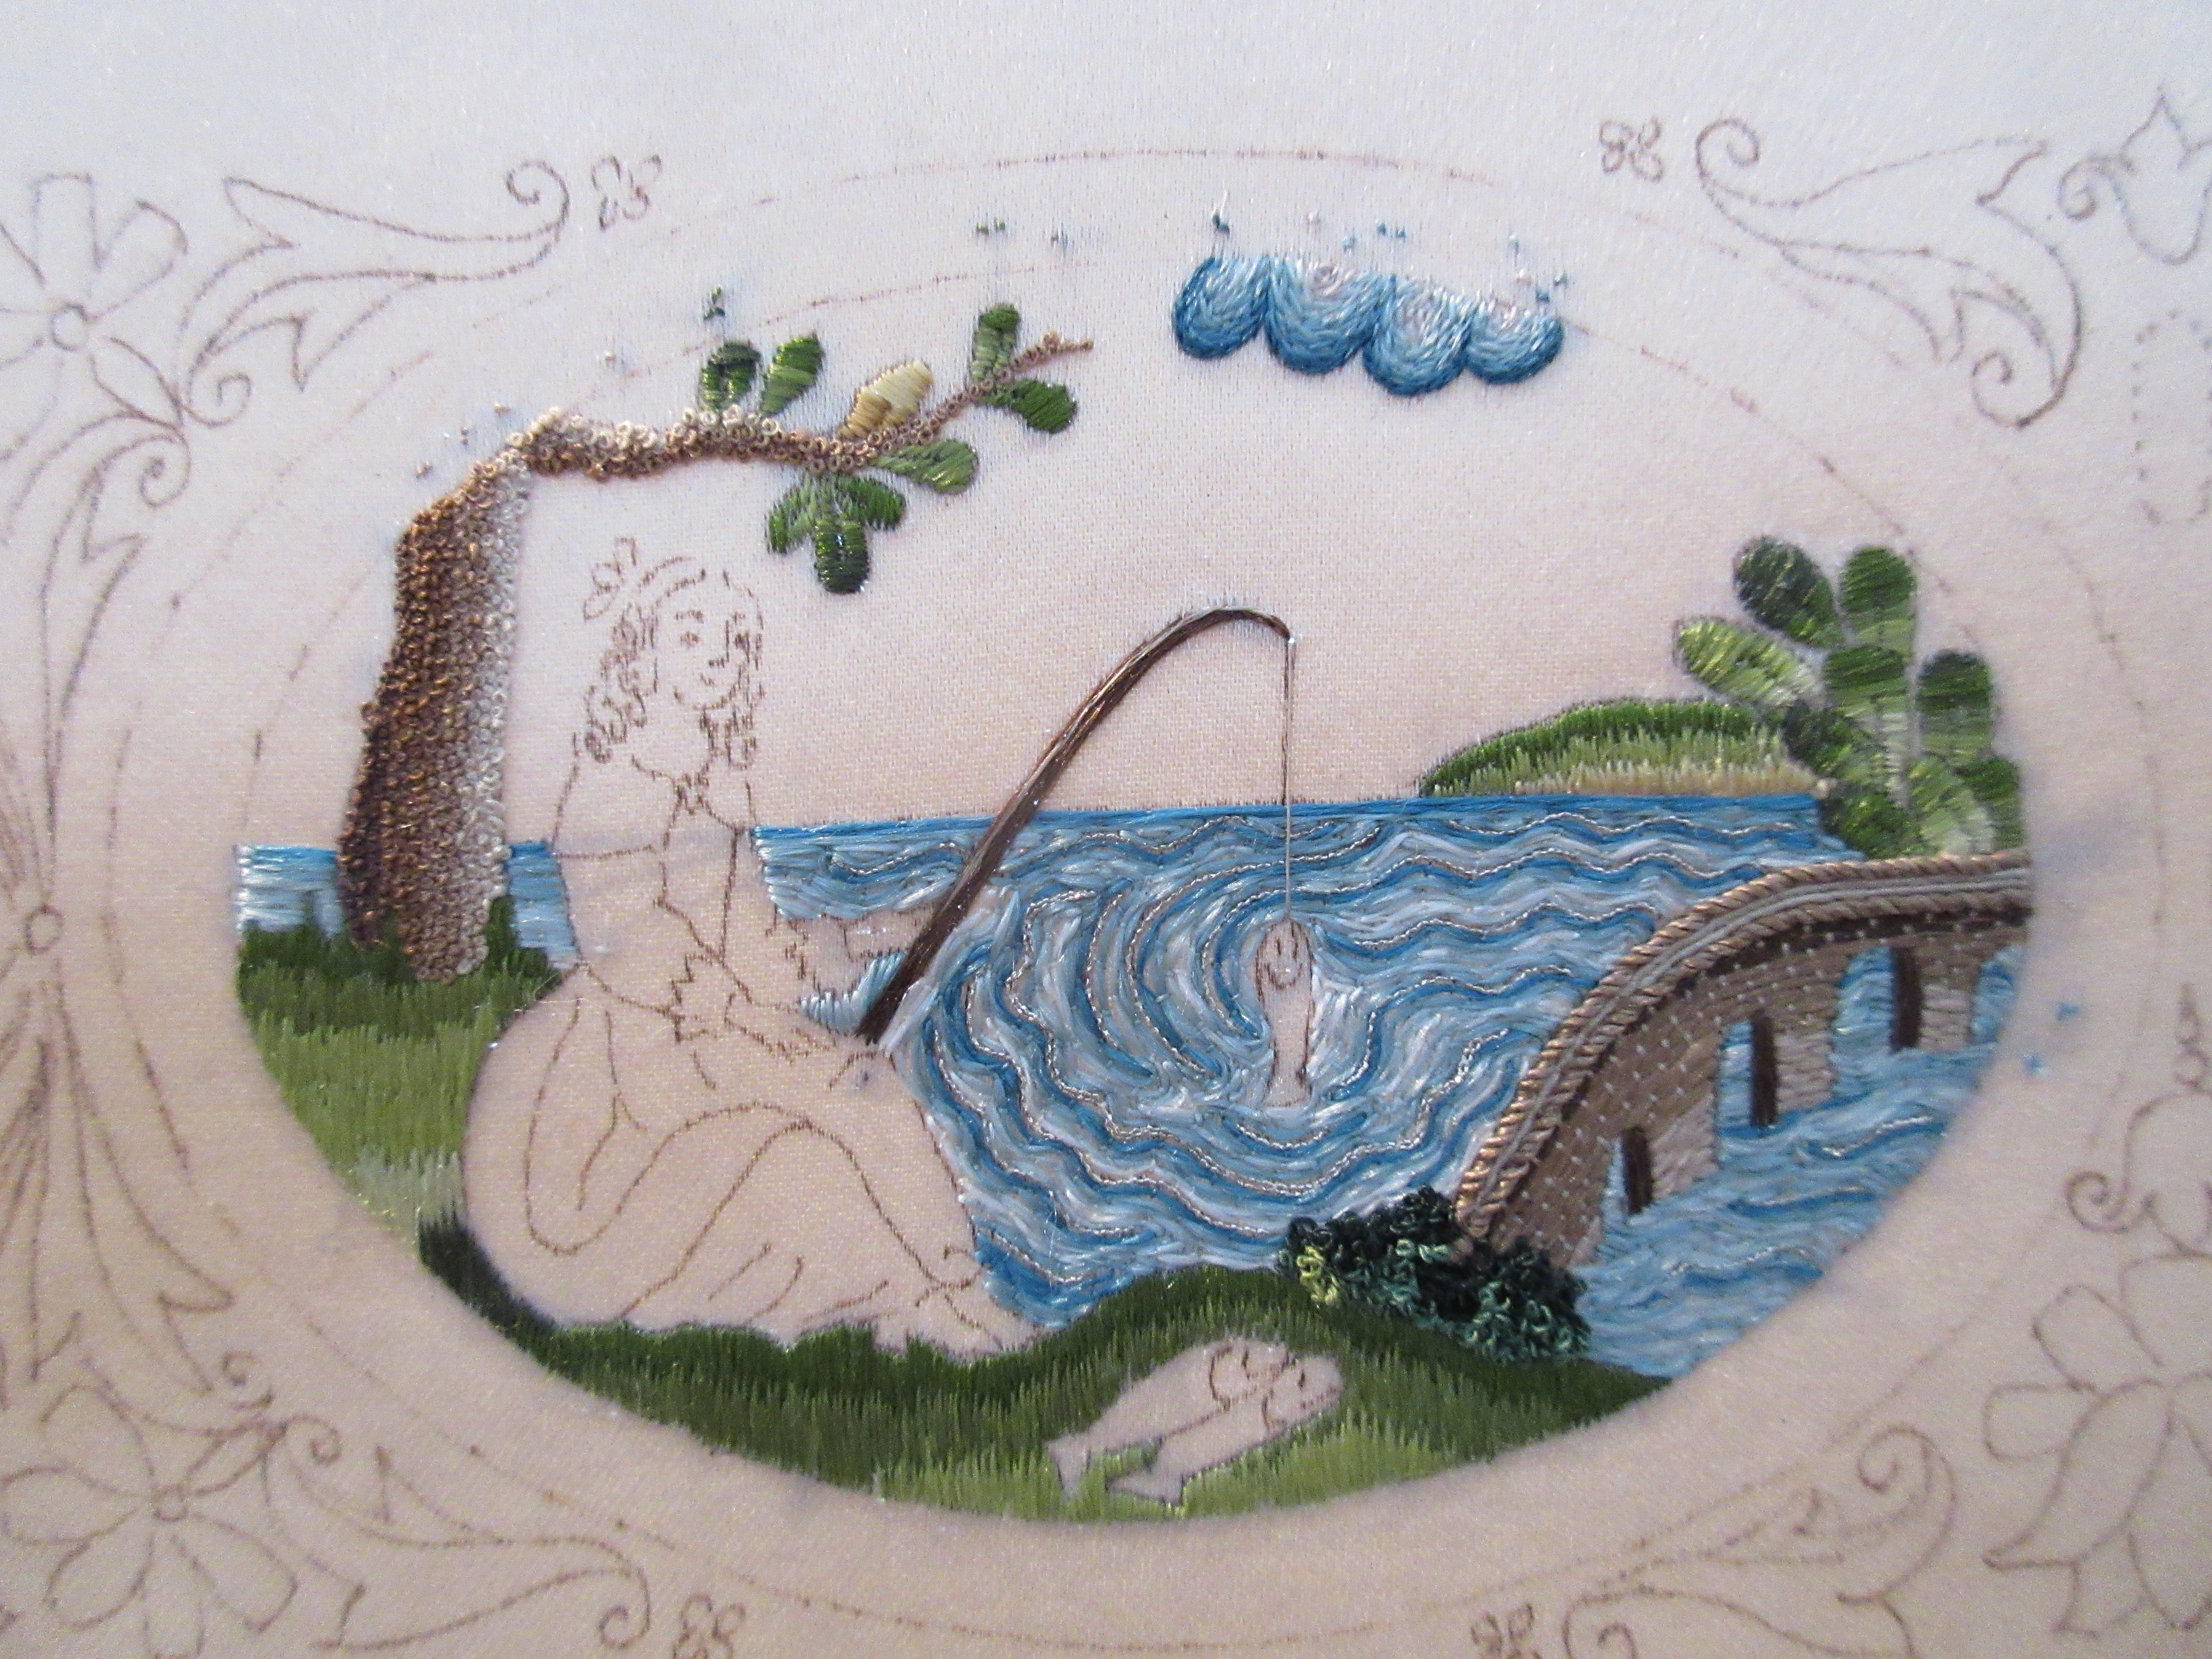
We are on the hunting side now, with the iris, hound, pansy, hare and strawberries


I saw gold hillocks on a casket and really loved them. Including grass blades within them helps break up a huge block of otherwise boring stitching. Its such a small space, I want to get in as many details as I can, without overcramming everything.


The pansy was sooooooooooooooo difficult. It just cant even put it into words. I spent an entire day trying to get this flower to look like how I wanted it to. First I stitched a petal with two plies instead of one, and was not understanding why it was looking so clunky. I thought it was the colour. I was starting on the second petal when I realized my blind melon was using two plies. An hour later I had the petals ripped out and was starting again. Now I had the right scale and was happy with the stitches, but not the colour. Did NOT look right, so out it came again. I wanted them to look like the little violas that sprout along the walkway in the backyard at home, so I persisted. Finally my white center stitches were not showing up how I wanted them to...two plies and they were invisible. Four plies, still invisible. Finally, I decided to use some weensie freshwater pearls. Success!


I had to include strawberries on my hunting side because we always find wild strawberries when we are out hunting. I think I have actually picked some wild strawberries that are larger than the ones on my frieze...

For scale, they are smaller than my pinky fingernail! Like I said, this casket is a challenge, but that's what makes it so much fun to stitch. I literally go to bed thinking about what stitching I will be trying out the next day....what colours, what techniques. If I don't get time to work on it, I actually get a bit cranky(or worse). I really do love stitching & hope you are having fun with your stitching too, whatever it may be!


Saturday, January 21, 2023

Spring Flowers in a blizzard

 Progress on my Scenes of Country Life, or Rural Pursuits Casket

If a person was to have a look at my ort box, they would think there was massive progress on this tiny little casket... but not really! Everything is just so tiny...I really have to make grand efforts to scale down my threads in order for things to still look delicate like I want, and not huge and clunky


 It is somewhat disappointing how long it takes to stitch such a little thing. Maybe I'm just a super slow stitcher? I am working the flowers around the scenes now. Most are long and short stitch with either just one or two plies of Soie Ovale...or a micro fraction of a strand of Soie Perlee.  One must get inventive with the tools available...see Soie Perlee is made from flat filament silk like Ovale...it is a twist of three 'plies'...but if you look further once you get those apart, you will note that each of those three plies, is each made up of three plies...it can be maddening really.

 Here is a peek at what I have named the Devil's Tulip. I had to work four of them on the two panels I'm stitching now, and have another three I am very much not looking forward to doing on the front panel when I get that far... I have several sizes of gimp on my table to pick from, but sadly the smallest size that would have been perfect was not made in the colours I wanted to use...so I had to use a larger size, much too big for the scale of the flower but I used it anyways. There was a million starts and stops, they are really just an absolute nightmare to stitch.

After the Devil's work, I had to redeem my spirit with a couple of regular pretty little happy pink tulips


Last night I worked this little iris. I like it. It's tiny, fits under my thumb, and no, I don't think I have very large thumbs. I am saving all the foliage for last. I have one more iris to work today, I can't decide if it should be peaches or purples...I keep going back and forth. I have the corresponding friezes drawn on above each panel, so I am able to make sure the colours below will complement the colours that will sit above it. It's currently blizzarding in southern Colorado, for us, really the first measurable impactful snow other than a dusting, of this whole fall/winter season. I don't really care for snow anymore, it gives me great anxiety, so its the perfect day to concentrate on spring flowers and NOT look out the window
Happy Stitching!


Friday, December 30, 2022

Happy New Year!

 Details ....Matter!

I hope you had a wonderful Holiday season! My surgery went well and I am ready to bid adieu! to 2022 tomorrow. Life has been a rollercoaster for me this year, but it did not fling me off entirely, and I hope that I can now get on to happier times in 2023. I wish EVERYONE happier times in 2023. I think often of my friends in Ukraine~ Oleksii & his family in Kiev, and Marina in Kharkiv. Oleksii is a marvelous shoemaker, he can make you anything that will fit like a GLOVE~ he made my 17th c shoes for me. Marina is a dollmaker and sells on eBay, in this horrible wartime post from there can take about a month to reach the US, but the wait is well worth it, and they really need our support. It is horrific what they have to live thru each day, and I hope you will visit the links I have provided. 
One of my goals for 2022 was to finish my Scenes of Country Life casket. That did not happen by a longshot, but I am more than thrilled to be able to say it is a goal for this next year. I have managed a little work on it though, if you want to follow more closely, do check my Instagram, as it is easy to post daily pictures there of when I get something done!
Anyways, on to what I want to talk about today, and that is details. If you wish your work to come out neat and tidy in the end, it must start with neat and tidy lines in the beginning. I chose to work this casket all in flat work for a few reasons. While I really love the look of it, I absolutely hate satin stitch. This casket is smaller, so I figured it would be perfect...less stitching. Well truth be told, the simpler something is, the harder it is to hide mistakes. The smaller something is, the more challenging it is to execute well. I gave myself a double whammie and didn't even realize it. Everything about this casket is challenging, very challenging.
So, back to details....check out the grouping of leaves in the first photo. I have finished the satin stitching. 
 
Now check out the same with the addition of tiny veins being added. It makes so much of a difference!

These little scenes are tiny....2x3" roughly...for the entire scene. I am using near microscopic threads to work near microscopic motifs. Behind the head of this pencil, is a dove!

In the original 17th inspiration piece, the foul was a duck. When I was drawing out this panel, I really wanted a grouse here, as we hunted grouse a lot when I was growing up. But, the space was just too tiny. I certainly could have drawn in a grouse, but I wouldn't have been able to stitch it so that it resembled a grouse afterwards, so a dove it became. 

Flat silk work is usually the base layer of stitching on a stumpwork composition. All the fun bits then get stitched on over it. (Some folks skip this step altogether and do not work the shadow stitching depicted on 17th pieces.) The detached needlelace pieces and other fun bits can be used to cover up any areas that got out of hand, or we as a stitcher, just plain dont like. NOT SO if one is working a flat silk piece. It is not entirely satin stitch as I had first planned. I did want some interest and have given myself permission to use a select few stitches that are not satin stitch, but they still must all remain flat to the surface. If you study 17th c pieces, you will actually notice that background, even in a satin stitch piece, is many times long & short stitch. Above is my hunting panel after all the ground work has been finished. It still does not look finished though...


For a proper finish, there must be gimps applied! It is easy to go hog wild and want to put them everywhere, so one must pick and choose carefully. What do you want to accentuate or draw the eye to? That is where the gimp does its job best. I didn't want my strawberries to get lost in the hillock, so I chose a light pink gimp to line them with. They bring back memories of finding a sunny spot on the top of a mountain to eat lunch at after a morning of hunting...and picking the wild strawberries at my feet

Happy Stitching, & I wish Everyone a Happy & Blessed New Year