Monday, August 15, 2016

Museum Monday!

1839 Embroidered Baby Shoes 931.2016.54

 This week's Museum Monday lucky number is 931!  This weeks object is a cuti~patuti pair of embroidered wool baby shoes. Wools were very popular for baby things, but do not easily survive to modern day times~ they were, and still are, a favorite morning, noon or midnight snack for pesky insects. This little pair are in wonderful condition, and quite fashionable for the child who originally wore them.

 Tiny petit point embroidery covers the vamps and sides done in  multi colors of wool that are still, for the most part, quiet bright. Square toes and silk bows on the the throats are common 1830 design elements. Not only is the embroidery wool, but the base fabric is a pretty taupe wool lined with linen. The nap has worn away in some areas, but is still full and fuzzy around the embroidery.


 One could purchase shoes ready made, or work the embroidery themselves and take to a shoemaker to have made up into slippers. Embroidery patterns such as the one above were common in the monthly ladies magazines and could also be purchased. A quick google of 'Berlin Work embroidery patterns' will have you drooling in seconds!
 These little baby shoes are shaped slightly different than the adult pair above~ these have a side seam and additional ankle straps.
 Each strap has a single eyelet hole for a lace to pass thru. These have been bound round in a pale blue silk. Fully lined in linen with linen footbeds~ nothing but the best for this wee one to wear.

 This pair of shoes has an added drawstring that runs round the throats within the silk ribbon binding that tie in the center, inside the shoe. Of all my early children's shoes, this is the only pair like this I have with inner tape ties. While trying to get a better photo of them, I removed a tissue down deep in the toe, and look! I am absolutely thrilled to find a little hand written tag of provenance hidden there.

 Soles typical of the period, late 1830s to early 1850s with very square toes and round heels.


Thursday, August 11, 2016

Exploring an 1820 Mache Doll

Reattaching m'Lady's Legs

 I have a nice stash of damaged turn of the 20th c kid gloves~ they are great for making doll bodies, clothes, shoes~ and making repairs. They are quite common at flea markets, and can be had for pennies, especially if you ask if they have any singles.

 I picked a dark hunter green kid and cut a wide strip with pinking shears~it needs to cover enough area above and below the join to give the glue a nice foundation to stick to. I will position the kid at the bottom level of the dark blue strip already on the leg, and want it to extend at least a quarter of an inch above the join, so that measure is how wide I cut my strip.

  A bit of cotton padding is carefully inserted between top and bottom leg to cushion and solidify the joint.

 The glue I am using is my staple~ Gane Brothers Yes! Paste. I love this paste~ its acid free and archival, goes on where you want it, and stays there. (This is the same glue I use to mount my embroideries).  A thin layer on the back of the strip is all that is needed~

 It is wrapped around once, being careful to keep the seam to the back. One thing I  love most about this glue is that it grabs immediately~there is no need to sit and hold something forever.  I was also careful not to cover the scallop edge of the earlier strip underneath of it.

 A quick little ribbon bandage tied around to keep all tidy while I attach the other leg the same way. It will get a thin layer of cotton wadding as well at the knee.
 The cotton wadding also helped to adjust her left leg to the correct length~ so standing both her feet touch the floor evenly. (They don't look the same length in the picture because the right leg is up higher than the left on padding). If you are repairing legs like this, you must also be sure to keep the toes off the edge of your surface, and be sure they are pointing forward as the glue dries.

Old legs ready to go walking again! These old kid bodies are so rigid and stiff~ aside from the years of age, the tannins in the wood fill really dry out the kid and make it brittle. They can certainly not be posed in any way!  If I would have attached her legs in line with her upper thighs, her feet would be about 8" apart...so the natural thing would be to grab the thighs and squeeze them together....which would result in two legs broken off at the hips most likely. So I adjusted the angle at attachment, and she does look slightly bow~legged now, but not noticeable at all with her pantaloon on, and standing her feet are nice and straight, and together!

Tuesday, August 09, 2016

a Lil Peek at My Flat Top Casket

A minute here.... an hour there....
 Summers are so busy its hard to make time to work on something for 'me', so I have to resort to sneaky measures sometimes to get anything accomplished.  I have all of my panels for my flat top framed up on table stands standing tall like little soldiers, patiently waiting for me to stop and work a minute or two. For me, having what I am currently working on out...out on the counter ready to go at a moments notice...is the only way I can squeeze in me time.  If I had to put all up and then drag out everything whenever I felt like stitching....Id really, really, never get anything done! Sometimes I can only stand and stitch maybe 5 or 10 minutes....but before long, those 5 or 10 minutes have added to the 5 or 10 I did the day before and so on........and suddenly, here is a little flitter~fly butterfly staring back at me! I am pleased with how he came out...even dressed in pink, he is a he, and quite a dapper little fellow....
And by little, well, he is little! Here is my fingernail for size~ his wings are wired and can be positioned how ever suits him best. Working with this tiny of antique beads has proved to be quite challenging. I know what I want to make, but no matter how close I get with my magnifiers, its so hard to see, and hardest I have found, is just holding on to the tiny detached pieces while I am working them. Just about a zillion or so more beads, and casket will be finished ;)

Monday, August 08, 2016

Museum Monday!

1865-70 Chemisette/ Corset Cover 59.1999.11
 This week's Museum Monday lucky number is 59!  (If you would like a hand in picking next weeks Museum Monday piece, pick a number between 1-950 and post it in the comment section below!)
 Often referred to as a Chemisette, this week's object is a white cotton corset cover. Just as it's name suggests, it was worn over the corset, and would have had a matching petticoat(s) and or pantaloon.
Short cap sleeves, dropped shoulders and the little stand up collar date it to the late 1860-early 1870's era. Along the front hidden button closure are vertical rows of tucking and machine made  whitework insertion laces.
 Back is cut in one piece with a slight gathering to the wasitband at  center back.
 Both hand and machine sewn, the same wide machine made whitework lace is used on the sleeve cuffs, collar and front of the bodice. All seams are piped.
 Under the central strip of lace on the front is a hidden front button closure~
 Hand worked button holes and pretty carved mother of pearl buttons are a picture of femininity. The edge trim of the wide lace has been left extending out from the center seam down into the waistband~ a very simple detail, but again, it adds to the feminine feel of this piece and gives a real delicate look.
 All of the rows of vertical tucks are machine made~
as are all major construction seams~ sides, waistband and collar, and lace insertions. Looking at the back (I left large so you can click to see the details), all raw edges have additionally been whipped by hand. I like to use this piece as a perfect example of how machines were used in early years for the basic construction of a piece, but then details and finishing were still patiently, and expertly done by hand. 

Friday, August 05, 2016

Exploring an 1820 Mache Doll

 But First~ Her Pantaloon!
Long ,lean, and quite grubby...but still, utterly charming. To answer before you all ask~ NO! I will not be washing her clothes. Unless its something horrible or distracting, I never wash any of my antique textiles. To me, doing so removes a certain history of the piece~ the age...the patina. Grubbiness and stains can tell how a piece of clothing was worn...in come cases, can be the only way to determine what was worn as the front or the back of a garment. Here the grubbiness of the bottom of the legs shows what length her gown and chemise were worn at. Fitting to the period, legs are long and straight, reaching down to the ankle. Front is closed, with a full back opening.
 The opening to the back, which extends from waistband to the crotch, closes with a single hook & eye. Note that both edges of the opening are salvedge edges.


 The bottom of her 'trousers' as they could have also been called, are covered in a band of netting. So very plain, yet it makes them ever so much more feminine and delicate.

Wednesday, August 03, 2016

Exploring an 1820 Mache Doll

A Most Uncomfortable Bunching.....

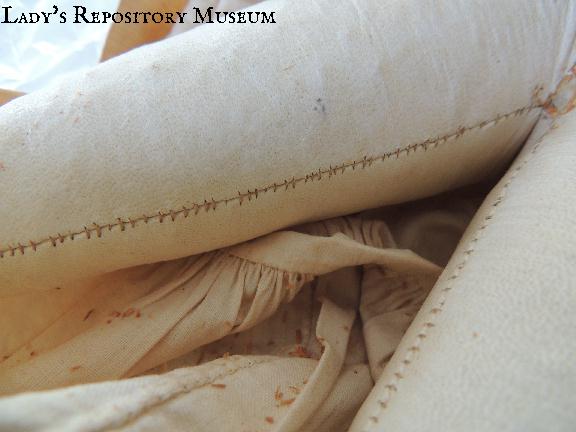
   Underneath her blue petticoat, dollye wears a comfy linen calf length chemise. Here we can see dainty hand stitching at the side seam and hem. In many cases, girls learned how to sew stitching clothes for their dollys~ exactly what they would wear themselves, just smaller.
  Unpinning the top of her dress bodice, just look at what this poor girl has endured for so many years.  This bunching is the sleeve of her chemise...its fullness too bulky to fit down into the bodice's sleeve. I have often thought this would happen in real life, as the armcyes of the gowns in this era are set so far up tight under the armpit...even with full gigot sleeves, the actual arm opening is not large, quite tiny actually. Poor girl~ the chaffing she must have!
 With bodice back open, the chemise can now be seen fully~ there is no front or back opening~ just a really wide boat neck, with no tape ties or drawstring to gather the fullness. Her bodice fits so very tightly, I am not comfortable removing it, so have decided, since I can easily get to the waistband of her pantaloon now, I will leave her bodice and chemise right where they are.
 Pulling back the fullness of the chemise, the bottom of the back cloth torso covering can be seen just above waist level.
 Her chemise is full and loose enough that I can easily unfasten the hammered hook and eye closure at the waistband of her pantaloon.
 Carefully shimmying them down to knee level reveals a clean leg break just above the left knee.
 Her kid body is all hand stitched, and stuffed hard as a rock with wood chips.
 Carefully removing the pantaloon further, reveals that her right leg is literally hanging on by a single tiny bit of leather. The red pinked edge is a paper strip. This covers the joint between the wood leg and kid body. On all the original dollys I have examined, I have only ever found paper over this joint. Our dollye has an added dark blue cloth strip with scalloped edge~ still well down onto the wood of the leg, so I think it is original. Over the top of this, is a blue kid strip, which must have been a period repair.

  Some refer to stuffing in these old bodies as sawdust...but clearly this is far from being 'dust'. Tightly packed in a circular fashion, little wood chips are so absolutely jam packed in there, that thankfully,  hardly any have fallen out.
Her pretty blue shoes with gold decoration on the throats. Now to get these legs back on our girl.....

Monday, August 01, 2016

Museum Monday!

1830 Girl's Roller Print Apron 300.2005.11
 This week's Museum Monday lucky number is 300! Sized for a toddler, this little apron is just about as precious as one could ever imagine. Aprons were an integral part of the 18th & 19th c wardrobe~ along with pinafores, they helped to keep the gown underneath clean. Such utilitarian  pieces of clothing just did not survive~ when Mommy's apron wore out, it was cut down for daughter to wear, or used for household rags and bandages. If it was made from a pretty print or silk, it could have the good sections cut out and used for quilt or pocket patchwork. Indeed, being able to share this rare survivor with you is an absolute joy, for not only is the apron beautifully and artfully contrived, but the shoulder straps are still attached!  It's hand stitched from a lightweight border print muslin, with two front pockets and pointed shoulder straps.
 Each shoulder strap is made up of a single large triangle. With the orientation of the printed border and corner motifs, along with the small size of the apron as a whole (measure from top of  waistband to hem is just 13"), I believe it to be cut from a large kerchief or possibly a head covering, such as a turban. Cloths printed for use as head wraps were very popular in the late teens and twenties.  There is a little blush pink silk bow atop each shoulder.
 The brown areas of the design have been cylinder printed with blue areas on the seashells either block printed or penciled on by hand.
A precious, wonderful scrap of cylinder, (or roller) printed cotton was used for the outside of the waistband~ its lined in plain muslin and pins closed in the back. This same print also was used for the piping that edges the pockets.
A common problem with fabrics printed using iron mordants is pattern loss such as above~ if you look closely you will see holes where the fabric has totally disintegrated away where the brown has been printed onto the fabric.
A technique known as Broiderie Perse was used to decorate both pockets. It was very popular in the early to mid 19th c for making quilts and coverlets. Motifs were carefully cut from a fancy pattern'd cloth, usually chintz, and then rearranged and appliqued onto a backing.
Perfect tiny and close stitches have kept the edges of the appliques from raveling or lifting. The little girl who once wore this quaint but beautiful apron was surely the envy of all her piers!