Tuesday, May 19, 2015

Ladye Water & Some Special Bling


Water side Panel Ladye

  When working stumpwork figures, it is good to study your pattern and visualize it in your head as finished~ get a paper and pencil, and list each element of the design you wish to work, then you can go back and number them in correct order~ for example~ I cant attach Ladye's left hand until I have worked her vessel beneath it...and her right hand cannot go on until I work the fish~ but, the fish cannot go on until I have worked the dress underneath of it~ ect ect. It helps to write down a list, then you can go back over it and make changes as you think things thru. I worked Msr. Fish first because I was bored one day, and just really wanted to make him! He is worked same as the little one in the water, with real fish scales and an antique white opal bead for an eye
 Ladye's shoes were worked in a dark putty ovale over shaped padding, with grey gimp rands and soles on the heels. Little cream silk rosettes with red beads adorn their throats
 The bottom of her skirt was worked in stages like Earth Ladye's
 Once the lower skirt was complete, I worked her vessel, then attached her fish and both hands. Gimp was added to her bodice to define her stomacher and waist tabs
 Sleeves, cuffs and falling band were next, hers I trimmed in gold squiggle plate with antique gold lace on her cuffs
 Even after her hair and string of pearls were added, she still told me she was not quite complete and wanted a brooch...something special she said. I got to thinking....and yes, indeed, something very special ....I had just the perfect 'thing' so I was off to dig thru drawers and boxes until I found it
  This was absolutely perfect. It was one of my Mother's earrings, 14k gold and opal~ I always loved it when I was little, she had lost the other at some point and had this in a jar....when I left home to join the Navy...or perhaps it was when I got stationed back in the States...anyway, at some point I absconded with it.  Several times over the years I have thought it would make a nice dollye brooch, but never the right dolly needed it~ but when Ladye Water saw it, oh yes, she had to have it
~
I snipped the back off and stitched it on with gold silk, its just perfect and makes this panel even more special to me now....so if you have some special little bit of broken jewelry....a button, a single earring....a broken bit of necklace or ring~ you may look at it differently and try and figure out how you could work it into a special piece of your embroidery.

Sunday, May 17, 2015

Two of my Most Favorite Things....

I Do Love My Lilacs...

But not near as much as I love my Lumpy in the Lilacs!


Wednesday, May 13, 2015

A Long & Short Stitch Stumpwork Ladye

 I have been so busy getting our oldest daughter moved into her first house, and getting the childrens end of school things taken care of I haven't had much time to stitch, but the inside panels are coming along slowly~ thought you would enjoy seeing the Earth side Ladye come to life~   On all my dollys, I start with the shoes first~ they're my favorite! Ladye got a nice sensible pair of humble black silk shoes with brown silk rosettes on the throats. Next came her petticoat, all done in long and short stitch of coarse to match the rest of the panel, and trimmed at the hem with a bit of antique silk and silver metal cord.
 

  I love making stumpwork figures~ they are like a big jigsaw puzzle! They may look intimidating at first, but are quite easy~ just start with the layer furthest back, and build up from there. One of the fun things is making the clothing~ weather you are working in a ground fill or needle lace, is experimenting first to get the shape of the separate pieces so they will give you the look you want~ you can work as simple or as elaborate of clothing as desired. I like to use paper towels to draft my pieces~ I fold and manipulate them to my desired effect, then transfer that as my working pattern piece. Above, I am holding the piece that will be the very bottom skirt hem, that is gathered in folds around by her feet.
  The pieces are transferred to dutchess silk satin and worked separately~ I like to work as many pieces as I can at once, so make sure they all coordinate. One must be careful tho~ with a high relief stumpwork you must be patient and work one piece, then attach it, then draft the next piece. As you move along thru the figure, the pieces worked below will affect and shape the pieces above it

 After her petticoat, the side of her skirt came next, padded to full out its folds.

  The next piece is the bottom skirt, here, I have worked it in long and short stitch, then cut it out and ironed the seam allowance under around the required sides
  If you are thinking what a mess of pins....YES! WHAT a mess of pins it took to tame this monster!!
 Be sure to work the base/background  underneath of hems and such, because everyone wants to peek under to see legs!
 Ladye Earth all finished~ She holds her apples in her hand and has silk wrapped purl over a long and short stitch base for hair. I sculpted all the figures for my flat top, and love love love how they come out~ so delicate and the mache is light weight enough that they wont drag the panel off the casket!  I think she looks happy~ I am sure happy with how she came out~

Wednesday, May 06, 2015

Camping at Lathrop State Park

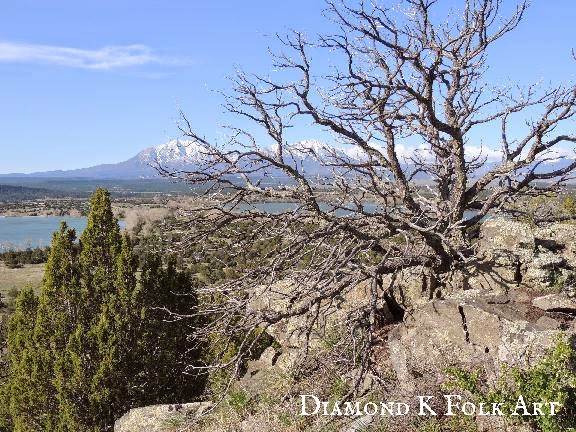
  A few weekends ago we went camping with friends at Lathrop State park here in Southern Colorado~ since I have so many Kindred Spirits around the globe, I thought Id share a little of our trip with you~ I took these pictures on a hike early one morning~ above, you can see alot of the park, both Martin and Horse Shoe lakes, with the Spanish Peaks in the background. We live just about same distance from the peaks, but on the opposite side, behind them, so not a far drive at all, just about  30 minutes.
 Pip wanted to go with me, she was so excited! Off we went up Hogback trail~ its not far, makes a nice 3.5 mile loupe. I love trees~ especially the gnarly oaks when they are dead, or like these, no leaves yet.
 Here we are on top of the trail, with the Peaks in the background. I must admit, Pip likes chatting it up, so this time, we didnt see much for wildlife~ a couple REALLY nice roadrunners we spooked that were too fast for me to get a picture of~ theyre so pretty
 Did see this Jay out singing his morning song for all to hear
 And found one clump of barrel cactus that were blooming already! There are some really old clumps up on the trail~ 100s of years old..this one growing out of a rock crevice
 I usually walk the Hogback a few times a day...this day, I saw it twice, and then ran around both the lakes...that day was over 11 miles on these feet!
  Lovely olde Cedar~ wonderfully spooky looking...and yet peaceful at the same time. I love to lay on the ground under a tree, and admire the view straight up.

  HA!  had to include this picture~ remember how excited Pip was to go? At the top she was still pretty energetic....this is about 3 miles in, when I asked...pleeeded....with her to go up the Jackson trail...she was so sorrowful~ "Mom Im so tired" she said~ "another trail???"  ....it was just a little one ;)
 So after being all worn out, she had to go fishing of coarse...so she wasnt really so tired after all....  we cooked her fish she caught in the coals of the fire that night...it was a good day!

Tuesday, April 21, 2015

Slow Progress on my Inside Lid Casket Panels

Here Fishy Fishy Fishy.....

  I am slowly making progress on the panels for inside my flat top casket lid.  This is the 'Water' side, with lower mound and small grotto. My plan was to work the inside panels in all long and short stitch, keeping them as flat as possible....but then, it happened. The coral told me it wanted to be raised.....
 And then things snowballed from there....I had planned to edge the water and mounds in silk gimp, with silk gimp waves....but then I found myself making real silver striped silk gimp for the waters falling from her jug and the mound....and well, falling water must have drizzle stitch splashes....so do you think I could leave the lil fish flat? No. Of coarse not!

  Ahhhh lil fishy. I spent the entire day trying to capture what my mind was seeing. Here he is before adding the little drizzle stitch water splashes. The majority of the 17th c stumpwork fish I have studied, all have coral color fins, so he got the same.
  After adding real fish scales to his belly and the water splashes. something was bugging me ~ I kept thinking it looked like he had a big bow on the top of his head...something was awry but it wasn't until I took this picture that I realized what it was~ his tail! If he has coral fins, he must have a coral tail, so off it came.
 This picture gives a good idea of how tiny he is. I don't think I can stitch any smaller than this, at this scale, I am literally all thumbs. I don't have enough fingers to hold all the tweezers I need!  This is the second  coral tail we tried, the first one was just hideous!  I like this one, but it was just laying there, I couldn't pose it, so off it came again too.....
Turns out, as tails go, the fourth one is the keeper. I worked woven picots over a wire edge to match the picots of his top fin, and now his tail curls and splashes just how I like it too.  I'm on next to Earth's basket of fruit~ I prefer to work both lid panels together, so they get finished at the same time....whenever that will be~ I can't wait to see them finished and in the lid!!

Tuesday, April 14, 2015

New Dollys in Print & on ETSY

Prims Summer Issue~ in stores May 1st~

  Moira & Penny Poppet would be pleased to meet you in the next issue of  Prims, available for order now from Stampington.com and available in stores starting the 1st of May. I am so humbled and honored to have been mentioned on the cover!  To Celebrate and go along with my story in the new issue, I have made some new little poppets that are available in my ETSY store

 If you would like to say hello to little Lady Bird (above) and her sister Lilleth,   just click on the link to my ETSY store in the sidebar

Sunday, April 12, 2015

Pretty Casket Scent Bottles!

Always Keeping Ones Eyes Peeled......

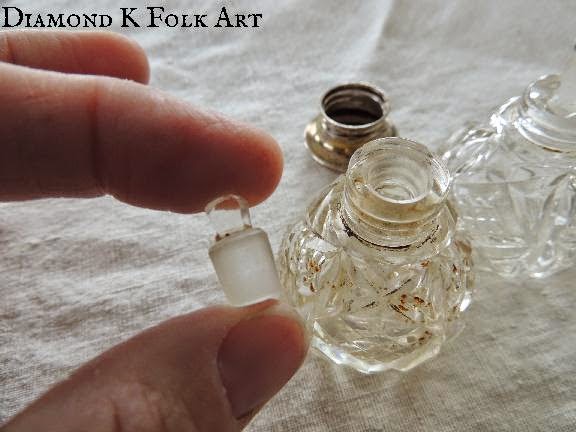
  Because you just never know what you may find one day!  I wasn't looking for them...they kind of found me...  Arent they wonderful!????  I think first decade 1900, but they could be a little earlier, their caps have several hallmarks so I just need to get the time to look them up. They are a matched pair of wonderful little cut glass scent bottles
  And how could I tell the God's of Providence no, they even have my initial "K" engraved on the sterling caps!!!!!!!!
 Each cap screws off to reveal an inner ground glass stopper. Whatever was once in this one still smells absolutely devine~ which is why I didn't wash out this bottle!
 If you are looking for antique scent bottles for your casket~ do notice the difference between the flat top and double casket compartment sizes~ the flat top's are way deeper so you can fit taller bottles in that one. Here are my bottles in the double casket~
 And here are same bottles pictured in the flat top~ you can see they fit well beneath the top of the cavity.....so tho I had my flat top in mind when I bought these, I will use them in the double.
 Not only did I find a wonderful set of antique scent bottles, I have also been collecting antique trims~ I will use the gilt over silver tape on my flat top~ and when I found the trim in the very front here, I nearly fell over~ bought the entire card. Its a near exact match to our interior tape trim~ this varies between 6-7mm wide.  Its very early 18th c or before, cotton woven with 2 wide silver plate strips and to each side of that 2 narrow silver threads~ looks much like elizabethan twist. The card itself too is so full of character,  it was completely wrapped in paper and it wasnt until I had all the trim off to measure, that I realized it is a single wide slab of hand sawn wood  :::swooon:::::