Tuesday, January 31, 2017

Flat Top Casket Progress

A new Love....
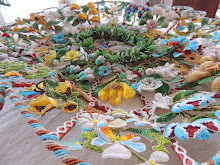
 I really love working on my casket~ I wish I could work on it all day, and some of the night, every day & night! It really is that enjoyable for me. Stumpwork is the ultimate puzzle in my opinion~ one has to figure out how to make realistic (or not) representations of what we have seen in the world~ what part needs to be made first....what stitches one will use...what colors one will use~ forget trying to work a 3 page calculus problem to give you brain a workout...just try and figure out how to make a squirrel out of beads! I was quite happy with my squirrel...and then I worked this flower....y...u...k...!
Just didnt like it. nope. not at all. The technique I used for the petals, specifically beading the wire around the outside edge of each, really made it more bold looking that I wanted~and I didnt like the inside section of petals....the three pinks looked like good gradations of each other in the pots, but on the flower~ nope, didnt like it. And then there is that stem. ::sigh:: 
I wanted to incorporate some 'plain' opaque beads in the design, and really liked this color of green....but eeeeewwwwww...not on this flower!  So....don't be afraid to unpick what took you hours and hours of work to do in the first place in order to fix a problem early on....instead of getting so far along otherwise you decide you can just live with it....and end up hating looking at the thing because it drives you crazy! This flower drove me insane, so out it came along with that nasty, hideous stem.

 This is the rose with center petals unpicked...and of coarse all my flowers have a happy little bee hovering on a wire overhead!

 For the reworked stem I went with a dark green that matched the part of the mound it was sprouting forth out of, and with the leaf added, yes, I like it now!

I left this one a little large so you can see the details~ this is one completed side frieze~ YAY!


 My other side frieze had two animals planned, along with another rose and two snails. At first, I admit the animals were a bit of a hurdle...they gave me a little anxiety as when I designed my casket, I designed what I liked, and paid no matter what so ever as to how I was ever going to work them. Once I made the squirrel tho,  they werent so scary and I jumped right in with the dog first. He has a blue glass eye, separate eyelid, whiskers, collar, ears and tail. His tail is tubular twilling and when I had finished him in my hand, if I pushed on his tummy, his tail would wag and Oh my GOLLY! was it ever cute! For a little while I thought about how I could make it wag on my panel/casket...but I decided I had enough going on to have to worry about his tail wagging....and the last thing I want to see, is a bunch of outstretched fingers wanting to push on every animal on my casket to see if it moves.

 Bunny came next, and here I took the opportunity to try out a color scheme I want to use on my unicorns on the back panel. He has no tail yet in this picture, but its a great view of his ears~

And alas, with this last side panel ~ all of my friezes are now complete! I am quite busy with work so it may be some time before I am able to work on my casket again....until then, I bead all night in my dreams, figuring out colors and stitches to use...when I ever get to it!

Tuesday, January 24, 2017

Bad Hair Day?

A Trip to Ye Ole Wigmaker.....

  I have been so busy I havent had time to share many dollys with you lately. Now that this pair of Queen Anne dollys are at their new home, I can share them with you.  I thought you may like to see some in progress pictures of how I style my wigs...Ye Ole Wigmaker.....aka...Ye Old Me!  ha
Patience is a sweet girl~ her owner ordered an over the top Queen with all the frills, so she got a custom made, period correct saque back gown, with literally yards and yards of trim. I stitched trim for days. There is nearly 2 yards of silk in this gown...on an 18" doll!  For her wig, I chose one of my Icelandic sheep skin pelts~ in this picture she is just trying on a bit for color and length of hair.....

  There are many shades of white, even on a single pelt the color hue can change from one area to the next. After cutting the skin to stitch the skull cap, the hair is washed, again, dried and combed out. It looks like shes got a lot of hair...but for a pompadour, one needs alot of hair...and then some extra

  With a certain style in mind, the hair is sectioned into parts~ the length in the back is braided and will be tied up tall on the crown~ this was a popular way to dress long hair in the 1750s.

 The crown has been tidy'd and braid stitched in place~ to the sides you can see two sets of long curls being set
 Once dry, the curls are drawn up and set on each side...starting to look nice now! I like to either stitch or pin the curls in place.

 I am including this picture just cause I really liked doing the tags this way~ this is how I always make tags of doll pairs~ I draw up the back and then cut it in half, so each dolly has a half.

 My customer stipulated that she wanted her Queen to be a 'Stitching Ladye'..... so....if you stitch you simply must have a working slate frame!
I can say, this is the smallest working slate frame I have ever seen(or made)!

 Her beau, Msr Isaac, is such a thoughtful fellow~ he has gifted Patience a new slate frame for her birthday~ I love his profile here....

 Here they are posing for their picture....but he is looking at me like,  'Please....just take the picture already'.....
 Her frame is dressed and ready to stitch with a hint of silk....ready for her owner to stitch a little something on!

Wednesday, January 18, 2017

Flat Top Casket Progress

Taking Joy....
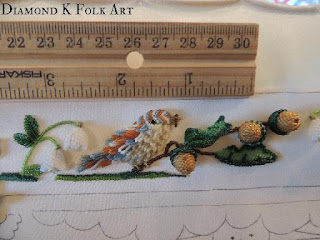
 Have had a few Sundayes now to work on my casket and look what happened~ a lil beaded stumpwork something was born! Is it a beaver???? Sure looks like a beaver doesnt he....... 
I have been dreaming about working on him for eons...years ago I found a hank of early beads and said to myself, this looks just like a red squirrel! And so...when I designed my flat top casket, Msr. Squirrel was nearly the first must have....to use those beads!
Working this small is hard~ the entire time I felt like I had no fingers~ they were all huge clunky thumbs! At this point, he is more like a sky diving beaver...cause I would fumble quite often and off he would go~ jetting out of my hands like a base jumper waiting for his thread to stop his free fall

 It was easier to work him in my hand, but after I attached him to my frieze he got another  back leg, another little hand, more pronounced nose and ears~ now he is starting to look like a squirrel....

I wanted him to have a big fluffy tail, like ones I have seen in tufted silk in regular stumpwork, so I tried a bunch of different things until I found one I liked. This is a fringe variation...its big and full and you can stick you finger down into it. I am really enjoying translating what would normally be a silk stumpwork into a beaded stumpwork~ its a fun challenge for me to see just what I can mold the beads into....just wish I had more time to work on it!

Sunday, January 15, 2017

Museum Monday!

Mid 19th c Tambour Embroidered Undersleeves 62.1999.14


The first Museum Monday of  2017 is  lucky number 62! A fine early pair of embroidered lady's undersleeves. I love undersleeves~any lady could own a pair, and a lady of fashion would have several, even dozens of pairs. Undersleeves were worn, you guessed it, under the sleeve~ but not just the big bell sleeves folks usually think of. Undersleeves were a wardrobe necessity, and were worn as a barrier between ones skin and dress sleeve on both short and long sleeves and everywhere inbetween. Of coarse undersleeves provide the perfect canvas for a Lady of means to showcase her own hand embroidery, or super fine handwork hired out, if she was not so skilled, but heavy in the pocketbook! 
This pair of sleeves measure 18" long and are hand embroidered with narrow casing at the top edge for drawstring. Some sleeves were tack stitched into the gowns they were worn with, but most were just tied high up on the arm with a drawstring.
I left the pictures large so you can click on them and enlarge to see details. Many fashion periodicals of the time included embroidery patterns for undersleeves in their publications. This set is unique from all the other sets I have~ at its cuff end is an embroidered frill gathered into a fixed embroidered band. By fixed, I mean, there is no button or hook/loupe adjustment~ it is a solid, 9" embroidered band. 

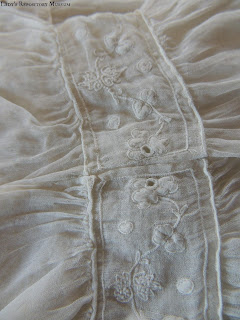
The embroidery is wonderful and petite~ a tambour hook has been used to work the vines and flowers, and to outline all the circles one can see. The circles are filled with satin stitch, with flower centers being made into eyelets giving the whole flounce a  light, airy feel.

Open centers of the flowers let a bit of skin show thru~

These sleeves are made of muslin~ muslin in the 19th c was very light and sheer~ not like the heavy coarse muslin we buy at the fabric store today.

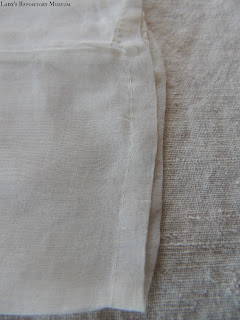
Looking to the back of the undersleeve, we can appreciate the whole design of the embroidery~ these sleeves were not a cheap machine embroidered flounce hastily set into an insertion of the same....these sleeves were designed as sleeves~ with the fancy embroidery to the front, and to the back, the design tapers to a narrow edging to save precious time and thread for the worker.

 Not only is the flounce its own shaped design, but so it the band~ looking at the center back seam we can see the embroidery was worked as a 9" band and then stitched together~ not cut down from a larger strip of embroidery.


 A simple turned casing at the top ready for a drawstring ~


Sunday, January 08, 2017

Flat Top Casket progress

How Goeth the Busy Snail......
 Its going to be a good year tater...thats what I keep telling myself~ and I think it will be! I have been working on my new 2017 Lt Ed Ornament....going AWESOME..... I have decided to start selling threads this year (more on that later)...and have also decided to take some of my own advise...which is to make time for me this year. I have  a slew of orders I am working on, slate frames, mirror cases, dolls and a couple of new projects.... was right in the 'groove' of things, when Mother Nature decided to whip me upside the head with 14" of snow....her way of telling me to stop the 'D Train' and get off for a while...because I do all of my woodworking outside~ so when weather is bad, I cant work! Last year things really took off for me, and while I feel each and ever order is a blessing,  I dont know if my family shares same views. As a buyer, I dont like waiting for an order~ so as a seller, I dont like to make people wait~ and with my workload, folks are already having to wait....not long, but still! I work all day, each and every day~ 7 days a week~ I take my work on 'vacations'.. I cant sleep some nights so get up and work at 2-3 am....I stay up after everyone goes to bed and work....I fit family things in between, but this year, I am making a rule. Sunday is my day. I'm going to try very hard this year to keep it that way!  I'm not complaining at all, I guess I'm just saying out loud, that I am going to try and manage my time better this year...if that is possible!  
  It's been a while since I have had time to work on my flat top....I think October last year was the last I worked on it~ and its been really calling to me of late~ if I was to say what one thing could recharge my battery....working on my stitching would  be that. It's been so long I cant even remember if I ever shared how my friezes are coming on....this is the back frieze ~ all finished! There are snails on every frieze, and every panel of my casket~ I love snails! Maybe I was a snail in another life....

 Little birdie fellow is in the center of the back frieze with a little worm in his mouth. The front and back friezes are completely finished... only the two sides were left~ so just four more snails to do....

 Just...I say that with a smile because these little buggers are way more difficult for me than they look...matter of fact, they are down right challenging for me to wrap my brain around. Aside from trying to get the spiral lay of the beads to conform to my vision....  I wanted to use different colors for each frieze's snail shells....but beads are mischievous....dare I say sly, sneaky things....they look one color in the pot, but on a thing they can change in an instant land look totally hideous!  Snail on the right came out wonderful~ those two on that side frieze zoomed forth from my fingers like lightning....but the snails on the left~ they gave me grey hair and then some.  El YUCKO!!!!  Two weeks, however many hours it took me to work them both in those hideous colors.....every time I looked at them I cringed....just hideous! Even more, the thought of unpicking everything without ruining the background satin was very intimidating.....but one night, I just couldn't stand it any longer and spent 5 hours...yes, thats right~ 5 hours to unpick the blasted beasts!!

They wanted to be same color as the snails in the other side's frieze...but no I said...we cant have four snails the same color. So I madly searched thru my beads picking and choosing new colors....would string up a few together and nope...not those...those look ok, but they wont fit with the rest of what I have planned on the panels...I really like these two colors....but beads are too big.....what to do...what to do?
Then. 
It snowed.
Snowed some more....
Snowed and was cold enough my body would not let myself go outside to work....
I found myself standing at my counter with nothing between me and this panel....and there were the beads from the other snail shells...right there...
just sitting there.....
And a half morning after, the sun is out, and low and behold, I have a completed snail shell, and I like it!
Yep...It's gonna be a good year tater!

Wednesday, January 04, 2017

Is it really 2017

Already? 
 Happy New Year! Now that its past Christmas I can share one of my favorite slate frames with you all~ nothing brings in a New Year like some gold! I had a special customer that ordered a frame for Christmas~ all she said was to base it on my Flemish Box that I worked a bit ago~

 There is a lot of gold on that box and my following Christmas ornament

 I wanted to make the frame extra special for her for Christmas, so I used real liquid gold for the scrolls and hilites and boy oh boy does it ever sparkle!

 Here I am just starting to add the gold~ in addition to the scrolls, there is gold on the petals and leaves as well~ just like how I embroidered the originals

 One thing I really love about using the liquid gold is how subtle it is....at first you may not even realize there is gold on the piece, but then when you look closer, or move it a certain direction~ the light just dances off in all sorts of directions and makes the surface glow~ soooooo pretty!

 The gold on the top of the trees looks like sunshine

 Scrolling Dutch tulips are perfectly suited for a horizontal slate frame

 I cant wait to paint myself a frame like this~ at the rate I'm going, it may be a few years before I get one~

I couldn't think of a better way to bring in the New Year than working with some 24k gold leaf~ maybe thats how this year will be for everyone~ I hope so! I am gilding casket and mirror case feet this week~ these pictured are mirror case feet that havent been burnished yet. An embroidered casket is special~ if you use the best hardware and the best real gold threads available~ why not give it the best feet available? My casket feet are fr sale in my Diamond K Folk Art blog shop~ link & more info to the right~  cause a girl's just got to have some pretty shoes....