Showing posts with label Scenes of Country Life Casket. Show all posts

Thursday, January 18, 2024

A Casket & A Class...

 Scenes of Country Life, or Rural Pursuits Casket Finished!

Its been a whirlwind the past three years. I am a bit surprised that I was able to get this casket done...but on the other hand, as usual, stitching helped me through it. I started the interior in 2021, and thought it was an easy mark of planing it to be finished by the end of 2022. Then I got sick...was already a nervous wreck when dr told me I had a coconut size liposarcoma that needed to come out not next month or sometime in the future...how about the day after tomorrow? So things changed, and I couldn't stitch on it for a while. You have no brain capacity for anything at that moment...at least I didn't. Slowly as I got better and realized I wasn't on the expressway to the other side, I started stitching on it again. At first, stitching gave me something to concentrate on so my mind wouldn't think about other things. Then, stitching gave my mind ease in reflecting and thinking about ...well...all the stuff I didn't want to think about. 

There is a mine of information just waiting to be discovered about the effects of the sounds of a needle and thread moving through a fabric. Perhaps it is that, combined with the repetitive motions of stitching, moving the arms up and down, that relaxes the spirit? I don't know, but whatever it is, I like it. I need it.

 I love how this casket came out. It is my Scenes of Country Life or Rural Pursuits casket, and it is everything I love about my childhood and then some. 

It is stitched on dutchess silk satin, entirely in flat filament silks. There are five cartouches with scenes in them that remind me of special memories. I am on the front sitting on the shore fishing(she also represents my Mother), and in another, milking a cow. Growing up there was many a day spent fishing. Sometimes we were fishing for our supper, so we sat there till we caught something to eat, rain or shine. I never liked going out in the boat to go fishing because one, I always had to pee, sometimes before we even got to the 'spot' to fish...and two, if I sat on shore, I could sit and play in the dirt while fishing. Maybe that's where I first learned to multitask? ha 

I learned to milk a cow at a little dairy farm in the first grade. I loved the sound of the milk hitting the can, and seeing the steam rise up from it. Can't stand to drink milk, but milk the cow, yes!

The surround holds flowers I know well~ my Mom always had the most beautiful iris and tulips in the yard~ I love red tulips and would always pick her a bunch for Mother's Day. She was always so happy that I picked them for her, and looking back on it now, probably secretly a little sad I had picked them. The frieze holds flowers and fruits that are special to me~ the turkey here is a nod to the turkeys I had here on our own farm. The central flower is a sunflower, Pip's favorite. Of course, we didn't have borage in northeast Washington...that is an homage to 17th stitchers


Filament silk is so wonderfully shiny, this really glows from all angles. Here you can see up close the faux tortoise shell trim I made for it. I love 17th c caskets with tortoise trim, and it was a favorite for picture frames as well, the dark colours really set off the embroidery.


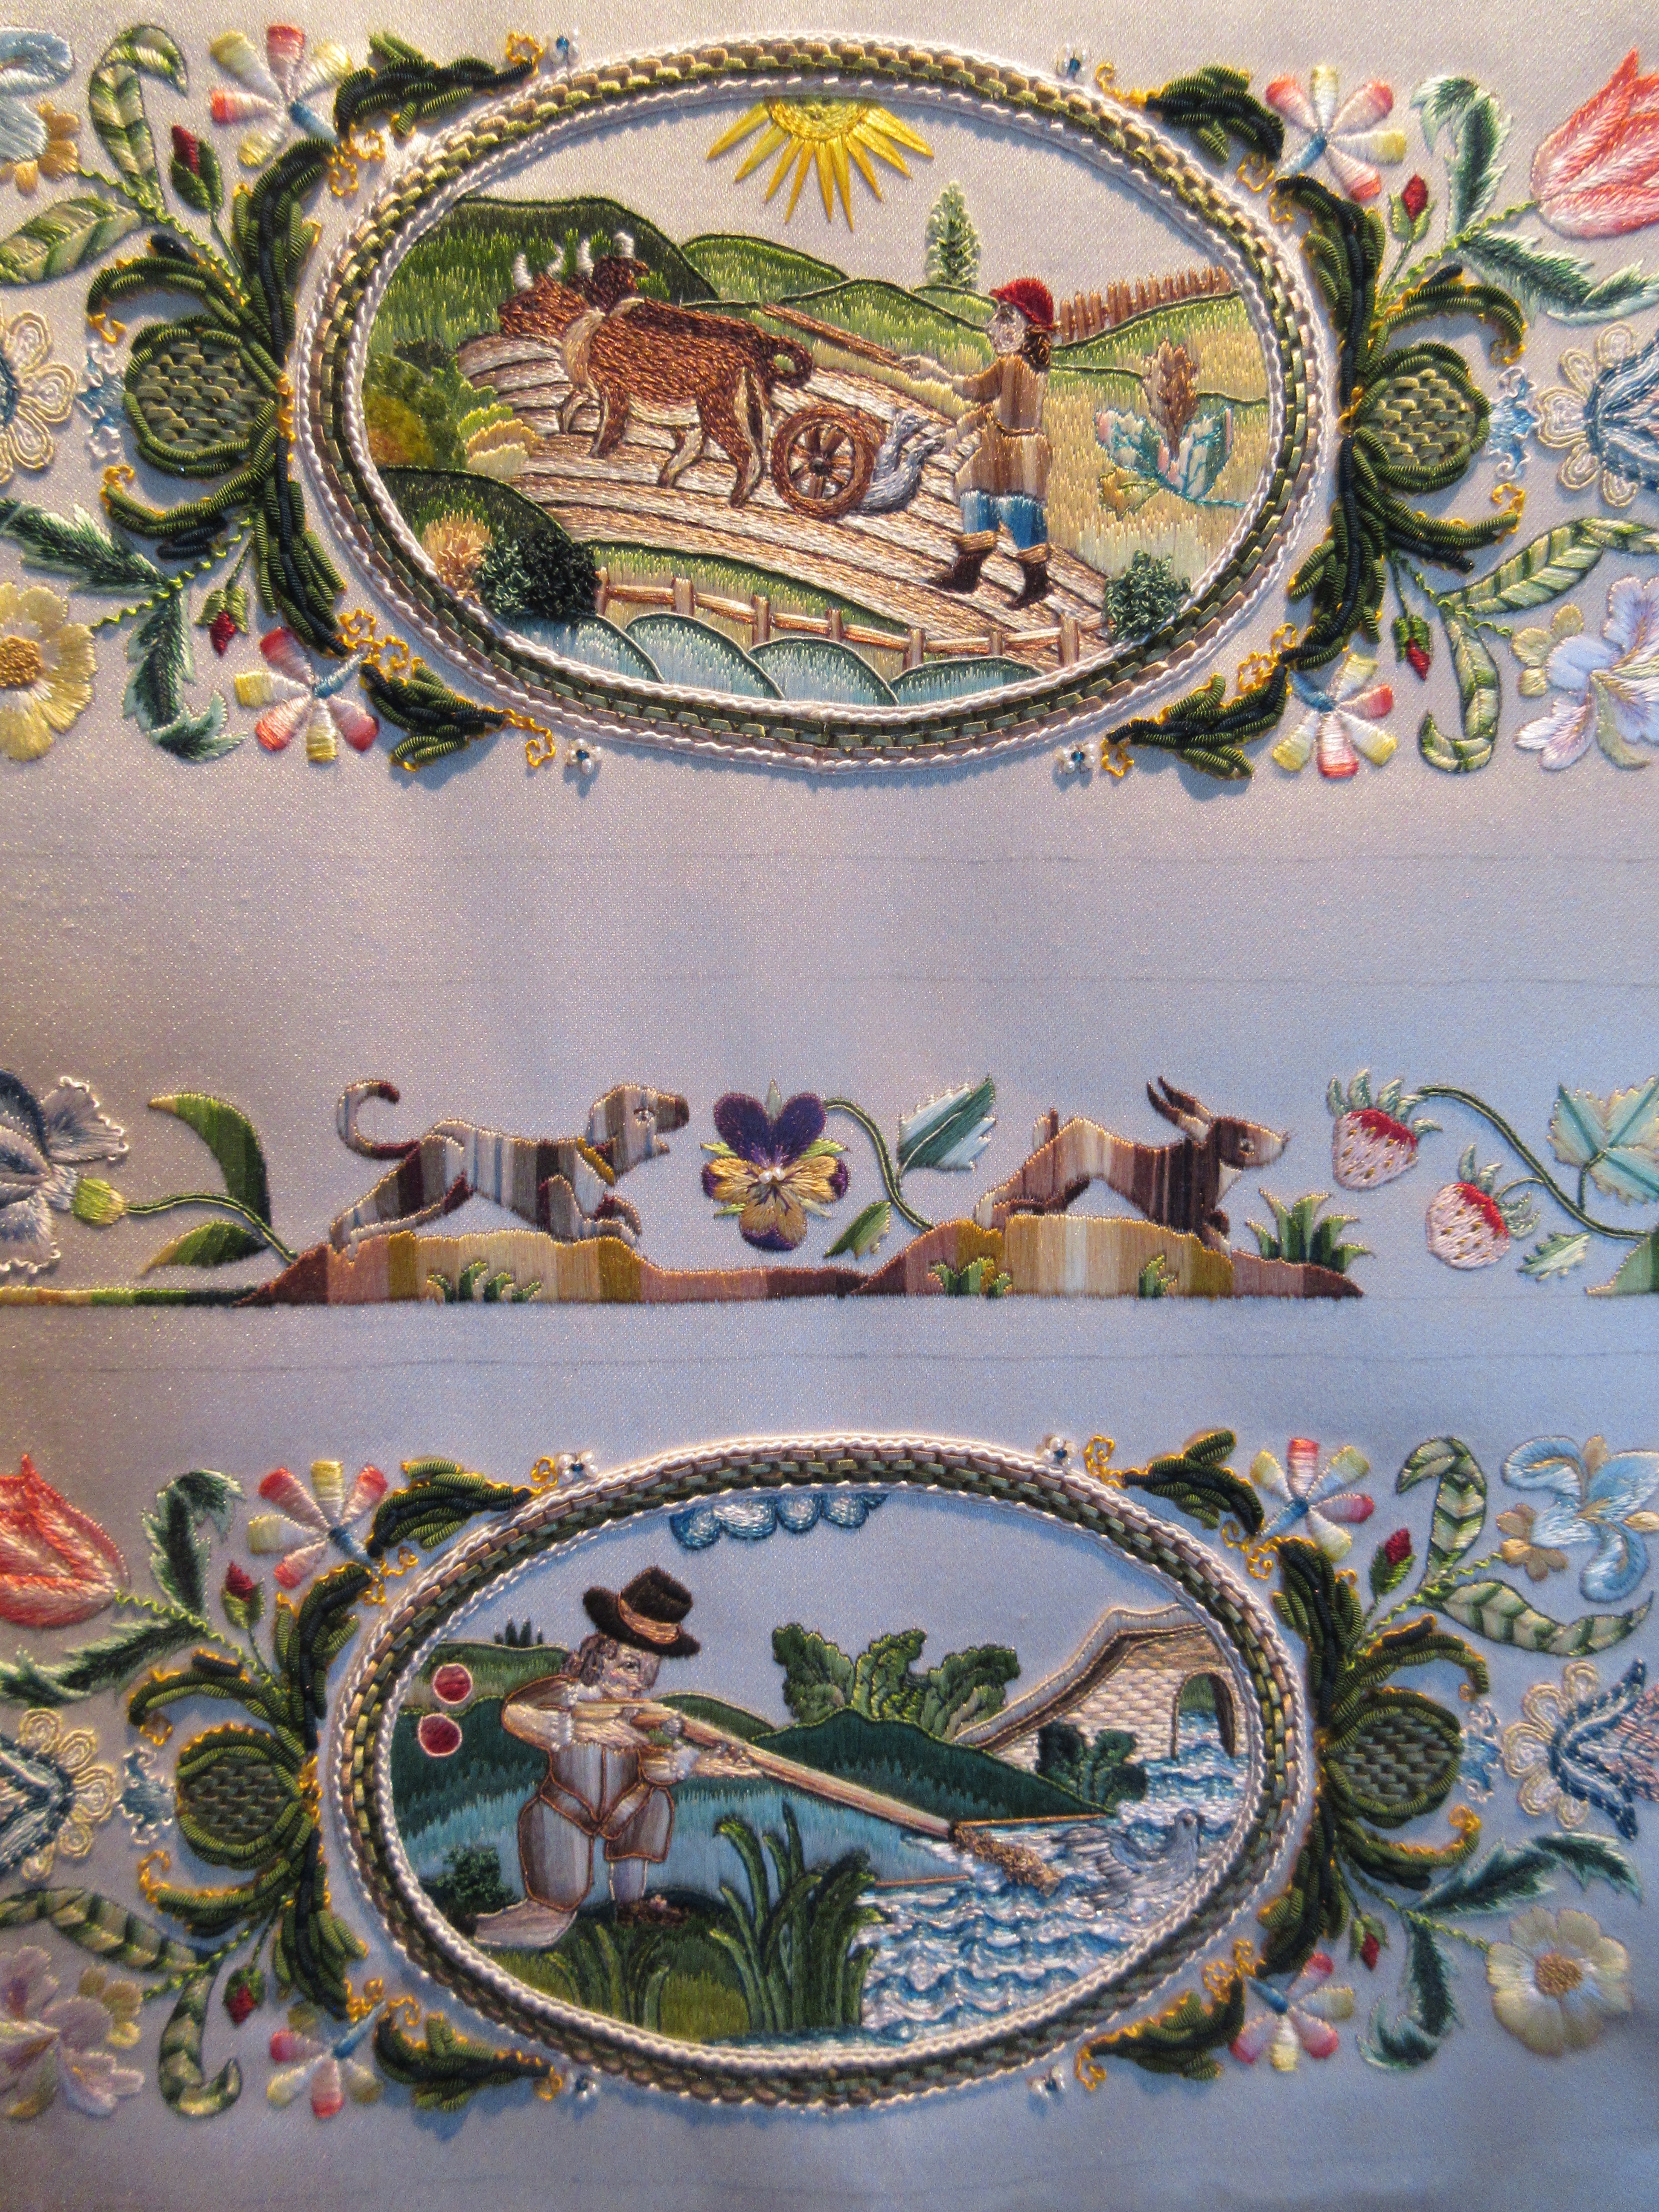
The proper right side depicts my Pa hunting(then again, I could be me too). We never hunted waterfowl, this is a grouse that has just flown out over water ;)  There are two wild strawberries on the hillock behind him, and more up in the frieze. I set the traditional 17th c configuration of a dog chasing a rabbit to the center, but in all honesty, we hunted rabbits a different way~ while riding in a Toyota landcruiser with a pistol. The pansy represents all the little violas that always grow in our yard at home and that seem to pop up always without ever being planted


The proper left side is a plough scene. I think of my Great Grandpa Randall, whom I never knew, out in the fields...pretty sure he was on a tractor, but I didn't really want to stitch a green and yellow John Deer tractor on my casket. The little flowers in the frieze to the far right were as close as I could get to a 17th c representation of the matchsticks I loved to pick out in the woods in the spring. There are thistles in the center, a snail cause I adore snails and a rooster...I thought it was fitting he was crowin the sun up in the panel below. 


One of the challenges of this casket is the scale~ everything is so small. I scaled down my threads to get the detail I wanted in my stitching, as well as made others. I made this silk wrapped plate purl in two colours for the snail shell.


The top is a single large cartouche with me sitting under an oak tree...lazing away. I have been picking wild strawberries again and am holding one. Three suffolk sheep graze in the foreground, and my kiko goats Luke(white and brown) & Meisie(black) are relaxing with me. The windmill in the background is not from my childhood. I have always loved windmills depicted in 17th c embroidery, and when I saw some on a trip to Paris in 2017, I knew I was going to include it on something! To the right of us all is a big pond...this represents my most favorite place on earth~Potter's Pond, at home. I also love swans, so you can't have a pond without swans in it


The surround is a mixture of flowers in long and short stitch, and purl work using silkwrapped purls. Two silk wrapped kidskin parchment flowers ornament the cartouche


All of the stitches on this casket are flat stitches~ satin stitch, long and short stitch, French knots, long leg French knots ect

I loved stitching the swans


The back of the casket and back frieze are made of silk wrapped cards~ the figurals on the bottom from left to right top to bottom are green apples, thistle, acorns, single acorn, pink wildflowers, and huckleberries
The interior is dressed in blush pink silk, with secret compartments to the lid and otherwise, with a special portrait that sits behind the mirror. I will be teaching a class this year on mirrored interiors that will include instructions for making the octagon design...

 If you like the look of the padded silk interior and would like to make your own, my new class Puffed Silkes~ 17th C Inspired Padded Silk Interiors is now open for enrollment~ you can click on the header for the Online Academy at the top of the page, or here to learn more about it.


As excited as I am to see this finished, I am also kind of sad. It has been a good friend to me and kept me company for many hours! 


Saturday, December 23, 2023

Embroidery FInished!

 Merry Christmas

Today I stitched on the final two little vellum rosettes on the top panel of my Scenes Of Country Life, or Rural Pursuits casket, so the embroidery is now complete. It was my goal to get it finished this year...well, last year really, that morphed into this year! I will take a few days off and enjoy Christmas and then glue the top, front, and front frieze panels onto the casket. Once that is finished, I can start making the trim, which I am really excited about~ it's gonna look fabulous!


I hope ya'll have a wonderful holiday season. Whatever your special day is, I hope it's filled with love & peace & happiness. If you are missing a special someone, I hope you make time to sit and remember them & the lifetime of memories they left with you. Remembering our loved ones and sharing stories about them with others, is how they live on forever~

Happy Stitching & Merry Christmas!


Thursday, November 23, 2023

Special 2023 Ornaments & Casket Update

 Happy Thanksgiving!

I hope you all are having a wonderful holiday today! I have added six precious hand painted ornaments to the Etsy store this morning. I think she turned out beautifully!
I have been working like mad to get these done in time for this holiday season. There are sooooo many coats of black to get them this dark and dimensional~ there are several 9 hour days of painting represented in this photo. I have had a heavy workload out in the shop. Between the painting and lacquering stages, I have been working on the top panel of my Scenes of Country Life casket.


The center panel is now complete and I have finally started the surround. It seems like I have spent eons on this casket~ its never ending! I'm still not confident that I will be able to get it finished this year, but I'm certainly going to try. You should be able to click on the photo to make it larger~ I love how the Suffolk sheep came out...the black goat is my Keiko Meisie, and her mate Luke is in white with brown splotches. The windmill in the background I saw on a trip to Paris, and swans, well, anyone who knows me knows how much I love swans! I was going to try and draw in a loon as well, but I will save them for another casket. 

If you want to follow my stitching journies, I post daily on Instagram~ just search #diamondKFolkArt or check out my page~  rlkinnison1

Happy Stitching!


Monday, August 21, 2023

What Are YOU Waiting For?

 Time Waits for NO ONE

I finished the front frieze and front panel for my Scenes of Country Life, or Rural Pursuits casket this morning. SUPER chuffed!
I try and post something every day on Instagram...however much or little stitching I get done~ I think there is a link in the sidebar to it. I always get the same messages though....

'Oh, I love your embroidery I need to work on my casket, as soon as I get XXXXXXX finished and some little smalls done'

Is that YOU? Do you keep putting your casket on the back burner until you Retire...or until you finish a sea of endless tiny projects?

Well...let me tell you dearest readers....if you really want to stitch a casket...ya'll got to get on it! 

TIME WAITS FOR NO MAN...OR WOMAN

I will be turning 52 here in a couple of weeks. I used to be fit as a fiddle! No worries...hardly ever sick. Things change. We do not get better with age. PERIOD. Last year could have been my last. year. I am now deaf in one ear. Its hard for me to get up and walk around...I now have macular degeneration making it severely hard for me to see. I see shit that's not even there...and cant see what is. 
I have chosen to prioritize stitching my caskets because they are important to me. You may be one of those folks who love to dream about things and pet their threads and that is enough~ and it is enough if that is your want~ there's absolutely nothing wrong with that. But if you really DO want to stitch a casket....
GET OFF YOUR TUCCAS AND DO IT!
All those tiny little projects you did these past couple of years, could have been tiny bits of your casket. Heck all a casket IS...is a smathering of tiny little projects. Break that sucker down into its components, and just do it! BABY STEPS. Before you know it, your casket will be finished!
I will be starting the final panel of my casket~ the top, here shortly~ hope you stop on by my Instagram to check it out and let me know what you're working on!
HAPPY STITCHING!!!


Sunday, August 13, 2023

Scenes of Country LIfe Casket Progress...And

 Some Notes on the Importance of Stitch Direction

 The time is flying by~ I spent most of July in Washington State visiting my family there, so not much time for stitching. I am back at it now, working the front frieze, as seen at the bottom of my frame above. Because of the number of panels I have drawn on this piece of silk, the size is too large to comfortably reach the top of the frame, so I have to stitch it upside down...I don't recommend it. Shadows change, and stitching that looks one way upside down, may not look the same right side up, so if you are in the same situation, be sure to check your progress right side up frequently!

 As always, I work all the flat silk stitching first, then will go back and add gimps, then other things like silk-wrapped purls, etc. If I have silk-wrapped purls on a piece, those always get put on last as they are terrific thread snaggers. Especially when using flat filament silk that is so beautifully shiny, thread direction can have a huge impact on the look of the finished piece. Most 17th c satin stitch elements were stitched with the stitches running vertically. Colour choices and shading would add the details.

 If one looks at the finer long & short stitch pieces, you will find the stitch direction flows with the elements themselves~ for example, hair. An entire head of hair can be stitched with just one colour of thread, but by changing the stitch direction within curls etc, the stitches themselves create shadows and movement.  Look closely at the stitch direction of my birds here. Stitches that echo the curving design lines will help to portray a rounder more dimensional object. See how flat and boring looking the cherries are next to the songbird? I have chosen to work the flowers on the frieze in straight satin stitch while using long & short stitch on the creatures for more details and contrast.

 Don't be afraid to mix stitches within an element. I have used both satin and long & short stitches on the turkey


Rarely are 17th c pieces ever just one type of stitch~ whether it be a single panel, or an entire mirror or casket. I like to think of them as samplers of all different kinds of stitches and techniques~ so if you want to use a pile of different techniques, GO FOR IT! It will look amazing!!

Happy Stitching!!

Friday, July 07, 2023

Scenes of Country Life Casket

 Progress

It's been a while since I posted about my casket progress...or lack thereof is probably more accurate. I don't know what I do all day long, but whatever it is, it sure goes by quick cause every time I turn around, it's time to go to bed again. 

Whatever happened to the days dragging on like they did when we were little? I might be able to actually accomplish something if I had that kind of time on my hands...

There are two scenes on the front panel~ one of me fishing, and the other milking a cow. Because I have them framed up with the top panel on the same slate frame, the only way I can reach them to stitch is with them upside down...which in itself presents some challenges. One of the best qualities or reasons for stitching with flat filament silk is the effects that the light has on it. A person can stitch with a single colour, and just the position of the stitches and how the light bounces off them creates shadows and illusions of there being different shades of colours there, when in fact it's all the same colour. 

So shadows play an important part in stitching with filament silk...insert stitching tip here...very important.....
Your stitching can look one way upside down, and drastically different once turned right side up! So check it often if you find yourself in my same situation...

I started with the ground as usual, and decided I wanted to work a basketweave pattern for one of the fields, as seen above.

I have to continually remind myself that this is a FLAT work casket that is supposed to be mainly satin stitch. It is very hard. I actually worked the entire forefield and then decided I didn't like it...didn't like the colours, and most importantly, ever so slight as it was, the field stood too proud from the surface. The milk jugs were going to be long and short stitch, so very flat, and hello, you can't have milk jugs in the foreground that sit behind the field that is supposed to be behind them.
So the field got ripped out el mui pronto, which actually made me quite happy as the colours I had chosen for the field were giving me flashbacks to our 1970s kitchen with orange, brown, and green mushroom wallpaper...

I kept the diagonal direction and worked stripes in satin stitch~ love it! It set the field off dramatically from the one in the background without it being too obnoxious.

Once the field was finished I built the fence and planted some long leg french knot trees. Worked the milk jugs next and REALLY HATED them. I mean, seriously close to ripping them out. As I am typing this you can see EXACTLY what I'm talking about with the difference of how something looks upside down....the jugs above are the same ones as shown in the picture below~ I think the ones below that are upside down are much nicer than the ones above....anyways, I decided to leave them and see how they looked after the cow was finished.

Everything is so tiny on this piece, as I was stitching Cow, I had to stitch the milkmaid's head and hat. They are seriously small and the lines were seriously hard for me to see. Am I overusing the word seriously? This should give you an idea of how stressful this panel was for me~ it wasn't much fun. The girl's face is literally half the size of the fishing panel's face, I think 4 mm from top to bottom, and not even that wide. R*E*D*I*C*U*L*O*U*S*L*Y* small. 
Enter stitching tip here: Don't draw things so small you can't stitch them with modern materials available today.

Cow complete, it's on to the costume. 

I wanted to make the costume bright so the girl would stand out against the fields...but not so bright she looked stupid...A farm girl does not dress in her best dress to go out and milk a cow! The addition of an apron and headscarf helped to keep her simple.

Rows of French knots for the foreground in blue-greens set them apart from all the greens in the background. A few strategically placed tiny silk gimps finished off the scene.

 I am actually really pleased with this panel which is odd because I think out of all of them thus far, this one had the most things I was not happy with in it. I ripped a LOT out, but I also left a lot in. One thing is so true with 17th c stitching it can be very easy to become hyper-focused on a single aspect of it~ be it a stitch or a colour etc....but there's so much going on, that once everything is in place, all the glaring things just kind of blend and disappear. 
Sometimes they add just the amount of quirkiness that is needed to make it perfectly 17th c

Whatever your stitching, I hope it brings you joy


Friday, April 28, 2023

Scenes of Country Life Casket Progress

 AKA the What Was I Thinking Casket....

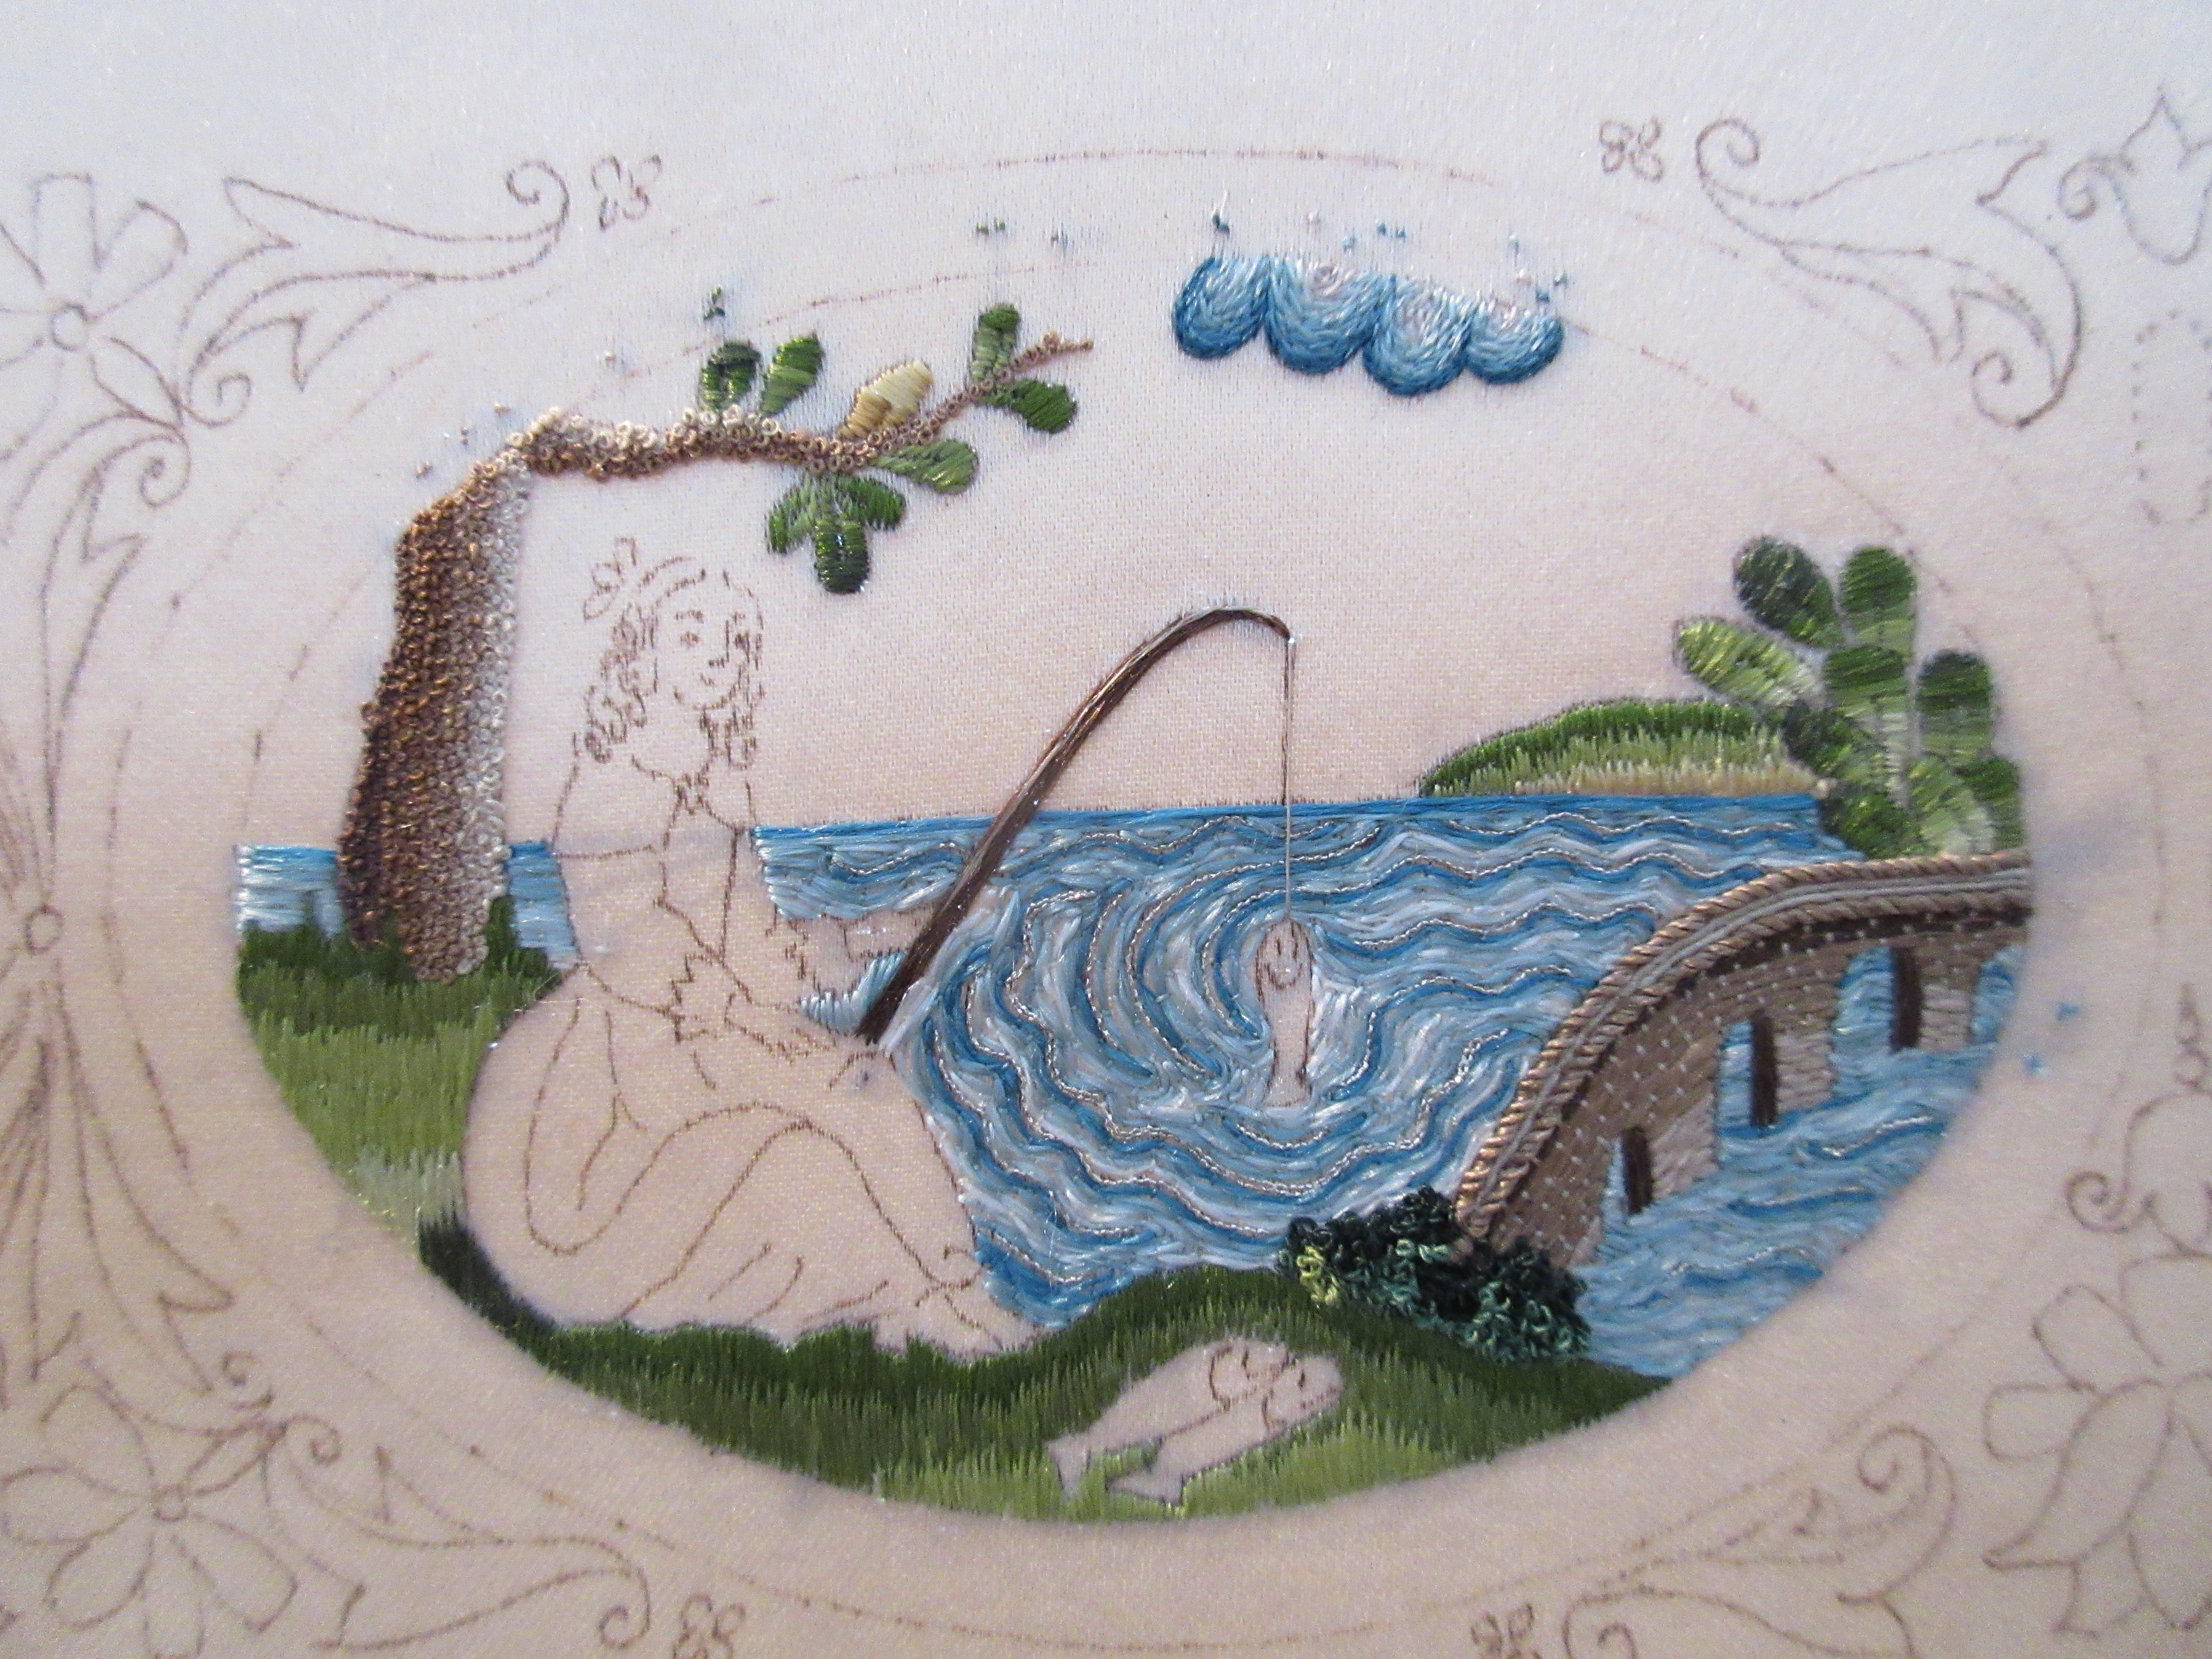
I have had such a large workload in the shop I haven't had much stitching time. Well, I probably have had a good amount of stitching time, but struggles with my health have prevented me from being in the happy zone that allows me to stitch. I am soldiering through hoping I will bump into my former self sometime soon. I have just three panels left on this casket, the front, front frieze, and top. I am working the front panel next, which has a smaller cartouch scene on either side of the front keyhole. I try to post on Instagram at least once a day, and if you have been following along, you will already know why I am now referring to this casket as the What was I thinking? casket. If you have no idea what I'm talking about, let me offer you this advice. Just because you can draw it that small, doesn't mean you can stitch it that small! This panel is an ode to my many days spent fishing for supper as a child...didn't like it then, don't like stitching it now. I started with the background~ the tree trunk is several hundred French knots in 4 or 5 shades of brown, I can't remember off the top of my head (probably blocked it out)


After the trees, I stitched the bridge, the water, the fishing pole, and the fish. The fish were a nightmare in themselves. I had always planned on using some microscopic metal spangles for the fish scales~ TINY, less than 2mm in diameter... I stitched them on the fish and they were way too huge and hideous, so the fish got worked in satin stitch, which I actually really like. But I wasted at least 3 days stitching dinner plate sized spangles onto microscopic fish and then unpicking it all off again because my brain would NOT let go of wanting to use them. 
Then came the ladye & my descent into HELL

I can fit this entire scene into the palm of my hand...and I have pretty small hands. I am not holding a giant pencil...nope, this is a standard size pencil eraser. It looks HUGE compared to her tiny face. 

I ended up stitching her face and unpicking it THREE TIMES before my final fourth try(which is just ok). This is her second face. I call this one the burn victim. Poor girl. HORRIBLE.  So I will remind you that I have macular degeneration....on top of having to wear regular glasses cause my ass can no longer SEEEEEEEEEEEE.  It is beyond frustrating. My first try was satin stitch...didn't like it so I thought I would stitch directionally. My eyes were tired, sooo tired. I have to have magnifiers on and even then, I am trying to focus and what I am focusing on will literally just disappear from my vision. Its gone. nothing, and I have to start all over....then maybe the lines of stitching will literally move, right as Im looking at them, and Im not moving. Enlarge this poor thing and say a prayer for my eyes, please. She didn't look that bad really, until I took a picture and looked at it on the computer. OH MY Golly. What the heck happened!? These stitches couldn't come out quick enough~they took forever to unpick cause they are so small. 

I put this picture on because I took it to show the fourth try at her eyes...not bad~ again though, it went all down hill from there. The only reason I did not unpick it and try again was that the ground fabric just could not handle another unpicking (neither could I)

I chose some really great taupes for her gown, purple but not too purple. I really wanted to give her a yellow dress, but who in their right mind goes fishing in a yellow dress??? At this point, I am hoping that the gimps will relieve some of her massive homliness. Enter Hell 2.0

What a person wants to use and what is available are not even close to the same thing when working at this scale. I used Jenny Adin Christie's Very Fine size gimp for her gown, which actually came out really nice. Thanks to my guardian angel for having mercy on my soul and letting her have just the colour. Now traditionally the hands and hair and face would have also had couched gimps for the defining details....but not here. Everything I had was too big. For her hands, I used  HALF of a single PLY of soie ovale. (first, separate a strand down into six plies, then separate a single ply in half~this will grant you entry to Hell 3.0) 

 No gimp currently on the planet is small enough for her hair...nor silk-wrapped wire. All too huge. I finally ended up digging through my silk-wrapped purls, finding the tiniest one and straightening it out. I like her hair a lot actually, as long as I don't look directly at her face shes great. 


 So here is the finished fishing panel, and now I am on to the milkmaid panel...Lord help me her face is HALF the size of this one.

Tuesday, February 21, 2023

Casket Side Panels Finished!

 No Glamorous Spaces Here


I often get asked what my stitching space looks like. I am usually a pretty organized person, I'm a Virgo so I do like everything to be in its place. When I am 'creating' though, things tend to get pretty hectic. We are always bombarded with pictures of Women's creative spaces looking so clean and glamorous...I personally don't know a single person whose space looks like those in the magazines. In case yours doesn't either and it bothers you, don't let it! This is a picture of my stitching counter, you can just see the corner of my slate frame in the bottom left there.  

See, I usually set aside January for doing my business tax papers....but doing so takes up my entire counter. I used the excuse that I would work on my stitching in January, and start my tax papers on 1 Feb. Well.....I was so close to finishing this current slate frame worth of casket panels, that I convinced myself that it would be a total waste of time to clean off my counter for tax papers, and then have to set everything else back out again. I mean. LOOK at it. I got EVERYTHING I need, right where I need it. It looks like a huge mess to the untrained eye, but it's what I call my 'working mess'. I stand to stitch, and everything I need is right where I can grab it.  You don't even want to see my doll room when I'm working on a doll. Just, no.

Anyways, I am also a numbers person and keep track of everything. I know how much time is WASTED getting stitching things out, and then packing them up again. Just think how much stitching you could get done in the time it takes you to set up and break down your stitching area every time. So this is my tip of the day for getting some serious gains on stitching progress~

Make yourself a dedicated stitching area. It doesn't have to be an entire room. Or an entire counter. A side table, the top of a dresser....just someplace you can have your stitching at the READY and not have to haul everything to and fro all the time. Portable rolling carts are great~ keep all your stuff for your current project in there, and then when you want to stitch all you have to do is roll it aside you. You may be surprised how much progress can be made with just 20 or so minutes of stitching a day!

Speaking of progress, yes! I have progress to share on my Scenes of Country Life or Rural Pursuits casket~ WOO!


I actually 'finished' them twice LOL. Above is a picture of the first time, with the original configuration of the silk-wrapped purl flourishes. Up close they looked good, but from across the room, they looked like a sideways crab or spider clutching onto the cartouche! It kept me up at night, literally. HUGE design flaw for me. I wanted the ovals to be within the center of a block of stitching....not hovering between two crabs in a rectangular negative space. So while I was sleeping I thought of all sorts of things I could do to remedy the situation. Just leaving it was not an option for me. What I decided to do was to make the one-sided flourishes into leaves. I drew them in with a pencil first, as can be seen in the bottom half. Then couched yellow silk over the lines to match the rest, as seen in the top portion. I just needed to get the rectangular angles out of this white/negative space of the ground.

A few silk-wrapped purls later, and bam! YES! Finished for the second (and LAST) time!  I am very happy with them now. 

I have now cleaned off my counter and started my tax papers like a good girl. This slate frame is ready to get cut up and glued to the casket, but I am saving that for when I get back from a trip to Colonial Williamsburg. Cant wait to see them on the casket!

Did you stitch some today???! DO IT!!!!!


Tuesday, February 14, 2023

Casket Progress

 Hunting & Ploughing Side Friezes Complete!

I guess its been a while since I made a blog post, I apologize! It is so easy for me just to stick a picture on the Instagram, I forget I have not blogged in a while. I have been baby stepping along on my Scenes of Country Life, or Rural Pursuits casket, and just completed both side friezes today. 

These first few pictures are close views of the plough side. Love my rooster! This casket has been a challenge in so many ways. I have said a million times I hate satin stitch, loathe even more Soie Ovale or flat filament silk....but blast it I really love how they look and wanted to make a flat work casket. I picked the smallest I had thinking it would be a good thing...less area to stitch on. WRONG. Oh my golly was I so wrong.

 I want to stay true to 17th c design and colour, but also the actual stitching techniques used then. I cannot even guestimate the amount of hours I have spent studying period stitching and caskets. I have literally traveled the globe to lay my own retinas on microscopic stitches from so long ago. And they really are microscopic. If you have only ever seen 17th c period stitching from books or a computer screen, you will be amazed at how tiny the motifs and figures are in person.  For example, the photo above. Ok you know its for a frieze...but how tall do you think the hillock under the thistle is? 
Less than 1/16 of an inch!

Stitching on this scale one must think outside the box and scale down ready available materials, as everything other than tram weight silk is just too huge to use.  If there is interest I will make a blog post on the different gimps available and how they compare to each other. For every period embroidery that uses gimp to outline satin stitched motifs, there is equally one that does not. Outlining with gimp can hide a ragged or unsightly edge, and it does look very nice, but I want to highlight another 17th c stitching practice that I have labored very hard over to achieve

Not outlining or split stitching the pattern line before satin stitching over it. Today, stitchers will usually do so in a matching/ coordinating thread to help hide gaps between each stitch, giving a nice solid edge to the motif. I actually prefer to not stitch any kind of outlining under my satin stitch. Not only does it add greatly to overall stitching time, if you are a sloppy stitcher, you can also distort the motif. You become a slave to the underlying stitching. One does have to be very careful and place each and every stitch right along side each other, but after a few hundred stitches, one doesn't even think about it. I stitched the iris above with a single ply of Soie Ovale ( there are 6 plies to a strand)...Id say there are well over 50 stitches width wise to the inch. Basically, I would move over a single thread on my satin ground with each stitch. 


We are on the hunting side now, with the iris, hound, pansy, hare and strawberries


I saw gold hillocks on a casket and really loved them. Including grass blades within them helps break up a huge block of otherwise boring stitching. Its such a small space, I want to get in as many details as I can, without overcramming everything.


The pansy was sooooooooooooooo difficult. It just cant even put it into words. I spent an entire day trying to get this flower to look like how I wanted it to. First I stitched a petal with two plies instead of one, and was not understanding why it was looking so clunky. I thought it was the colour. I was starting on the second petal when I realized my blind melon was using two plies. An hour later I had the petals ripped out and was starting again. Now I had the right scale and was happy with the stitches, but not the colour. Did NOT look right, so out it came again. I wanted them to look like the little violas that sprout along the walkway in the backyard at home, so I persisted. Finally my white center stitches were not showing up how I wanted them to...two plies and they were invisible. Four plies, still invisible. Finally, I decided to use some weensie freshwater pearls. Success!


I had to include strawberries on my hunting side because we always find wild strawberries when we are out hunting. I think I have actually picked some wild strawberries that are larger than the ones on my frieze...

For scale, they are smaller than my pinky fingernail! Like I said, this casket is a challenge, but that's what makes it so much fun to stitch. I literally go to bed thinking about what stitching I will be trying out the next day....what colours, what techniques. If I don't get time to work on it, I actually get a bit cranky(or worse). I really do love stitching & hope you are having fun with your stitching too, whatever it may be!