Showing posts with label 17th Doll Bodies. Show all posts

Thursday, December 16, 2010

Marguarite's 17th c Corset / Bodies Complete

I couldn't be more please with how these came out! As soon as I am finished with Marguarite's Smock, I will post a picture of her wearing them. Until then, I think you will enjoy these. Finished, her bodies measure 6.5" across the shoulder, and 12" at center front from bust to busk point
I used the last of my matching hand dyed silk ribbon for the points, and since I don't have miniature metal aglets, I made my own

Each ribbon point is wrapped in copper wire, and then dipped several times in beeswax....and yes... bees wax from our own bees :)


I used a precious scrap of handspun tow to tie the shoulder straps together in a permanent knot


The tabbed skirts flare out quite gracefully


back view


Back is laced with a single ribbon in the proper 17th c fashion. All in all, I had an absolutely fun and wonderful time stitching these, and of coarse, I kept track of every minute, writing down the time I started stitching in my journal, and again when I finished to get up for anything.... for a total stitching time of 64 hours, 1 minute.

Monday, December 13, 2010

Binding the Bottom of Marguarite's 17th Century Corset


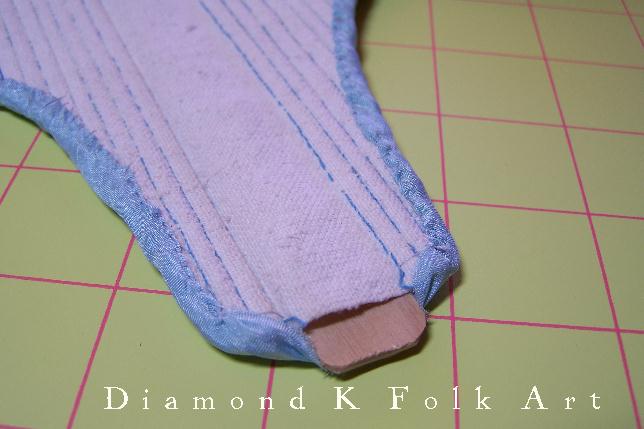
Here you can see that I have finished back stitching the silk binding, right sides together, to the bottom of Marguarite's pair of bodies. This was extremely slow to stitch, about 6 hours for this one step if I remember right. You can see the 'skirts', or tabs, pointing up and away there. I actually used a double thickness of silk on my binding here, as I didnt want the ends of the bamboo working their way thru it, and its so thin, I just felt the bottom needed more. After the binding was on, I again trimmed the linings. NOTE: The center busk pocket. I wanted to leave an open pocket so it could be removed, so the binding only goes thru the upper layer of lining, not thru all layers here.

After the linings are trimmed, I brought the silk to the back and whipped it down, just like on the top edge. It looks right spiffy now!

Here is my busk pocket opening....cause, well, one never knows when they will fall in love, and need to give their busk to their departing beau to carve while he is out Whaling...... If you want to have a pocket like this so your busk is removable, here is a tip~ make sure to cut all your pieces so this opening is the salvage edge! There is no bulk, and its nice and tidy.


Nearly done now. This is the front view after binding. I still need to press the tabbed skirts down.....


And finish the last of the brass grommets~ there are two at the bottom back opening, and then four more each side for the ribbon points (ties used for attaching a farthingale).


Saturday, December 11, 2010

Binding a 17th Century Pair of Dollye Bodies

Here are some progress pictures of Marguarite's pair of bodies. I used 1" hand dyed bias cut silk ribbon for the binding, doubled over as shown both for strength and a more opaque coverage, since its such a light color, and such a thin tissue silk ribbon.
I waited until I was at the strap to trim it to shape (really cuts down on the edges raveling cause the straps are always flopping around while I'm sewing). In the picture above, I have the binding on, and you can see the edges of the linen lining sticking out around it....the next step is to trim all this off~ very important for a nice uniform and equal binding!

After the excess lining is cut away, the ribbon is brought around to the back with my thumb there, stretched as far as it will go and whipped down. To answer your question why am I wearing gloves.....for two , well three reasons actually. The first, the linen I used for the lining is antique and really thick and densely woven, really hard to get the needle thru~ the gloves are excellent at helping me grip the needle and pull it thru nearly effortlessly...2, on my left hand, the rubber helped to grip the slippery silk and pull it taught, and 3, they also keep any oils I have on my hands and fingers off my work. I love sewing in rubber gloves..........


Here is the binding as seen on the front, and the whipped edge to the inside. I really love these two colors together, and in the 17th century...everything was colorful!


Next step was to finish the brass eyelet holes that were up next to the binding at the back opening, and on the front and straps. Top is finished!!! And, I must admit, it looks awesome :)


Starting on the bottom edge now, saved the hardest for last I guess. First, I pin'd the 3 tabs to the bottom edge in their rightful places~ largest next to the back opening, inbetween in the middle, and smallest to the front most area next to the center boning.


I then carefully stitch the binding silk over all the layers. This is very slow going on the bottom edge, as the bodies are extremely stiff, and I cant bend them to make my normal running back stitch, so I am left to stab each stitch one at a time, straight up and down thru all layers, including thru the bamboo, which I am using my pliers to help with. If anyone ever x-rays this in the future, they will find the tip end of my last needle buried in the bamboo 7th from the left...too many broken needles today, and I cant get this one out, so in it will stay!

Friday, December 10, 2010

Good Grief!

Where the heck has the time gone? I think my life remote is stuck on fast fwd.... I have been working on Marguarite's bodies...and good grief. These things are a pain....well...theyre definitely giving me a pain...in my hands, my fingers...my back....my eyes even hurt. blaaaaahhhhhh......... All the while I am sitting with my wonderful wondrous Heavenly Ott light directly in front of me....I try and imagine my ancestors working in mainly sunlight....and wonder, what the heck did they do in the winter??? I mean, a candle can only put out so much light, even with a magnifying water globe in front of it......its pitch black dark here by 4.30 pm...... what did they do all winter long... Sitting in the dark...in front of the fire....trying to keep warm? As much as I would really love to go back in time and just see what all was going on, and what they were EATING....and what they were wearing.......and what the stores looked like inside....I am so very thankful for living in today! But I'm getting off my point for today~ which is binding these bodies. Y*U*K*. As you can see above, I snapped a pic after I bound the first tab in silk....isn't it a pretty contrasting color? I am very happy with this blue.....but actually binding the bodies is a pain in the tuccas. I have bound and picked out twice already today before finally getting the top edge halfway done. These are so stiff, it is really hard to hold them right, cause the fabric doesn't bend so its hard to make a good back stitch...they are small too so also hard to hold. So far, this binding is my least favorite part. I really wanted to use kid, but couldn't find any of the right color, so chose a hand dyed silk. Ill snap a pic tomorrow when the light is good~ until then...... sore fingers going to bed!

Tuesday, November 02, 2010

If U want somthin' done, do it yourself.......

That's what my parents always told me growing up, and what I tell my own children still. I guess if I had a saying I live by, it would be that. I find it much easier to do or make for myself, instead of trying to find from others, or depend on others for~ and especially so when it comes to dolly things! When I started making reproduction doll size corsets and stays, I grew so tired of trying to find supplies at the right scale, that I just eventually gave in and made my own. Little brass rings are very hard to find in the right scale for stitching over to make lacing eyelets up the back of a set of stays....who on earth would use hunky klunky metal grommets....iiiiiick! Above the the back closing of Marguarite's bodies, boning channels are stitched, and I have lightly marked with a pen where I want the eyelets to go~ just one side tho. After I get the first side done, I use it as a guide for the other side, so no need for marking.


Making the metal rings are very simple~ all you need is a pair of flush cut wire cutters and flat pliers (can find in jewelry supply), a mandrel to wrap your wire around (size of the mandrel or rod, will be the finished size of your eyelet holes), and wire. I used brass wire, cause it doesn't rust, and is nice and stiff. Use a heavier gauge for larger rings~ Marguarite's are small size, so I am using 24g.

Just take a length of wire, and wrap it around your mandrel~ you can use a pencil, wooden dowel, knitting needles...those are great cause they come in a variety of sizes....
Keep the wire as tight to the rod as possible, and try not to twist it.

When you get a length of wire wrapped around the rod, slip it off, and then take your flush cutters and just snip a line up from one end to the other, and the rings will fall off as you continue on to the next. You'll end up with a pile of open ended rings like this


The next step is to 'finish' the rings off with your flat pliers. Mine also have round tips, as you can see above. If you look closely at the picture, the two rings on the left are the before ones, the two on the right are finished. I take and pinch them the rest of the way closed and then take and lay them on the flat surface of the pliers, and give them a good squish so they lay nice and flat and are not twisted at all. Once you have your rings, just lay them on the surface where you want them, and stitch over them all the way around to cover the brass, and they make a very nice reinforced and even eyelet hole.


After I got the eyelet holes done, I filled the boning channels on each side of the back opening, and am now ready for binding. I will stitch the final lacing eyelets after the binding is on, as they are just directly above it.

Tuesday, October 26, 2010

17th c Pair of Bodies Progress!!


I have been progressing nicely on this pair of bodies. I am making every effort to be as period correct as possible, and in nearly every minute of stitching, I keep thinking to myself, its really no wonder why men were the staymakers! One really does need a lot of strength in their hands~ I have overly strong hands, and mine are really feeling this every step of the way. Got the back boning channels stitched, and decided to only make 3 on each side of the back opening~ Dorthea's had 4, but this is a scaled down version, and I just didn't like the bulky look of 4 channels. The wide one next to the opening is for the lacing holes.

So next step, once all the channels are stitched, is to fill with your boning material. Whalebone, splints and bents(type of stiff grass) were all used in the 17th c as boning/ stiffening materials. I have plenty of whalebone, and I really would have liked to have used it, but its so darn brittle, it just cannot be cut. Perhaps it wasn't like that 200 years ago when it was harvested, but it sure is now, so I will save that for something with 1/4" channels, something I wont have to cut it down for. A person could also use hemp or jute twine to bone their channels as well, I have used both in later period corsets and it works wonderfully....but I wanted a really rigid, period correct look, so I am using bamboo for Marguarite's bodies. Above I have already cut a hardwood center busk, and bones the 3 channels each side of it. I used the pliers to nip the ends off right at the edge of the material. I was going to work from the center out, like I normally do, but since I had to still stitch the lower edges of the boning channels going up the side of the front panel, and I needed to actually be able to get my hand around the material to stitch it, I switched and did the side sections next.

This really worked out well, and I stitched the channels as I filled them, so the little pieces wouldn't slip out. I used bamboo BBQ skewers, and split them with my x~acto knife to the right thickness, then whittled the edges until they were the perfect fit for the channels. On the side pieces, I cut them to the exact angles top and bottom, then slipped them in, and stitched the baseline below them. Here is a hint when using any type wood material for your boning. Trust me, this will save you much time and effort! Before you fill the channel, first pre-fit or stretch it with something smooth~ I used a metal rod that was the exact size of my channels. Insert the metal rod all the way up to the tip of the channel...and it wont be easy! You will have to wiggle and jiggle it to separate the 2 layers of lining from each other....twisting is actually best, I found. This acts like a glove stretcher, and once you pull it out and insert your boning material, it will slip right in like butter.


This is the main reason why, if you are using a fragile fabric like silk or velvet for the outer layer, you want to have a backing fabric for it, so your boning doesn't pierce it, or grab a thread and make a run or hole. The boning is placed between the 2 linings, not up against the outer fabric. See my rubber gloves~ I am forever changed and love sewing with them on~ they help my sewing hand grasp the needle easily, and I wore one on my other hand while doing the boning, to help grab the bodies better, and they also kept any dirt and oil on my hand from getting ground into the fabric. One really has to get physical when boning a corset like this. I wont lie, there was some swearing involved......

Here is the above bamboo stitched into its channel. If you have angled channels, it really does make a huge difference to take the time and cut the angles in the boning material as well, so the entire channel is filled. If you leave the top and bottom of the boning straight across, it will look "hokey"....this is why I don't like to use steel boning, because it is so hard to cut.


Front panel fully boned~ woo hoo!


Trim the boning right to the edge, the binding will cover this, and keep them from popping out.


Inside. Next step is to stitch the lacing holes at the back opening~ don't fill the back boning channels yet~ it is easier to needle the eyelet holes first, then add the stiffness last.

Sunday, October 24, 2010

A MUST see!!!!

If you are anywhere in the vicinity of Oxfordshire, UK...you simply must make the trek to Witney Antiques to see their current exhibit, "Wrought with the Needle" ~ an exhibit of outstanding English embroideries from 1590~1750 (and get this, many are for sale if you have a few hundred grand in the bottom of your purse) You can see and read more about it here on their website~ www.witneyantiques.com . I ordered a catalogue thru the mail and it got across the pond to me here in the US in a woppin 3 days! Ohhhhh my goodness, it is an absolute treat for the eyes to behold, with wonderful closeup views of embroidered jackets and coifs, mirror surrounds, bead work....if you have at all the slightest interest in early Jacobean, Elizabethan, or Stuart embroidery, you simply must must must have this book

Saturday, October 23, 2010

Front Channels completed!


Here is a picture of the front of Marguarite's 17th c pair of bodies. I have finished stitching the front section of boning channels~ woo hoo! It was not the most exciting thing to stitch, rather boring actually.
Her is a view of the inside. I buried all my ends within the 2 lining layers, so nothing is up against the outer silk. Left the tails long on the bottom edge, as these will be covered over by the binding. I would really like to find a nice kid leather, but may use silk, haven't decided on that yet. Next comes stitching the channels at either side of the back opening, there are 4 each side, after a larger channel for the eyelet holes.

I will leave you with this awesome picture I took yesterday evening~ just LOOK at how huge the moon looks! (above the stack of hay in the center) I just love this time of the year.


Sunday, October 17, 2010

THANKYOU Trevette For the AWESOME TIP!!!!


Today I got an email from Trevette~ she writes

"Rachael, dear, I think you'll find it a lot easier to pull the needle through all those fabric layers if you grip the needle with a (deflated) balloon. Mine is gold, a DMC giveaway years ago, which I keep in my sewing basket, always handy for frequent use. I also keep one in my purse, car, kitchen junk drawer, etc, good for grabbing and opening all kinds of things "

What a fabulous idea~ THANKYOU SO MUCH Trevette! I didn't have any balloons, but I do have a box of latex gloves I keep for doctoring the animals and such, and it worked so well, I just cant hardly believe such a simple thing can make such a difference. My fingers don't hurt at all, and I no longer had to really grip my needle hard to pull it thru. I really like this idea of wearing the glove, as I don't have to pause my stitching to pick up the balloon if I needed it. I can feel the needle thru the latex just like I didn't even have a glove on. We dug the last of the potatoes and such today, and I was going to share pictures of that, but this was TOO GOOD to wait to tell you about! Stitched around 5 hours today, and could do another 5!

Saturday, October 16, 2010

Now I REALLY know why stay~makers were mostly men.....


Uggg. My hands are so tired. I stitched 10 channels on Marguarite's pair of bodies today, and the 3 layers are just so thick....terrifically hard to needle thru and still get the tiny stitches I want. I wear a leather on my middle finger to push my needle(broke two today), but what are really sore, are my right thumb and forefinger, from having to grab the needle so tightly to pull it thru the layers. It actually feels quite good to pound the heck out of these keys. I first stitched the center busk pocket. I am using a masking tape of mark my place, instead of using a pen, or chalk. too messy. I stitched thru all layers, burying my knots in between the inner cotton and fustian lining.

You can see my stitches are not at all even as they should be, but I am managing to keep them small enough, and I actually like them uneven a little, it adds much character when looking at them up close, you can easily tell they are made by hand!

Next I drew out my line with a temporary pen....well, it is actually a water solulable quilt marking pen, thats really dry, and around 5+ years old...so you can barely see the lines it makes, and they don't last long! he
I stitched this top line that defines the bust and the front area of the boning next. These two sets of stitching, are my baselines that everything else will flow off of. When stitching channels for any corset or stays or bodies....in any era, always start in the middle and work outwards. You will avoid any wrinkles in doing so, and all will be nice and even and flat. One could be tempted to stitch the diagonal line going up the sides at this point too, but DONT!! This line of stitching will be last, and the most difficult, as it is stitched after the boning is fed into the channels. So for now, I'm going to relax and not stitch any more this evening....I think Ill go oogle over that staircase some more...I see the V&A has chairs right in front of the display, I am sure I'm not the only one who could sit and stare and daydream about them all day. Don't know what I'm talking about??? Well scroll down and follow the link in my last post!!


Wednesday, October 13, 2010

17th c Bodies....


I am finding 17th c bodies to be deceptively simple in construction. The pattern on Drea Leed's Online Corset generator is a single piece...how cool is that? The original ones were made of 3 pieces tho, each made separate and then whip stitched together to assemble. This was so that if a person's weight or proportion changed, they could simply unpick the sides, and add a different back piece, as alot of them were front closing. This front closing type leaves NO ROOM for adjustment, they must fit perfectly, and come tightly together in the front, with no space. I wonder if they laced them over a busk???? hmmmmmm.....that is an interesting thought isn't it?? In any case, Marguarite is a dollye, and hers need not be 100% accurate, which, on her smaller scale, is why I am not cutting this pattern into three pieces, I am leaving it one. Another interesting thing about 17th c corsets you all may not know, or realize, is that they are meant to give a rigid FRONT to the body, and so they are normally only boned in the front. They are supposed to be extremely comfortable to wear, if they are not, then you are not wearing the bodies correctly. They do not 'suck in' anything, no matter how tight you lace them, the small waste you see in paintings and the like, is merely an illusion created by the long extended front point.

I cut each of my 3 fabrics with no seam allowance, as they will be bound around all edges. If you are going to make one along with me, cut your pieces out on the straight of grain!

At first, I was going to use the stitching channels recommended on Drea's pattern generator, but after I got this far, decided I really didn't like the look of it. It has channels on the sides, that I have not observed at all on the Effigy or Dorthea bodies. Those both are boned in the front and very back only, so I decided to pattern my channels after the Dorthea bodies. I also realized, that 1/4 inch channels are just too large for the scale I am working at, they take up too much space, and just don't look right.

My daughter's school ruler is just the right size for my busk, so used it for reference, and as you can see, the 1/4 whalebones on the left in the picture are just way too large. No matter WHO tells you they can be easily cut, has no idea what so ever what they are talking about. You can cut them with scissors, but baleen is a brittle substance, and they crack along their 'own' grain....no matter how sharp your knife or scissors are. Trust me, I thought I would be able to cut them in half lengthwise, to use in 1/8 channels, but nope~ no can do Kimo~ Sabe! So now picture me ransacking the house, trying to think of something I could use....all my reed I have in various shapes, is all 1/4" and larger. Then I found a drawer of bamboo skewers.......mmmmmmm. I think they will work perfectly! They are tough as nails, absolutely rigid, and most importantly, small enough to give me the correct period look I am after~ note the pic of the Dorthea bodies I am modeling them after. If you enlarge it, you can see that using the larger whalebone, while being exactly period correct in substance, will not give me the correct form or ratio of boning channels per inch. And who knows, since there are only 2 surviving corsets of this era, I suppose someone could have used bamboo in one....perhaps!


This is my first draft of the placement of the boning channels, modeled after the Dorthea above. There will be 4 channels on each side of the back opening, just like the original, and 26 channels each side of the center busk. They will be shaped down below the bust cup, just like the original. Marguarite has a very flat chest, but likes very much the idea these will give, of her indeed having a little something there :)


Monday, October 11, 2010

Ink Tests & Final Fabrics for Bodies....


I will be inking my design for Marguarite's jacket by hand, with a metal nib. I'm not going to use an actual quill, cause honestly, I cant cut them at a consistent angle to get the same width of a line. They work well on a smooth paper, and in an up to down motion, but nothing else! HA! I have drawn on fabrics for years, so it doesn't bother me or make me nervous about messing up...but my normal India ink I always use, has recently been """"improved""", and is total crap as a result of said improvements. No more shellac used, and they have gone to a .....(gag) plastic base. blek I ordered a couple of bottles to try, actually the only two India inks that I could find that were being sold as WATERPROOF & PERMANENT. Well, as is normal these days, things are not what they are advertised as.....


I did both samples at the same time, on the same day, with the same pen, on the same fabric, a cotton muslin. Used the same nib. Everything was the same, except what I drew on the doodle, and the ink of coarse. After I finished and let both dry for 5 minutes, I ironed the heck out of them with a dry iron on highest setting to 'set' the ink. Let them cool and sit for half hour, then dunked them in the water. While they were below the surface, I massaged the piece in between my thumb and fingers, to see if any ink would run......well, as you can see~ it did! The one above is "Calli Jet Black India 010" by Daler Rowney. It is supposed to be both permanent and waterproof. This stuff smeared instantly , NO rubbing needed. As soon as it hit the water the ink lifted~ absolutely unacceptable. Cost for this 1 oz bottle, 5.00

Next was an ink from just up the way from me here in Golden Colorado~ Dr. Ph Martin's Black Star Waterproof India HICARB. Now when I dunked this one in the water, nothing happened....so I scrubbed the heck out of the sample, and still, nothing lifted, as you can see. So this is the ink I will be using, and its got a higher carbon content than most India inks, so is a bit blacker, much to my liking. 17th c inks had a very high carbon content as well. Cost of this 1 oz bottle, 9.00 ....and worth every penny
I have also made my final decisions on the fabrics I am going to use for Marguarite's bodies...and I am SO excited about them! Ya I'm a bit nerdy about it, I even made a little 3 min video for you to see. This is them below~ a goldenrod yellow silk shot with lavender for the outside, late 19th c 100% cotton sheeting for the backing of the silk on the front, and a FABULOUS mid-late 19th c handwoven fustian for the inner lining~ this stuff is so thick and heavy, its really awesome. I am going to stitch in the blue 100% cotton thread, and am pondering using the antique whalebone stays I have amassed over the years as a stiffener....I may use bents or reeds, haven't decided on those yet. Ill will be stitching up a sample soon.