Showing posts with label pretties. Show all posts

Monday, November 20, 2017

It's so Dark....

Makes me Want to Hibernate
I don't know what is up with it being so dark lately...but I don't like it. Here in southern Colorado, its midnight dark by 5pm! Depressing. I don't remember it getting so dark, so early last year.... Its hard to get things done when all I want to do is sleep. I have been working very hard tho, tho at the moment it doesnt look like I have anything to show for it. Last weekend I worked the four butterflies on the top panel of my flat top casket...so this weekend I was super excited to get to start my two angels. Their wings are a big focal point~ each feather I am working separately.  I drew in lightly with pencil where each feather would go....eventually.

 So there's not much to show for an entire weekend of work...the two angel busts are attached now...but thats about it.  You can see their poor feet dangling on the panel~ I just have them pinned in....not sure if they will even have feet or not yet....

 The entire weekend, just about, I spent working 2 pieces of needle weaving....for portions of their gowns. I wanted them to be open and kind of lacey...so made up my own stitch. The second piece has more open areas, so they both wont be totally the same. It was fun, but took what seemed like eons...

 I have been working like crazy out in the shop trying to get orders filled for Christmas, and working on orders due in January and Feb(I just can't crank out things in a day)....I think it is hard for people to really understand how much time and effort I put into my work....so I took a few pictures of the shop yesterday to try and maybe show why ya'll have to wait for things.  When you open up one of my kits and see all the cut and portioned threads....they didnt arrive like that! We had to measure, cut, package and label each and every container....me...myself and I. We have a great time doing it...but it takes time.  Oh...and that awesome picture on the cover....of the finished model....we stitched that too, so that we can write you the most complete stitching instructions possible. We make an awesome team, ....me, myself, and I...but we can only do so much in a day.

 The wood for my stitching tools I mill myself...we are planing down stock for padded mirror cases in the picture above.... Each and every hole on a thread palette, gets drilled not once, but twice~ once from the front, half way, and then again from the back, so there is no tear out....same goes for holes in the slats of my slate frames....there are 48 holes on a single large slat, so 96 holes per large slate frame, drilled twice is 196 holes I have to drill for one large slate frame....then they all get sanded.....and yes, each and every hole I drill, gets sanded inside the hole!  When you see a shaped thread winder...I cut out each and every one, myself, on a scroll saw. If it's a circle.....dont even dare think I use some hole saw jig....absolutely not~ I cut that sucker out freehand, absolutely.

 Speaking of slate frames.... I had a visitor to the shop the other day see this stack of frames I have to make the mortise & tenon joints for, and he says...'so you use a mortising bit on a router for those I been thinking about getting one'   To which I replied, "no~ I dont use power tools for my slate frames~ theyre too small. A power bit has too much power and bends in the wood when its this small~ I use rasps and a chisel."  ...He didn't believe me until I showed him, to which I then got the~ you are crazy comment. Its  what I do~ I enjoy the process just as much as I enjoy the finished product.

I wanted to have a slide top spool box ready for eBay this weekend...I got the box done, but not painted, so it will be coming soon! I am also working on some regular spool palettes for those of you who dont want a hole box. Here are three sets of spindles....and yes, I make them too~
  
 It took an entire afternoon, and I mean an entire afternoon to sand and shape the tops of the spindles!

 I have been working on some new designs in between other things. Got in some new wood, this is quarter sawn sycamore, and I love love love the design of the grain~ its only achievable by sawing the wood this way.  I have been wanting to make this shape of a thread winder for a while~ I have to have a steady hand on my saw....it's a replica of a c1840 winder...coming to eBay this week!

 As you can see, we(me, myself and I) have all sorts of things going at once...while some things are getting clamped...I work on something else....everyone is patiently waiting for their turn!

 Ok...I'm so excited about it, here is a peek of the thread winder going on eBay this week! For me, this is the best winder I have made to date~ I have been experimenting with different finishes to try and get a more Early American looking finish to my work, and finally, finally have a lacquer based finish that I am super super happy with. Its strong and super smooth to the touch. The varnish I have been using sometimes can feel tacky to the touch after fully cured~ which was just the nature of the varnish...I have been trying to get my finish to look and feel like a hand rubbed and worn finish....and finally, success! I know ya'll will be as happy with it as I am....not to mention the colors of the design~ these are water colours folks!


And if all that wasnt enough to keep me busy... husband decided to throw a new puppy into my day. We lost our beloved Yetti on the 4th of July, and well...I really wasnt ready for another Pyrenees yet....any puppy for that matter. But what can you do~ that wicked little face is so cute. I personally wanted to name him 'White Devil'....because he tears around the house, eats everything in sight...my shoes, the kids shoes....pots, pans...I caught him chewing up tiles from the floor the other day :::sigh:::  ...but alas, his name is Yukon, so everyone~ say hello to Yukon....he wont be little little for long!

Saturday, June 17, 2017

an Heirloom Quality Box on eBay this week

One of a Kind Flemish Slide Top Spool Box

I have been working on a special, Heirloom quality box to offer and have it up for sale this week on eBay~ you can find it here , or click the link in the sidebar to me eBay specials.   I have over 42 hours of work into painting this box, aside from actually making it, and finishing the isnide.  I wanted to make something special, that there will only be ever just ONE of~ so if you like it, feel free to bid on it!  For the hours I have put into it, the start price is a steal of a deal~ I challenge you to find anyone else to produce a nice slide top box and paint it for less~  So many times people will not bid on my eBay auction, and instead ask me to make them one of whatever it is I have offered~ not so on this piece. I will not take orders ~ this is the ONLY one

 If you want something really special and pretty to hold your stitchy needfuls, that no one else will EVER have~ please, go check it out!

Wednesday, July 08, 2015

Bears & Sea Shells

Summer Sea Shells on eBay this week!
  I hope everyone had a Happy & safe Independence Day holiday! I finally finished the above palette set and they are on eBay this week! I say finally because its taken a bit! I designed the clam shell palette for a custom mermaid set I did a bit ago and had shells on the brain~ I have wanted to paint some for a while....they were such a popular motif to paint at the beginning of the 19th c~ I wanted to see what all the hub bub was about. well. Oh My Golly! I love painting seashells!  They are quite involved actually and take extra time to paint, but are so much fun~ so colorful and happy!  I picked some favorite sea creatures to go with~ a star fish, seahorse, and clam for thread winders. So if you are one of the many who have been requesting seashells, you can find them here on eBay this week.   I think perhaps I should paint a bear on the next palette set.....
  We have had a few visitors this summer....I usually get so excited I forget to get my camera...a few weeks ago we had a little 2 yr cub...the blondest bear I have ever seen in my life~ he was the color of a bananna ~ I am not kidding!  This fellow stopped by day before last...well, early in the morning, and was so comfy in our tree he decided to take a nap so had plenty of time to go get the camera...perhaps I need to put him on a skep palette...or maybe a dancing bear!

Saturday, June 27, 2015

Painting My New Slate Frame

'Tools' Should Be Pretty!
   I just made this Ash slate frame for working my flat top casket and tho I really like how it came out, it was just so plain!  I thought, if I am going to be merrily slaving away for months over work stretched on this frame...it should at least be pretty! Something simple...not to busy or distracting...but nice to look at, so I designed a simple rose border with my name at the center of one of the bars. Its taken me all week to paint~ in early 19th c schoolgirl style with India ink and watercolours.  First I inked a bit of the vine and my name.

  I would prefer to paint outdoors, but with watercolour it is quite picky about the weather~ to much sun/heat, and the paint dries right on the brush...too much wind, even the gentlest of breezes~ same thing. I cant even have the ceiling fan on so I sit by my window at a little table where the light is good. Just like in my china painting, many thin layers of paint always looks better than one thick one globbed on. I love to paint~ not only do I enjoy the outcome, but the process even more~ I put on my Al Bowly...or maybe some Astrud Gilberto, and can sit and paint all day long!
 After inking I have added a bit of green  to the vine and blocked in the base for my roses
 Leaves are now drawn on with more India~ buds are painted
 Lastly the roses get their delicate petals and will sit a day before varnishing
 I have had many folks express interest in me making them a slate frame~ and answer if Of coarse I would be happy to. This size frame I am really liking, outside measure is 24"x 24" with a working inner area of 21"x 19" at the largest, all the way down to 7" x 19" smallest dimension. I can make larger or smaller frames, if you are interested just email me~ address is in the sidebar.  Price depends on what wood I use and size~ and what a special gift a custom painted frame would make for the needle worker who has everything!
 My name~ inked in India with an actual dip pen. I will say here that a distinct difference can be seen between those who 'cheat' and use a modern Pigma marking pen, and those that draw with a quill or steel nib pen. There is a flow and pooling of the ink when using a quill, not to mention India is very opaque and just a deep rich dark black~ you just don't get the rich colour with a  modern pen, and as well, there will be telltale distracting little dots at the end of each pen stroke from a modern pen
 This is the smallest dimension at 7"x19". You will notice I do not staple canvas to the stretcher bars~ I prefer to lace my work on all four sides like was done in the 18th c.
If you liked & missed my first skep thread palette set, I will have another on offer on eBay this next week~ this time painted with a double skep and inked around the outside edge of the palette
 "How doth the little busy bee Improve each shining hour, And gather honey all the day, from every opening flow'r"
  You can find it by clicking the link on the right to my eBay specials~ it will be on later today

Sunday, June 21, 2015

19th c Schoolgirl Art Reproduction Thread Palette on eBay this week!

Joys of Summer Palette Set
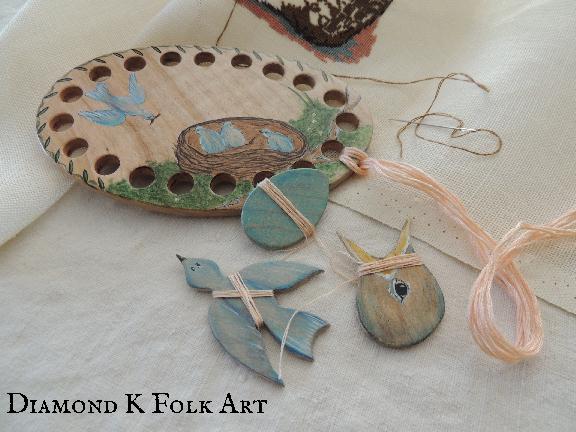
 How fitting that the week Squeek's eggs are hatching,  I have this set available on eBay?!  I love it~ painted with a mamma blue bird feeding her three lil babies in the nest. If you are familiar with schoolgirl painted furniture or art, you may recognize this design from an early 1800-30 painted box.  The three thread winders are an egg, bluebird, and a lil chick's head~ they are always so hungry!  If you would like to see more pictures of it, or are interested in purchasing, you can see it here on eBay this week!

Sunday, June 14, 2015

Butterflies Everywhere!

Rose & Butterfly Palette on eBay this week!

  My next thread palette is the set above~ I really like how this one came out~ I know I always say that, but I really did enjoy this one! The weather has been so wonderful, I could still paint outside (notice I said, could ~ the mosquitoes have hatched now and I have had to move back inside!)
  Emma sat out with me and worked on her landscape painting with Grandma Dixie....shes getting so old and grey, but still thinks shes the biggest dog in the land!
  On the very outside edge of this palette I inked a few lines from one of my favorite Norfolk samplers done by Mary Southgate, 1806~
 "Pray let the needle claim some little share~ With shades of silkes to copy nature faire"

  There were several butterflies that flittered by while we were painting...along with a zillion little green caterpillars that kept dropping out of the tree above us.....note to self...not good to paint under a box elder tree early in the morning.... anyway~ this fellow was like a B52 bomber compared to the others~ he came somewhat crashing through and landed in the driveway...maybe a bird tried to eat him? He was quite exhausted and let Emma hold him for a bit, and when he had caught his breath, off he zoomed.

I do love butterflies~ and of coarse I could not just paint one on the palette, I had to make three different thread winders to go with! Love love love love them, so much so I could not bring myself to paint one side only, so they are painted on the backs as well! If you would like to see them or are interested in purchasing, you can see them here on eBay this week.

Friday, May 22, 2015

Inside my Flat Top Casket, FINISHED!

One Small Step...
    ....at a time. I always prefer to finish the inside of a case first~ then when I get the outside done, its really done!  Hope you enjoy this little video~ the doors are hinged with magnetic catches... I am taking a little respite to get over being sick...(thankyou school germs~YUK), and have been working on some really marvelous stitchers helpers for the shop...youre gonna really love them, I mean really love them!  Made for stitchers....by a stitcher..you can bet Ill be saving a set out for me!!!

Saturday, January 11, 2014

Found & Finished!

The Only snow we have seen for a bit.....

   So back in 1999 when I was pregnant with my son, I started this wonderful counted cross stitch Santa. It was a Designs for the Needle kit that came with blank cloth, threads and a chart. I used to do counted work all the time, this is the 4th big Santa....I like to start a the bottom and work up, so he was done up to the first ring on the lantern, just above the first polar bears eye. We lived in Upstate NY then, and soon after moved out here to Colorado...so it got rolled up and stuck in a box.
  That was YEARS ago and I just forgot about him for a few years, poor fellow.  About 5 or 6 years ago I found HIM, but not the kit with the chart. Back into a box he went....then found him again last year, and that time actually looked for the chart but couldn't find it. He is BIG, on a rolling scroll frame I wanted to use for something else....so he has been sitting out to remind me to look for the chart!  Once I got my beaded basket finished the last week of Dec, I literally tore the house apart looking for that blasted chart~ took me about 3 days, but I found it!!!!!  WOOP!   And, even impressing myself, I got the entire thing done~ now I can use the frame for what I want~ I knew if I took him off it before he was finished, hed NEVER get finished!

  Honestly speaking...I have never disliked a chart so much in my entire life!  I do not recommend this kit to anyone!  The chart and the picture do not not not go along with each other at all~ so much so that I scrapped the chart altogether for the back stitching and french knots and just winged it.  For example...the gold bells on the pack~ half of them were red according to the chart symbols....and the blue part intermixed with red and blue~ I was merrily going along with the chart in my cross stitches...and thought, wow, this looks like a bell....what the heck~ red??? and blue????  So I had to rip out a huge section, which I HATE!   And thread....I have never ever ever run out of thread in a kit either~ but this one had 4 colors I ran out of...and not by a squeak either~ I needed nearly half a skein more of a red that was in the border than what was provided....and am only using 2 strands!  Ohh....but I guess they made up for that, giving me 7 yard long chunks of the nasty PURPLE that was ONLY sposed to be used for the rocking horse!  BLEK! A Purple horse in the midst of such other pretty colors...as you can see, I made mine grey!

Saturday, June 01, 2013

An early 19th c Flip Toy Reproduction


The simplicity and quint nature of early 19th C children's toys and amusements have always captured my attention~ I adore them. It wasn't until I made my first reproduction of a little pop up cone doll a few years ago, that I realized how involved and utterly confusing they can be to make.  I especially like the early optical toys, made from paper with simple hand colored engravings, that by a twist of the wrist or flip of a finger, they move and in turn make something 'magical' happen.   Many of these toys began their lives in the early 19th Century~ before that time, it was a rare occurrence in the 18th c to have toys specifically made for children, as a 'childhood' of play and learning was still yet unknown to the majority.     A while ago I ran across an original Victorian era flip toy, still in its original paper sleeve~ it was a highly coveted thing for sure, hardly ever played with, with a different hand colored engraving to each side. Once the handle is rotated, the images changed from one to the other. Simple enough I thought.....

 I couldn't have been more wrong.   It is always amazing to me how things so simple and plain, are so difficult to reproduce!  I think if I had a Master's degree in engineering I still would have been pulling my hair out trying to figure out this little toy. Its taken me weeks literally to get this one made, but I think you will agree, the final product is quaint and cunning and well worth the effort.  Do enjoy this little video of it, as I am quite proud of how it came out.   Ill add the link to the eBay auction later on today if you would be interested in purchasing it~


Friday, February 03, 2012

Beads & More beads!!!
Aren't they beautiful? I love beads~ these are tiny! not as tiny as my 22/0 antique seed beads, but still really REALLY small~ they are size 15/0, about 25 per inch strung. These are modern made Japanese glass beads, and I chose them for my knitting because they have a bit larger hole for my thread to pass thru, and, they are all very uniform in size. Did you catch that, that I said knitting???? Yes, I really am that crazy


I have been working on the other side of my little knit Quaker pin ball, and have chosen a wonderful late 18th c design I will be working in beads for it. When knitting with beads, they are strung on first in order, so that whilst knitting, when you need one, just just slip one up and knit it in as you go~ I think the colors look so pretty, really nothing like what the finished design is going to look like~ what do you think my design is, by looking at the beads all strung ready to be knit???


Sunday, January 08, 2012

Intricate Challenges.....


I am not the kind of person that makes 'New Year's Resolutions'....but I do like to identify my goals for the coming year at its start...and usually, I like to start some interesting something I have been meaning to get to, in January. I guess, with starting at the head of the year, in my mind's eye, I will have the next 12 months time to figure out my new whatever-it-is. One of my projects for this year, is knitting more period correct, 18th century fancy pinballs. Now the ones I did last year, were FABULOUS and I absolutely adore them~ and so do my children~ they have all asked me to make them one.....but being....well,me...... I want to make dollye size ones, with precious sayings and mottoes and beads knit into them. yaaaaaaa....right. sounds endearing enough? doesn't it? Above is my start, I am using size 12 DMC coton perle, on 6-ought (000000) lace needles. Evidentally, I have gone absolutely looney, and have a subliminal need to make myself go blind in the process.


I mean...good grief! WHAT THE HECK AM I THINKING????? These blasted needles are smaller in diameter than the straight pins I use for my sewing are!!! And this thread...size 12? My dental floss is bigger. Ohh well, I have started already, so will have to finish :) At least I will have one side done eventually~ how difficult it ends up being, will decide if I actually come out with a finished pinball, or a little framed what-not for dollys wall. The above picture shows 4 completed knit rows, and...gasp, as I am tracking my time, a bit over 5 HOURS of work so far.


post script~ if you read the commetns, you will see one of the little doilies my Mom crochet me so many years ago for the dollye house~ of coarse I still have it! Love You Mom! xoxoxoxox

Monday, March 14, 2011

TDIPT Mercantile update tonight, 7pm CST


Did you all here in the USA, well minus Arizona...remember to set your clocks ahead yesterday? I hope so :) I am so ready for spring! Just a wee little update this evening, one dollye and the very first of my new tiles~ do you see it in the picture above????
Ohh I am certainly addicted to making these~ if I had a kiln, I would be making them in porcelain, (I want some for my bathroom!) but since I don't, I have done them up in mache~ these really are special, and I am so excited to share them with you all. I hand press them from antique springerle cookie molds and presses~ I have been collecting the modern reproductions for quite a few years and they really are special~ all reproductions of early hand carved cookie molds dating back to the 1600's. I hand paint each, and glaze them to make them each unmistakeably 'Diamond K Folk Art'! This one I am offering this evening is a c1820 Beidermeier Garden Ladye, and she is quite large~ almost 4"x6", not including her hanger. These look wonderful hanging on a cupboard door~ I have painted this one to resemble my favorite powder blue Wedgwood.

Saturday, March 07, 2009

New Easter Pretties in my ETSY shop...


I have been doing a bit of spring cleaning this week, and yesterday found an entire box of Easter Egg Ornaments I made for a show in 2006. I sold out of these there, so I thought!! I have put them in my ETSY store in lots of 3, and at a great price too! I originally sold them for 22.00 each, but because some in each lot are dated 2006, I have priced them at 25.00 for the entire lot~ quite a savings! They look so wonderful in a basket like I have them here, or on an Easter Tree. Each lot is also good for one entry into the Fundraiser Giveaway too...so go check em out!!

Saturday, May 10, 2008

The Workbasket........a la 1855

Several of my dear readers in bloglandia have asked about shoes recently. Shoes are always, and have always, been favorites amongst us women....don't ask me why! Tomorrow being Mother's Day here in America, I thought it fitting to share with you a pattern for a lovely little pretty Watch Case, courtesy of page 553 of the June, 1855 issue of Godey's Lady's Book.


As you can see, no pattern is really needed, these are so simple to contrive! There are not even any instructions given in the Lady's Book, just the illustrations you see above. These were very popular thru the 19th century, this particular little shoe is intended to hold a lady's pocket watch when not in use, but they are very charming holding anything really~ from little dried or paper flowers, to real ones picked out of your flow'r bed. You could also add a bit of stuffing and a little silk covering, and have a very cute pin keep. What a perfect little 'needful' you could whip up for a cherished Mother's Day gift tomorrow! I made this one up today in about an hour~


Mine is made of silk in my two most favorite colors~ blue & brown together. You could make it up in a SNAP if you just wanted to use pretty paper instead of fabric.

What you will need~
pencil
paper
snippet of fabric for sole & vamp
little ribbon scraps for trim
glue
thread & needle

1. So you may start by drawing you out a shoe shape. I used the one in the book, but you could draw your shoe with an even pointier toe, or a stubby flat one. First draw the sole shape, as if looking at the bottom of your shoe.

2. Next, draw out the shape of the vamp~ which, as you can see by the illustration, is the same shape of the sole, but widened a bit~ the wider you make the vamp, the larger/deeper the little pocket will be on your shoe(where you would put your foot into)

3. Assembly~ If making entirely of paper, just glue your vamp to the sole around the edges~ takes about 2 seconds! If you are making of fabric, I prefer and think it easier to decorate/trim the vamp first, before attaching it to the shoe sole. You want to bring the edges of the vamp over the sole, and fold over to the BACK~ and glue it just around the edges. Once this is done, then I take a scrap of paper, cut the same size & shape of the sole, and glue this on the back, hiding the edges of the vamp & making it look nice & tidy.

4. Add a little string or wire hanger from the top, add what pretty trims to your heartes' desire, and voi~la! finito!

Have fun~ and Have a Happy Mother's Day!


Sunday, January 06, 2008

A Collection of Love Tokens.............
Will be available this month on eBay, and the TDIPT Mercantile on the 15th of this month! The fabric covered mache keepsake box will be on the Mercantile~ with its bubble covered vignette in the lid~ Ohh I love making these. A reproduction of an 1830 fashion plate, along with vintage flowers & ribbon is arranged permanently in the lid. See the hat in the box behind the lid???? It is a reproduction c1835 bonnet~ sized perfect for dolly~ all hand stitched together of fabric covered board~ it goes along with the keepsake box~ woohoo!
I have made just a couple special shadow box Valentines~ This one here is accented with the teensy guard feathers from a peacock quill around the engraving, with loops of precious hair~ these have come from one of our horses, 'Apple'................SO beautiful! I think I will list one of these on eBay later on tonight.....
Ohhhhhhhh there will be some of my glass glittered 'candy heartes'.....to use for ornaments or bowl fillers...... and some special lil Valentine's Day Cupids I'm SO in love with! They are hand sculpted mache, with lil wire & tinsel Halos....nestled up in a mica covered 'cloud'....each has a banner that dangles so daintily, and each are different~ all one of a kind pretties I hope you will enjoy!

Monday, December 31, 2007

My New Heirloom Victorian Love Token Valentines............
As promised, I have some wonderful new pretties for 2008! Above is one of my 'new' heirloom valentines, or remembrals. It was a very popular past time in the early~mid 19th century to give tokens of affection to friends and loved ones that contained precious bits of hair, flowers and ribbons. These are my versions.
They are made to hang on the wall, and are very nice size at 6x9 inches, not including the hangers. this one has a beautiful reproduction of a Victorian sentiment, that I have hand painted with watercolors.
Inside, you will find 2 gentle hair mementos, one strawberry blonde, very delicate and braided, arranged into a bouquet of graceful loops, 3 for the trinity......this one held by a crimson wax seal, made from a c1820 antique letter seal. It shows a flower, and says 'Forget me Not'.... below it I have inked the name 'Jane'
This is a side view~ another black hair piece, along with some dainty dried straw flowers, and red silk ribbon are contained permanently inside a wonderful vintage thick papered box with window front. Each are one of a Kind, and this one can be found in my Mantua Maker's Mercantile Blogstore~( link is in the upper right hand corner)