Showing posts with label 17th beaded stumpwork. Show all posts

Tuesday, October 24, 2023

New Witney Antiques Exhibit of 17th & 18th c Needleworks

 Choice & Precious Work


If you are in England ZOOM to Witney Antiques and check out their current exhibit, Choice & Precious Work. Firstly, it is amazingly FREE, and secondly, it is the first of two exhibits that will be showcasing the Elizabeth Hall suite of 17th c needlework & embroidery. Later pieces from the 18th c have been added to  her collection by her descendants. I cannot stress to my Dear readers enough how very rare these pieces are, and that they have been so well taken care of and passed down through the family together. This is a once in a lifetime change to view such a collection~ if you cant get there, then order the catalogue! It can be had directly from Witney Antiques, or if you are in the US the Attic Needleworks will be carrying it here shortly, so give them a ring and reserve yourself a copy!

Thursday, June 01, 2023

New Beadwork Class Open for Enrollment!

 Fruit of Thy Hands

I am super excited to announce my new 17th c beadwork class at Diamond K Folk Art Online Academy is now open for enrollment. I am so far behind from being sick last year, I am trying to catch up & sincerely apologize to all of my students patiently waiting for the classes I was working on to be ready.   
I designed this project class to teach the basic detached techniques used in making beaded baskets like mine shown above. What is learned in class can be applied to any and all the flowers and fruits and acorns etc I made for my basket!

If you are not familiar with 17th c beaded baskets, I can refer you to read an earlier post on them here. There is a link to the basket above at the Met~ note the wonderful beaded oranges and lemons in the border surround. I will teach you how to make them in this class~ though you will make strawberries, the technique is the same for all fruits/ nuts etc. 


Class starts on 1 July, and the kits will ship mid-June. If you would like to learn more about it or enroll,  you can do so here, or click the Diamond K Folk Art Online Academy PAGE TAB under the header at the top of the page to see the current classes offered.

Tuesday, May 09, 2023

10 Spots Available

 Beneath Thy Poft Oak

Beneath Thy Poft Oak, The Art of 17th c Beadwork is a wonderful class that will teach you all about 17th c beadwork. It is a 12 month class that I am now running individually, so you will not have to wait for a class to fill if you are interested in taking it!  I have just 10 class spots available.

You can learn more about all the particulars and/ or enroll here. You can also click the tab at the top of the blog page here for the Diamond K Folk Art Online Academy to see all the classes currently offered.

For those of you who keep asking me about teaching here in the USA,  this is the perfect opportunity for you to do so right from your own stitching chair! This is the most comprehensive class I have ever offered, and like all my classes, all materials you need to complete Beneath Thy Poft Oak are included in the class kit. All the student need to provide are a few tools and a slate frame. The class is divided into 12 easy-to-complete monthly lessons. Each lesson contains a slew of pictures, step-by-step photos, instructions, and videos for completing this pastoral Texan scene.  This is not just a class to work the shown picture~ it is a class aimed at teaching you all you need to know about 17th c beadwork techniques and how to apply them to other projects you have milling around in your head.

As you can see above, my scenes are complete. Ladye is not just sitting under a tree with a one-dimensional top of a skirt draped over her lap....she has beautiful legs, shoes, stockings, and garters under her gown. 

Each kit comes with a one of a kind 3 piece hand sculpted papier mache figure set (bust and two arms)
.
Along with flat and looped cartouche treatments, speckling, grounded and in-hand peyote stitch, flat and curved couching, French wired leaves and flowers, detached hair and lace techniques, netted overlays, designing and working clothing, and bead history, I will also teach you how to make these gorgeous fully detached yellow roses. The same technique can be applied to any flower~ known to nature or contrived of your own imagination. 


Friday, September 23, 2022

17th c Beadwork Class Starting 1 October

  Twelve Spots left!


If you are interested in learning the art of 17th c beadwork, aka beaded stumpwork, there are 12 spots left in my Beneath Thy Poft Oak class that starts 1 October. This is a twelve month long class, and I am not planning on offering it again until at least 2024, more likely 2025. You can learn more about here . 

Happy Stitching!

Wednesday, September 07, 2022

Future Class Dates...

 A closer look at my Beaded Stumpwork Casket

Here is a video sharing some closer looks at my beadwork casket. I chose to work my entire casket in beads, but there are literally oodles and oodles of extant 17th c silk embroideries that contain motifs worked in beads.


Registration is still open for my 17th century beadwork class, Beneath Thy Poft Oak. Class starts October 1st, 2022. I have had several folks ask me when I will be running it again, and the answer is honestly, probably not for some while. The class itself runs 12 months, so that puts me at 2024 for the next running. However, I am booked for in person teaching then, and as well my last is graduating from high school, so it may not be 2024, more like 2025 or 26 if I can still get the materials for it. 

You can learn more about it/enroll by clicking the link to my Online Academy classes at the TOP of this page, right under the blog header. 

Happy Stitching!

Saturday, September 03, 2022

So I was Thinking....

 And Had This Idea...


 I shared this picture the other day on Instagram(link to my Instagram is on the right in the sidebar under links)...I love this picture, even though I absolutely really do 100% hate seeing my reflection or having my picture taken. 

I was filming my casket for YouTube and was just vegging out staring at it and saw myself there. Immediately I thought of the early ones, and how absolutely awesome it would have been to SEE who made them~ who's reflections those mirrors had projected for so many years. It's been a few years since I made this one, but I still look basically the same, so I printed this picture out and it will forever live in my casket. 

I hope my fellow caskateers will do the same!


Tuesday, August 23, 2022

Beads & Baskets

 My 17th c Inspired Beaded Basket 


Offered this week is a peek at my beadwork basket I made back in 2013, hard to believe it has been 9 years since I made this. Check the notes for the video, I have a link there to the actual 17th c basket in the Corning Museum of Glass's collection that was the inspiration for my basket.

I hope you do something today that not only puts a smile on your face but makes your heart happy too
XOXOXOX

Thursday, August 18, 2022

17th Century Beadwork AKA "Beugle Works"

 Applying Learned Techniques to Different Projects


Over the next few days, I will be shooting a number of videos of different things I have made using the techniques I teach in my 17th c beadwork class, Beneath Thy Poft Oak.  So many marvelous things can be made using the core techniques from class~ change the beads... the pattern...change the colours and BAM! you can make some new something of awesomeness!!!  Today I will share a peek at my Padded Mirror Case. While I no longer offer this class specifically, I do still sell the pattern and figures for it. The surface work, three-dimensional berries and leaves, and clothing/figural work are all covered in the Beneath Thy Poft Oak class. I think the only thing not covered in this piece, is the making of Kings Crown, and the covered watte acorns. All of the beads on this piece are antique, which adds to its perceived complexity. As well, note that all of the beads are NOT the same. There are big ones, little ones, and metal ones....there are cut charlottes, and large bone beads (the berries above the Queen). There are opaque, transparent, satin, and greasy glass beads. For a proper 17th Century impression in your beadwork, aside from the colour palette, the more variation in materials you can glom on, the better!

Sunday, August 14, 2022

17th c Beadwork Class

Beneath Thy Poft Oak, 2022 Registration Open


 Registration is now open for my 2022 running of Beneath Thy Poft Oak, The Art of 17th c Beadwork. Spaces are limited so if you are interested, you can learn more about all the particulars and/ or enroll here. You can also click the tab at the top of the blog page here for the Diamond K Folk Art Online Academy to see all the classes currently offered. 

 It's hard to appreciate any beadwork in a flat photo, so I made a video for you. I will have more videos in the coming days of other beadwork projects that can be made using the same techniques that I teach in class....my padded mirror case, beaded basket, and of course my beaded casket~ I hope you'll check back!


Thursday, January 27, 2022

Last week to Enroll & A Finish!

 Do you want to Learn how to make THIS?

There is but a mere 4 days left to enroll in my Spring 2022 class Gum Work~ The Art of 17th Century Gummed Silk. You can learn more about it and enroll here. It is such a beautiful and fun technique, and class starts on Feb 1st!

I also am so proud to share with you one of my student's finishes~

Patti was in my 2020 class Beneath Thy Poft Oak. Over the span of a year, I teach both surface and detached beaded stumpwork techniques, all combined into this beautiful sampler. I am so proud of Patti~ this is her first beadwork! 


I knew she wanted to incorporate her class piece into a casket when she started but did not realize it would be the focal point, as in, the work on the outside.  I think her vision was inspired and the result is a stunning example of less is more


She has worked her initials and date alongside, and due to forethought in backing preparations, her final mounting of the silk satin onto the wooden casket is just beautiful.


Her casket has such an elegant and classic aura, the interior fittings just as splendidly finished as the outside. I really love her use of blank space to create a peaceful & serene feel to it overall. 

Do not think that every nook and cranny of your casket's stitchable areas need be filled to the max, and I hope that you will let yourself be inspired by Patti's example!

I will be running this class again later this year, if you would like to be put on the mailing list, just send me an email or comment. Comments are moderated, so if you send your email address, it will not be published. 

Happy Stitching!!


Friday, December 24, 2021

The Last Step...

 To Casket Finishing: Trim!


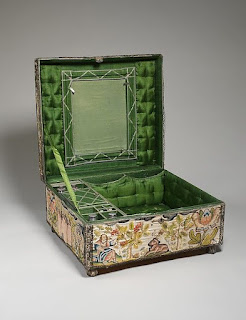
Casket 1070-1873, shown above at the Victoria & Albert Museum in London is one of my favorite caskets because I just love its unique trim. You can see it here. It's not the only extant casket that has lace over ribbon for trim, but it's my favorite. The lace makes for such a feminine look. This is the casket that was inspiration for the trim on my little dome top casket. 

I hand stitched lace over ribbon to make my trim, and my last Finishing Tips video on YouTube below shows how I apply the trim~ which is the same for ANY type of trim I am wanting to apply. Hope ya'll have a wonderful Christmas and come back tomorrow for a little video tour of the finished casket


Friday, December 17, 2021

Floss Tube Finer Finishing Tips 15

 Things to Think about when Looking for Trims for a Box or Casket


Happy Friday! I hope you are having a great stitching week...or perhaps getting ready for a great stitching weekend. I will be at a craft show with Pip all day tomorrow, so my usual Saturday video is a day early this week. The only thing left to share of the making of my little Dome Top Casket is how I apply the trim, but before I get to that, I first wanted to have just a little chat about the trim itself, and what you should take into consideration when searching out the perfect trim for your own project. 

Check back next Friday to see how I apply the trim to the box, and then on Christmas Day I'll post a video of the finished casket. I cannot convey enough how much fun this little project was and that I hope it has inspired you to continue on your own project, or maybe even start up a new one!

I do believe this is the first peek you will get to see at the completed Gum Worke~ if you like it and want to learn how to do it for yourself, I will be having a class starting in January~ just drop me a line to rlkinnison@yahoo.com to get on the mailing list. 

Saturday, December 11, 2021

Floss Tube Finer Finishing Tips #14

 Gluing A Finished Panel Onto The Box

So.....you have laboured for perhaps years on your embroidery and it's finally finished. All that is left is to glue it onto your box or casket. Easy right? You may be surprised to learn that the majority of folks I know when they get to this point, they panic. Some don't even get as far as opening the glue pot, just the thought of glue on their embroidery is overwhelming enough for them to stop and make the thing live unappreciated in a drawer for the rest of its life. 

I am here as a calming voice to assure you, it's really NO. BIG. DEAL. 

Take a deep breath, gather your tools, and watch this week's YouTube video on how to do it below!


Each panel is glued on in the same way, one at a time, no matter what you have worked onto the panel itself. It could be cross-stitch, crewelwork, stumpwork, or beadwork...no matter, they all go on the same way. Come on back next week for a fun video on choosing trim!


Saturday, November 27, 2021

Dome Top Casket Progress

  & Upcoming 2022 Classes

 Today is just a short video to show you the progress of my Dome Top Casket and to reinforce my point that while you do need a good sound foundation for a casket, it need not be an overly fancy or expensive one. It's more about what you do to the box....than the box itself.  Of course, I have not been stretching this project out minutes at a time. Its been finished for a while and SUPER hard to not just share the whole thing. I think overall, from start to finish, it was less than 2 months time from buying the box on Amazon here , to its total outside completion.  BTW, I see that the price of the box has gone up, when I bought it it was 11.00 and now is up to 18.00.  Still an excellent value! You will see the link on Amazon there are three sizes~ I used the large size for my little casket. 

I am working on a new teaching website and am planning on launching 2 new classes at the first of the year. The first will be Puffed Silkes~ 17th c Inspired Padded Box Interiors. 

This class will teach you the skills to make a padded interior for any shape of box or casket, as elaborate or simple as you want. 


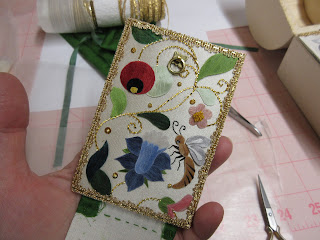
The second will be a very exciting class on how to make Gummed Silk~ Gum Worke ~ The Arte of 17th Century Gummed Silk, where I will teach you my technique for making gummed sleeven silk.


Either class offers skills no one who wishes to make their own casket should be without.  My little Dome Top Casket is a perfect example of combining the two. 

 Traditionally, a picture or casket covered in gummed silk was worked only in gummed silk. It was usually flat...like the closer view of the interior door above. But unlike the 17th c examples I have studied, I like to add silk stumpwork stitches and goldwork to really make the surface come to  life....and wait until you see the outside! While it is amazing as flat work...I will show you how much dimension you can achieve with Gum Worke. It really is a fun and fabulous technique!


Saturday, November 20, 2021

Roll with It

 Dome Top Casket Progress...

Do you ever feel like you are on a roller coaster that won't stop? Lately, I have been desperately trying to get off the one I am on but it never slows down enough for me to leap out. Every time I turn around it seems like it's time to go to bed and my to-do list is not even half-finished for the day. Maybe the sun is on the same schedule? It goes to bed around here by 5pm.  IF anyone has any hints on how to s-l-o-w  t-h-i-n-g-s d-o-w-n a bit, I would very much appreciate it. 
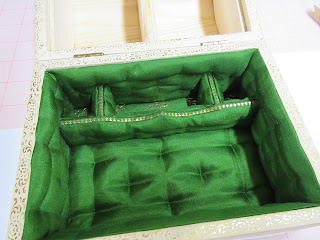
The Dome Casket flew together and I am so happy with how it came out! In the line of progression for today's Floss Tube Finer Finishing Tips YouTube series, I am continuing to prep for the embroidery of the interior doors. What you don't see in the video is the finished padded interior, shown above. Isn't it the most gorgeous shade of green?

 I have a list in my head going of interior colour schemes I want to do, and this green was high up on the list. 


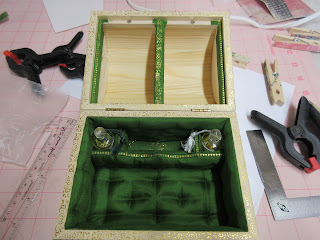
I have always admired the interior of this one at the Met Museum, shown above. Click that link to go to the Museum's page to really check it out! It was the inspiration for my padded interior, except with gold trim. I love my tiny little Penhaligons bottles nestled so snugly into their cubbies. Who am I kidding, I just love padded interiors....and if YOU love them, well I may just have the class you have been looking for coming up soon! It's not a project class in particular. It will teach you the skills to make a padded interior to fit any shape or size box you can dream of! If you think that's something you would be interested in, just shoot me an email (rlkinnison@yahoo.com)to get on the mailing list, I am hoping for a January 2022 start!

Just a quick tip today showing you how I roll the glued paper onto the surface of the silk to glue it on. I use this rolling method for gluing finished embroidery panels as well. Along with the Yes! Paste, one will get no bubbles!

Saturday, November 13, 2021

Happy Saturday!

Floss Tube Finer Finishing Tips 11

The tip for today is how to support the fabric for design transfer after its been laced into the frame.  Just as a building is only as good as its foundation, so is our embroidery. In order to get the cleanest, smoothest pattern lines, the fabric on your slate frame must have proper support, which is the subject of todayÅ› video tip

Happy Stitching!

Wednesday, November 10, 2021

Things You NEED to Think About....

  Before You Know You Need to Think About Them....


I was editing videos for my Dome Top Casket series on YouTube today and think that this next tip is just too important to wait until Saturday's usual post. Today's tip is about when to transfer your embroidery design onto your ground fabric. If you plan on mounting the embroidery onto a particular size of something...or the finished size of your embroidery needs to be exact for whatever reason...today's tip is for you! The easiest way for you to not have to cut into that glorious embroidery you just finished because its now magically too big for its intended spot is to watch today's video tip!!


Saturday, November 06, 2021

What's Your Plan?

 Floss Tube Finer Finishing Tips #9


Happy first Saturday of November! Stop by the You Tube today to see the latest video for the Dome Top Casket. I am a firm believer that one should finish the inside of a box FIRST, before the outside. There are several reasons for doing so, but mainly, it is not so easy to manipulate the box in all different directions when a finished embroidery is mounted on the outside! 

That being said, if you are one of my readers who is dragging their feet on their casket....this video is for YOU! Who cares what you are going to put on the outside....DOESNT MATTER. Get up and FINISH THE INSIDE! Then, when you do get the outside embroidery finished, the inside will be done and ready!

Saturday, October 30, 2021

Dome Top Casket

 Time to Paper the Outside!

Ahhh a pretty clean slate ready to cover with the embroidery or decoration of one's own desire. Are  you following this little casket's progress on You Tube? I hope so. I have come to realize that I think I love the finishing just as much...perhaps maybe a little bit more, than the embroidery itself. Well...maybe not, but they are a close tie. There are so many possibilities..if you have a lot of ideas and find it hard to pick one, well ask somebody else to choose for you and you can do the rest on other boxes! Above is a picture of the finished exterior papering, which is the focus of today's two videos. 


Yep, another two video day today. My camera angles are weird. Yes, I know. Sometimes Im out of the frame of view...Yes. I know. I am just me. It would be great if I had someone to hold the camera and follow me around and zoom in and out...but I don't. Just me.....and YOU, there in the camera coming along for the journey~ I do hope you enjoy and can take away a few little tips here and there to help in your own making ups.

I will be launching my own Thinkific Online Academy soon and will be offering some really great online classes that will include downloadable detailed finishing courses. So until then, I hope you enjoy today's two part video on exterior papering

Part 1~


Part2~


Saturday, October 23, 2021

Finer Finishing Tips #7

 Wrangling That Paper!


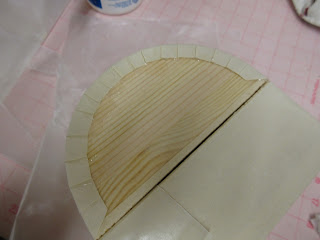
Happy Saturday All! I hope you had a great week. If you are following along with the progress of my little dome top casket, this week's video is a birds-eye view of cutting the exterior paper before gluing. Everyone says matter of factly to glue paper on the outside of the box...but they don't really go over how to wrangle and cut that huge expensive sheet of paper. If you only have one or two sheets, it can be intimidating...especially if you are afraid of making a mistake and wasting it! 

Have no fear, Rachael is here to help guide you through it! As always, I do apologize for the angle of the camera in today's video. I changed it to an above view so you wouldn't see the back of my elbow like last week, but along the way, I think I knocked it out of alignment. If you ever had aspirations of being a bird and seeing what they see, well just imagine you are an inquisitive woodpecker hanging upside down on a tree branch while I'm wrangling this paper!

I wanted to share the photo above to show the finished fold-over of the paper on the lid. This is what can form the halo I talk about in the video.