Showing posts with label 17th Century embroidered Jackets. Show all posts

Friday, October 07, 2022

2022 Heirloom Christmas Ornament Kit

 Skarlet Ladye is Available on Presale Now!

I am super excited to offer you this year's 17th c inspired embroidered ornament kit, Skarlet Ladye! Have a peek at the video above, she's really awesome. I said it before, and the more I have her out, this is absolutely my favorite of all the ornaments I have designed. You can click the tab at the top of the page to learn more about the kit and see exactly what is in it...or just click here.

Here is a look at some of the silks


There are 21 full spools of silks in this kit! There are 2 spools of metallic braids and a few other silks in lesser quantities on flat bobbins. Are you going to use alllllll of this silk on this ornament? Heck no! Some colours you may, but others you will have plenty left over to add to your stitching stash~ and these are glorious Au Ver a Soie silks in Ovale & Perlee. Lucious!!! With full spools, if you want to change the colours around, you should have enough of all to do so (except for the yellows).

Kits will ship in Mid November, or sooner if possible. 

And if you're wondering why I added the 17th c embroidered jacket tab to this post...well...I just may be planing on making a skarlet red embroidered jacket ;)

Happy Stitching!!

Thursday, September 29, 2022

A lil peek!

2022 Heirloom Embroidered Ornament Kit

Skarlet Ladye 


Oh. my. gosh.
I finished stitching the model for my 2022 annual Christmas ornament kit and it is so beautiful! I wish you could see it in person! Several years ago I was lucky enough to see a 17thc embroidered silk petticoat before it was auctioned, and I fell in love with it. The embroidery was fabulous, but what was most striking was the scarlet red silk it was stitched on.  Can you just imagine an embroidered red silk jacket!? (swoon)

I have wanted to make this ornament for some while, but could never find the right colour duchess silk satin. When I saw this satin earlier this year, I knew exactly what I wanted to make with it. I used some of my favorite motifs from the petticoat and designed what I think is my favorite ornament to date. It was super fun and pretty quick to stitch, so keep watching for the kit so you can make your own! 

If you would like to get on my annual ornament kit mailing list, just drop me an email at rlkinnison@yahoo.com


Wednesday, November 10, 2021

Things You NEED to Think About....

  Before You Know You Need to Think About Them....


I was editing videos for my Dome Top Casket series on YouTube today and think that this next tip is just too important to wait until Saturday's usual post. Today's tip is about when to transfer your embroidery design onto your ground fabric. If you plan on mounting the embroidery onto a particular size of something...or the finished size of your embroidery needs to be exact for whatever reason...today's tip is for you! The easiest way for you to not have to cut into that glorious embroidery you just finished because its now magically too big for its intended spot is to watch today's video tip!!


Saturday, December 15, 2018

AutoPilot


Have you ever been driving along, and realize you are in a different spot than you expected? I do it all the time on a long drive home, say from the dr office...which is 89 miles from us. All of the sudden I realize we are on the other side of Walsenberg....and I dont remember going past it....Auto Pilot. 
Lately I feel like I am stuck in autopilot....or maybe its the Twilight Zone...that could be it. I have a list a mile long to get done every day, if I dont write whatever it is on the list, it doesnt even get remembered.  I am an emotional wreck...in less than a week will be 1 year since I lost my Biskie....cant quite thinking about that, missing my parents and wishing I was home with them....my last Christmas at home was 1988....its just never worked out to be home again~ not for lack of want, not at all. Thats just life and I suck it up, but every now and then I get overwhelmed. I have had my Christmas tree up in the gallery here since Thanksgiving weekend....boxes of ornaments all around it on the floor...but there it sits, I have no want to get them out. WHAT is the deal??
  I know I should be spending my spare time decorating the tree....but this is what I find myself doing instead....is this my auto pilot? I dont know, but it is very engrossing.....all consuming......making fish scales from beetle wings. My dear friend Stacy gifted me them one year, and I have had them in mind for a mermaid tail ever since. Have no idea how many I will need, probably a zillion or so.
 I first cut the wings into strips, then cut the strips into smaller bits, and then trim one edge of each 'bit' to round it out, like a fish scale. Takes forever and I seriously need to go get my glasses redone, as I am really having a hard time focusing on ANYTHING lately....as in...the seeing kind of focus.....oh my eyes are wide open, Im walking around, but big blurry blobs, thats all Im seeing. Hannah has been telling me, while at the store, 'geeze mom, you didnt even say hi'.....and I honestly say~ what are you talking about? And she will say I came within arm reach and total eye contact of a neighbor....and I literally have no idea they were there.... even more reason to get it in gear and get this casket finished, before I really do go blind.

 After I get the little buggers shaped, then I have to go back and drill a hole in each one. Takes forEVER. This is two wings worth of little beetle wing fish/mermaid scales.

Happy Stitching y'all~
Oh and just a little reminder~ I have only 2 of this years Ltd Edition Peaceful Kingdom Ornament Kits left, and as well, the Padded Mirror Case Class will be closing December 31!

Monday, October 29, 2018

Can U Believe it!?

More Glorious New Threads from Access Commodities Are Here!

New Colors of Wired Silk Facette Gimp
New threads just got in from Access Commodities today and they are BEEEEEEAAA UUU TI Ful! In addition to the 12 colors of silk facette gimp in the historical color line,  there are 5 more, including...at long last...black! If you are not familiar with facette, it is a filament silk wrapped over a kinky wired silk core.  Just about the same size as silk serpentine gimp, but with a wired core.

New! Size 4 Silk Wrapped Purls
 Yet another size of silk wrapped purls is now at our command, and in some great new fantabulous colors as well. The colors shown are currently in stock at the warehouse~ there are a couple not shown that are on backorder.  I love to see the colors together~ one can get a good idea how they compare to each other, within their own color grouping, if you are not familiar with the color numbers.

 We get a black in this size of purls as well~ which is super exciting because it is often left out of color groups...but is needed! My favorite color of these is 41046, a deep wine claret red ~ not purple. Do enlarge the pictures~ I left them big
 So with all these sizes of silk wrapped purls, its easy to get confused as to what size is what, and how they compare to each other~ so I have taken a picture of all 4 sizes above, and below~ for you to compare. The Tiny SWP is the smallest, at the upper right above. The Standard size 2 SWP is upper left. Lower right is the new size 4 SWP, and lower left, you can see the new size 8 SWP, which is used to make the silk scallop trim~ all you do it stretch it out and press it flat.

This picture is a closer view of how they compare...why so many sizes you ask? Well why on earth not???!!! Not only can they be used in the traditional way, couched down flat or louped up off the surface,  they can be pulled apart, like the size 8, and used as a trim, or pulled straight and used to edge detached needle lace pieces used in stumpwork and so much more!
I am working on a special order threads page on the Diamond K Folk Art blog, but until I get that done, you can special order any of the above threads from me now if  you need them, just drop me an email at rlkinnison@yahoo.com. 

Saturday, August 25, 2018

Wonderful NEW Threads Available!

 Size 8 Silk Wrapped Purl in 17 Colors~

Did you know that I am a retailer for Access Commodities & all of their wonderful threads & Legacy Linens? Well, I am and look what new threads just arrived! I am in the middle of kitting up the Peaceful Kingdom ornament (Just over half of my quantity has sold already in preorders, so if you want one, put it on your list for sooner than later!), and just had to take a break to share these with ya'll.
This new size of silk wrapped purl seems HUGE compared to the others we are used to, but I can imagine the possibilities for its use endless, and not just for embroidery either. So far, it is available in 17 gorgeous colors, and retails for 9.00 per meter. If you enlarge the picture above, the color numbers are marked on the picture~ you will see some new colors for purls if you are a fan of them~ the 3414 is my ultimate favorite and a color I have longed for for some time. Its an aged taupey dusty purple that is just gorgeous and I have seen on so many caskets!

 So what is a size 8?  Just how big is it? In the picture above I have all 3 sizes of silk wrapped purls ~ the tiny on the top, regular on the right, and size 8 on the left.

What is great about this huge size 8, is that in addition to cutting, chipping and louping, it can be easily pulled apart and flattened to form a loupey trim~ much like the silver and gilt metal loupey trim on so many 17th c stumpwork pieces...but now we can have it in colored silk! Think of it for edges of clothing...flower petals and curtains. I am really loving it for its the perfect scale to use as a sub for soutache in tiny dolly clothes~ think Civil War jackets with all of the applied braids. I love it! If you are interested in purchasing, just drop me a line at rlkinnison@yahoo.com.  For that matter, as long as what you need is in stock at Access Commodities, I can order your hearts desire and have it to you in a jiffy!

Now I am back to sorting threads for Peaceful Kingdom, I am about half way through the spools....just look at those beautiful colors!

Monday, August 06, 2018

Available Now for Preorder!

2018 Ltd. Edition Heirloom Music Box Casket Ornament Kit~
 Peaceful Kingdom
 I am super happy to introduce the new limited edition Christmas ornament kit for this year~ Peaceful Kingdom. It is a combination of two of my favorite things~ stumpwork caskets, and music boxes!
It will only be available for purchase from now until Dec. 31, 2018.  
If you would like to read more about it, all of the ornament and kit information is on my Diamond K Folk Art blog, just look for it in the header at the top of the page, or you can click here.

Monday, July 23, 2018

2019 Bath Textile Summer School


Bath, U.K. ,12-17 August 2019

    The classes have now been posted on the Bath Textile Summer School website for next year, you can find them here to learn more about what I am teaching. Hover over the 2019 workshop section, and you will find me last in the drop down menu.  This year pictures of some of our past workes are included on the information page, so as to not be confusing, I thought I would post pictures of both class projects here. Above is "Pretty Ladye", and below, "Bath Bunny".  My focus this year is surface techniques, for those who would like to add a beadwork element on to a casket panel or picture. Both classes work with modern Japanese Miyuki size 15/0 seed beads, so they have nice large holes, and are both good representations of the details one can get with this larger size of bead.   Pretty Ladye is a super special class, each large bust is sculpted with brown lampwork glass eyes. Aside the fact it takes me about 3 weeks to sculpt a single figure, I had a horrible time getting suitable glass eyes this small, and for this reason, BTSS 2019 may be my only running of this class.   (She would be a wonderful start to the top of a casket...hint hint!)

    Bunny is so adorable! Students of this class will learn detached techniques, such as the flower petals, and my method of working up an animal figure in beads using twilling, or peyote stitch.   I am making a great effort this year to keep the kit cost as low as possible, but more even, the international shipping~ so I will be only shipping the prework kits for each class, and handing out the rest of the kit in class. Prework will include silk satin ground, instructions, and padding for the cartouches only, so packets will be small to keep both shipping & customs charges to a minimum. 
One things I love about teaching the beadwork, is that my methods can also be used for regular raised stumpwork in silks and metals threads.. the materials maybe different, but the way one goes about it, in the steps, is the same for both.

 I have been plugging away on my special something and am super happy with how its coming on so far.  I really love 17th c blackwork, and it is such a challenge to creating depth on a flat surface while painting with a single color.  Like I said, I am painting one for me, and one to share, so here I took advantage of having two to show the difference between just penwork, and painted. I loooove it!  This bunch of grapes took just under 3 hours to paint...of coarse I am keeping track of the hours!

Friday, December 15, 2017

on eBay this week!

12 Spool Flemish Spool Palette

   My last offering before Christmas~ if you would like to see more views or perhaps place a bid, you can find it here, or click the sidebar link to my eBay specials. 


Wednesday, October 04, 2017

Is it really October???Already???

Squeezing in some me time...

  Everyone keeps asking me what I'm working on...and truth is, I dont have hardly any time to work on anything for me. I am busy as ever working up not one or two but three new classes, new boxes and needlework tools and dollys for Christmas~ along with painting slate frames, sculpting stumpwork figures and being the endless chauffeur to a bottomless pit of never ending school activities. So I have to make time for me...which is squeezing in a few hours on a Sunday, or a few minutes before bed to work a leaf or something....After I got back from the U.K. when I was digging thru my endless stacks of notebooks that keep track of different things, I found the one for my flat top casket and...really?  The last time I worked on it was in January? seriously???  Well that was just a pathetic realization....that if your not aware, time will just leave you in the dust.  
All the panels for my casket sit on their own little table in the gallery. They look like little ghosts under their dust covers. Its super hard to decide which panel to work on, as I had finished all of the friezes, so now I have to start from the beginning on a panel....to keep the choice easy, I picked the frame that didnt have any work done on it yet, which was the lid.  Since I won this casket in the Beaded Basket competition, I thought it fitting to work an allegory of Lady Victory in a central cartouche , surrounded by angels of coarse....and a few bugs. There is so much detail packed into this little roundel, I have had to dig out my smallest of smallest little weensie beads. The castle could fit on my thumbnail....

Little dragonfly has peacock feathers worked into his body, and I have his gossamer beaded wings complete...but set aside in a parts bag to be put on last after all the beadwork is finished.

In a weekend I got most of the background completed~a little cloud, bird, hills and water....I only have the leaves on the one tree to work, then I will be able to start the fun three dimensional parts. Ladye is patiently waiting to be dressed.....  because she is just a bust, I was able to sculpt her a little larger than most figures, and so used a precious pair of antique 18thc blue glass eyes. I cant wait to see her finished!

 I know I have to work the inside first before starting the outside, but that doesnt keep my mind from wandering and all the while I am stitching, I am thinking about how I will work the roundel....what colors of beads I will use, that sort of thing. I made  little practice padding and trial of these colors....havent decided yet if I like it or not.

Friday, July 08, 2016

New Blackwork Thread Palette Set

Hand Painted 17th c Blackwork
 Recently a customer ordered a set of slate frames and when I asked how she wanted them painted, she said "Paint whatever makes you happy". Is that awesome or what??  I have always loved blackwork embroidery~ the early 17th c style~ not the cross stitch that folks think of today that is labeled as such. Early blackwork is basically done in outline stitch, with any shading done in speckling or fil turk. If you have followed my blog for some years...you may remember I did an inked jacket based on this coif quiet a while ago. Along with this coif, the V&A has several fragments of what is believed to be a jacket, in same pattern. I drafted my own version of the pattern using all the pieces and some others found held privately. I have wanted to make a painted version for f-o-r-e-v-e-r...and so, I took the opportunity to paint up a blackwork slate frame.
 The design is first drawn on by hand with india ink using a dip pen...(did you that steel tip pens were in use in the early 1720s?.....most think of them as replacing quills in the late 19thc)
 After I have the outlines on, then I go back and add black shading~ I really love how it came out...I think an entire box would look stunning! The slat on the bottom is without shading, the top slat is finished.
 I left all the pictures large on this post today, so you can click on them to see details easier~ This is a large frame, and looks quite nice just hanging out when not in use. I am totally jealous of my customer having a blackwork frame and I think I may need to paint me one....in the mean time, I made up a thread palette set~
  using a fragment of same pattern~ I think a must have for anyone who loves blackwork embroidery!  If you are interested in it, or would just like to see more pictures~ it is available on eBay this week here .


Thursday, May 19, 2016

Take a Step Back....Take Time....

Take Joy

  While working on my casket this week, I have spent hours in quiet reflection....literally, hours. But this is me, this is how I enjoy my sewing~ its not so much the end product to get finished all of the sudden and stack up on a shelf....but more of the doing that I enjoy. It's not that I think I am old fashioned...I know I am old fashioned....and thats not a bad thing. I see it happening all around me...every day...everyone is in such a hurry. Why? What ever happened to enjoying life?  Life as in....every second of every day? Weather doing the dishes or digging a hole or stitching? What is the point of zooming around like a chicken with your head cut off....being a nasty person, pushing... shoving...to get where?  I have come to the conclusion these people have no happy place.
 Life has gotten quick! One can mail a letter to the other side of the world and back again in 24 hours...need to talk to someone ...just call them~ nearly everyone(but not me!) these days has a cellular phone and has obviously no problem talking wherever they are at...news happens one second and the next everyone knows about it. Quick hurry~ we need to go here or there~ zoom here or zoom there....come on~ hurry hurry!
It makes me sad. The children hate it when I have no TV days....when I make them sit at the table to eat supper....ahhh what happens??? No shows? No mindless dribble streaming from the electronic babysitter in the living room? What happens...we all sit and talk and end up having a nice time.

  Stitching to me is no different. Why do it if you don't enjoy the process? Stitching can pass the time when you are bored.... or when you are nervous or even upset about something....but its more than just passing time. Stitching can teach you things...about the fabric and thread of coarse...if you listen...but it can also teach you things about yourself. Unknowingly, we put all of our emotions into our stitching~ and weather we like it to or not, they show up again in the finished piece. Did Michelangelo hurry to paint the Last Supper in a weekend??? When you see a piece that speaks to you~ do you hear a voice in your head that says...'wow', that must have taken alot of time....I could never have the patience for that'....My answer to you is...sure you do! When I stitch, I am truly in my happy place, and spend my time remembering my early days learning to sew with my Great Grandma, my Mother, my Aunty Becky.....I also look at embroidery like a huge puzzle, full of tiny little pieces that each have their own way of going together. I enjoy the process. 
 I think, if more people took the time to slow down, and enjoy their process, whatever it may be, the world would be a much happier place.

So been working on my casket and spent a bit of time trying to decide what pearls to use for my initials...I have some pretty small, about 1.5mm seed pearls....and then I have some ridiculously tiny ones that are supposed to be 1mm...but I think they're more like half a mm....anyway, the top picture is my doodle of how the larger ones looked...which wasn't too bad, but up the the smaller ones (bottom foot of the R), they looked huge and clunky!
 Of coarse,  I decided I liked the little ones...really? I have to like the little ones? I cant even see the damn hole in these things!
 Need I even mention, the holes are so small, not even my smallest needle would pass thru them? 'Bring it on'  I say to myself...Ill just have to thread each one on by hand, no needle. So me being me, challenged myself to whip these little buggers into submission. I know how I would like my casket to look when I get it finished~ and the big clunky pearls just werent there in that picture in my mind. Would you go with the big pearls just because they were quicker and easier?? If so....why? Stitching is not a race. Its not a competition...well, unless you are specifically stitching a piece for a competition....but otherwise....why take the easy quick road? Why stitch the same thing over and over again??? Try something new!  Challenge yourself the next time you find you are at a fork in your stitching road....the path less traveled may have more challenges for you, but in those challenges are more rewards
It took me over 4 hours to get these little whatnots on here, but here they are to stay. I have marked my territory. I haven't done 90% of the techniques I'm planing for my casket before...but thats not bothering me any...it should be fun and interesting and frustrating too....but as most of ya'll know my favorite thing to say is..... Just do it!  When you are at that fork in the road...don't stand there puzzling....Just do it!
Take your time! Take Joy in your process!

Saturday, April 30, 2016

Dressing a Slate Frame

Dressing a Slate Frame
 I have had several questions since I started selling my slate frames on how to go about mounting the fabric onto the frame...so here are some step by step photos of  how I do mine~
  First off, you will notice that my hand made frames are a little different than some other mass produced frames available~  mine do not have any nylon webbing attached. Not only is this the period correct configuration, I think, once you try it, you will find it much simpler to mount your fabric by lacing all four sides than just two. So, to begin~ as seen above, you will need your slate frame, pegs(just four), scissors, prepared fabric, lacing cord and needle with big enough eye to fit your lacing cord thru.

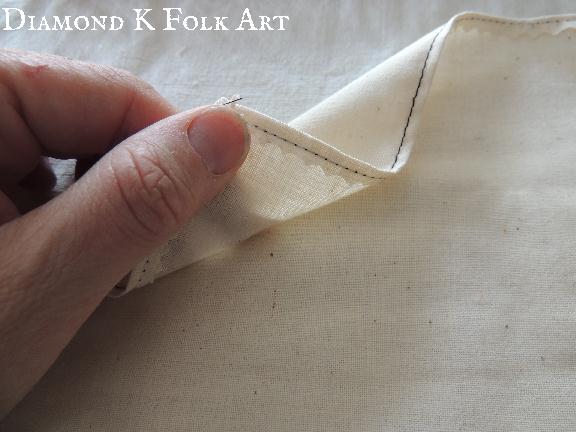
To prepare the fabric for mounting, turn over the edges and stitch at least once~ this will keep the edge from raveling on you, and will also add some strength to it and keep the lacing from ripping out thru a bare edge. For large pieces of fabric, especially if you are using my large 36" frame, I highly suggest turning the edge over a cording. 
 To begin, first lay your fabric on a flat surface, then place the frame over it. Adjust the size of the frame to allow a few inches on all sides of the fabric. Set all four pegs now
 I use Londonderry linen thread size 18/3 to lace my frames~ I like the size, and it doesnt stretch that much over time. Here is am using black so you can see it easier than if I was using my normal natural color. Each side is laced separately, and to start each side, I put a slip knot of sorts into the beginning end of the thread. I loupe it around, then just make a little half hitch knott.
 This leaves the end in a loupe that will be placed over the corner peg.
 I like to position my frame with the edge I will be lacing extending out over the edge of my surface, as seen above. This lets me continually lace the frame without having to pick it up at all.
  To start, the loupe is placed over the peg, with the tail end brought around the outside of the frame, and then up thru the corner of the fabric. Pay attention to this simple little step!!! Bringing the lace around the frame in this way, will help to pull it all together and keep it square.
 The first side, I bring the fabric right up even with the edge of the frame. Note how the needle is brought up  over the machine stitched line.
 Continue until you reach the other side of the frame, bringing your lace around the corner of the frame, just like when we started~ and I wrap twice around the peg with a slip knot to end.
 The second side to lace is the opposite side of the frame~ just like the first, but pulling as tightly as you can with each stitch.
 Third side of the frame is laced.
 Lacing the last side of the frame~ with each stitch, holding the lacing cord down with my thumb to keep tension as I go~  I like to end my laces with a slip knott, so that they can be easily undone if I have to tighten them later

 The best thing about using a slate frame is that one can achieve a drum tightness that just is not possible on any other frame
Isn't this little frame cute? Cute cute cute! I have been wanting to make some mini frames from some of the ends I have kept from my larger ones~ this is my 'Super Mini' size....tho there was actually more work involved to make the smaller frames than the bigger ones!   If you are interested in a Super Mini, I will be listing these as specials in my ETSY shop as I get them finished, (they will not be a regular offering). All sizes and wood types will be different....just whatever I make at the time!

Sunday, November 29, 2015

My 17th c Inspired Stumpwork Flemish Box

 Dutch Tulips & Glittering Gold Scrolls 
 If you love 17th c embroidery & embroidered caskets, you will have no doubt come across at least one or two Flemish cabinets in your studies. They are unique in their construction and typically set up on tall floor stands. The cabinets are made of ebonized hardwoods with elaborate embroidered or lacquered interior decorations. This type of cabinet comes from Flanders, the area of the Southern Netherlands in the late 16th to 17th centuries~ from cities such as Bruges, Ghent, Kortrijk, Antwerp, Leuven & Brussels (just to name a few).  I have always admired Dutch art and textiles~ the scrolling motifs are so unique...and the tulips! (enter a long sigh here:::)  The above cabinet is accession no 77.58 and part of the Royal Museum at the  Rockox House ~ you can view it online here .
  I am making my own version of an Antwerp or Flemish Cabinet and was working up an embroidery pattern as practice for the inside panels~ about this same time, a Dear friend of mine became sick, so I decided to make it up into a box for her.  I am real happy with the results so far, and from the feedback I have been getting, so watch for some little kits and patterns based on this design in the ETSY shop or on my blog in the future!
 I redrew the scrolls and tulips from the Antwerp Cabinet to represent a stylized vase of 'get well' flowers for the top of my little box. The little wood box itself was a gift from another Dear friend that originally held Mr Stanley's Crystallized Ginger. I used Piper's Silks and real gold threads for the embroidery. What is so unique about the embroidery on the Flemish cabinets is their use of the crenelated gold plate for the scrolls. Few of the remaining cabinets have all the gold plate still attached, so it was really fun and rewarding for me to be able to reproduce how the panels would have originally looked when they were new
 The bulk of the flowers are worked in long and short stitch, but there are also satin stitch, burden stitch, needle weaving,  couching and overtwisting.
 The interior is a thickly wadded or 'tufted' silk taffeta
  I am sure I'm not the only one who loves little boxes~ anything can be covered with embroidery!
 The stitching is over a duchess silk satin, with antique gold metal trim on the sides and top, which is also lightly padded~ you can see the slight dome to the top.
I worked two panels testing different colors and stitches on each~ I knew I was making one into a box, but wanted to frame up the other in ebonized wood to see how they would look in the cabinet~ and I must say, I really love the panels against the black! I took a little video to show how these would sparkle in the dim candle lights of the era~ just really spectacular in person!  A few months ago, I was joking that I have finally discovered what was indeed inside the black briefcase in  the movie 'Pulp Fiction' ...it was embroidered like this! The glow is amazing and I cant wait to make up my cabinet!  I do have a wait list running for cabinets, so if you would be interested, just drop me a line or send me a comment with your email address and I will add you~ dont worry, I never publish comments with personal info included in them!