Showing posts with label 17th c beaded baskets. Show all posts

Tuesday, October 24, 2023

New Witney Antiques Exhibit of 17th & 18th c Needleworks

 Choice & Precious Work


If you are in England ZOOM to Witney Antiques and check out their current exhibit, Choice & Precious Work. Firstly, it is amazingly FREE, and secondly, it is the first of two exhibits that will be showcasing the Elizabeth Hall suite of 17th c needlework & embroidery. Later pieces from the 18th c have been added to  her collection by her descendants. I cannot stress to my Dear readers enough how very rare these pieces are, and that they have been so well taken care of and passed down through the family together. This is a once in a lifetime change to view such a collection~ if you cant get there, then order the catalogue! It can be had directly from Witney Antiques, or if you are in the US the Attic Needleworks will be carrying it here shortly, so give them a ring and reserve yourself a copy!

Thursday, June 01, 2023

New Beadwork Class Open for Enrollment!

 Fruit of Thy Hands

I am super excited to announce my new 17th c beadwork class at Diamond K Folk Art Online Academy is now open for enrollment. I am so far behind from being sick last year, I am trying to catch up & sincerely apologize to all of my students patiently waiting for the classes I was working on to be ready.   
I designed this project class to teach the basic detached techniques used in making beaded baskets like mine shown above. What is learned in class can be applied to any and all the flowers and fruits and acorns etc I made for my basket!

If you are not familiar with 17th c beaded baskets, I can refer you to read an earlier post on them here. There is a link to the basket above at the Met~ note the wonderful beaded oranges and lemons in the border surround. I will teach you how to make them in this class~ though you will make strawberries, the technique is the same for all fruits/ nuts etc. 


Class starts on 1 July, and the kits will ship mid-June. If you would like to learn more about it or enroll,  you can do so here, or click the Diamond K Folk Art Online Academy PAGE TAB under the header at the top of the page to see the current classes offered.

Tuesday, May 09, 2023

10 Spots Available

 Beneath Thy Poft Oak

Beneath Thy Poft Oak, The Art of 17th c Beadwork is a wonderful class that will teach you all about 17th c beadwork. It is a 12 month class that I am now running individually, so you will not have to wait for a class to fill if you are interested in taking it!  I have just 10 class spots available.

You can learn more about all the particulars and/ or enroll here. You can also click the tab at the top of the blog page here for the Diamond K Folk Art Online Academy to see all the classes currently offered.

For those of you who keep asking me about teaching here in the USA,  this is the perfect opportunity for you to do so right from your own stitching chair! This is the most comprehensive class I have ever offered, and like all my classes, all materials you need to complete Beneath Thy Poft Oak are included in the class kit. All the student need to provide are a few tools and a slate frame. The class is divided into 12 easy-to-complete monthly lessons. Each lesson contains a slew of pictures, step-by-step photos, instructions, and videos for completing this pastoral Texan scene.  This is not just a class to work the shown picture~ it is a class aimed at teaching you all you need to know about 17th c beadwork techniques and how to apply them to other projects you have milling around in your head.

As you can see above, my scenes are complete. Ladye is not just sitting under a tree with a one-dimensional top of a skirt draped over her lap....she has beautiful legs, shoes, stockings, and garters under her gown. 

Each kit comes with a one of a kind 3 piece hand sculpted papier mache figure set (bust and two arms)
.
Along with flat and looped cartouche treatments, speckling, grounded and in-hand peyote stitch, flat and curved couching, French wired leaves and flowers, detached hair and lace techniques, netted overlays, designing and working clothing, and bead history, I will also teach you how to make these gorgeous fully detached yellow roses. The same technique can be applied to any flower~ known to nature or contrived of your own imagination. 


Friday, September 23, 2022

17th c Beadwork Class Starting 1 October

  Twelve Spots left!


If you are interested in learning the art of 17th c beadwork, aka beaded stumpwork, there are 12 spots left in my Beneath Thy Poft Oak class that starts 1 October. This is a twelve month long class, and I am not planning on offering it again until at least 2024, more likely 2025. You can learn more about here . 

Happy Stitching!

Wednesday, September 07, 2022

Future Class Dates...

 A closer look at my Beaded Stumpwork Casket

Here is a video sharing some closer looks at my beadwork casket. I chose to work my entire casket in beads, but there are literally oodles and oodles of extant 17th c silk embroideries that contain motifs worked in beads.


Registration is still open for my 17th century beadwork class, Beneath Thy Poft Oak. Class starts October 1st, 2022. I have had several folks ask me when I will be running it again, and the answer is honestly, probably not for some while. The class itself runs 12 months, so that puts me at 2024 for the next running. However, I am booked for in person teaching then, and as well my last is graduating from high school, so it may not be 2024, more like 2025 or 26 if I can still get the materials for it. 

You can learn more about it/enroll by clicking the link to my Online Academy classes at the TOP of this page, right under the blog header. 

Happy Stitching!

Saturday, September 03, 2022

So I was Thinking....

 And Had This Idea...


 I shared this picture the other day on Instagram(link to my Instagram is on the right in the sidebar under links)...I love this picture, even though I absolutely really do 100% hate seeing my reflection or having my picture taken. 

I was filming my casket for YouTube and was just vegging out staring at it and saw myself there. Immediately I thought of the early ones, and how absolutely awesome it would have been to SEE who made them~ who's reflections those mirrors had projected for so many years. It's been a few years since I made this one, but I still look basically the same, so I printed this picture out and it will forever live in my casket. 

I hope my fellow caskateers will do the same!


Tuesday, August 23, 2022

Beads & Baskets

 My 17th c Inspired Beaded Basket 


Offered this week is a peek at my beadwork basket I made back in 2013, hard to believe it has been 9 years since I made this. Check the notes for the video, I have a link there to the actual 17th c basket in the Corning Museum of Glass's collection that was the inspiration for my basket.

I hope you do something today that not only puts a smile on your face but makes your heart happy too
XOXOXOX

Thursday, August 18, 2022

17th Century Beadwork AKA "Beugle Works"

 Applying Learned Techniques to Different Projects


Over the next few days, I will be shooting a number of videos of different things I have made using the techniques I teach in my 17th c beadwork class, Beneath Thy Poft Oak.  So many marvelous things can be made using the core techniques from class~ change the beads... the pattern...change the colours and BAM! you can make some new something of awesomeness!!!  Today I will share a peek at my Padded Mirror Case. While I no longer offer this class specifically, I do still sell the pattern and figures for it. The surface work, three-dimensional berries and leaves, and clothing/figural work are all covered in the Beneath Thy Poft Oak class. I think the only thing not covered in this piece, is the making of Kings Crown, and the covered watte acorns. All of the beads on this piece are antique, which adds to its perceived complexity. As well, note that all of the beads are NOT the same. There are big ones, little ones, and metal ones....there are cut charlottes, and large bone beads (the berries above the Queen). There are opaque, transparent, satin, and greasy glass beads. For a proper 17th Century impression in your beadwork, aside from the colour palette, the more variation in materials you can glom on, the better!

Monday, August 10, 2020

New Online Class Open for Registration!

Beneath Thy Poft Oak
  Last year I was asked to design a 17th century inspired beadwork class to teach in person in Dallas by Access Commodities.  Lamora wanted a pastoral scene that showcased the beautiful Texas Post Oak trees and yellow roses. We had great plans for a 5 day long seminar in Dallas, but due to the current world health situation, travel was no longer an option so we rolled with the punches and decided to take it online.
Tricia Nguyen of  Thistle Threads will be hosting my class at her online university platform. 

  For those of you who keep asking me about teaching here in the USA,  this is the perfect opportunity for you to do so right from your own stitching chair! This is the most comprehensive class I have ever offered, and like all my classes, all materials you need to complete Beneath Thy Poft Oak are included in the class kit. All the student need provide are a few tools and slate frame. The class will be divided  into 12 easy to complete monthly lessons. Each lesson will contain a slew of pictures, step by step photos, instructions and videos for completing this pastoral Texan scene.  This is not just a class to work the shown picture~ it is a class aimed to teaching you all you need to know about 17th c beadwork techniques and how to apply them to other projects you have milling around in your head.
As you can see above, my scenes are complete. Ladye is not just sitting under a tree with a one dimensional top of a skirt draped over her lap....she has beautiful legs, shoes, stockings and garters under her full 360 degree gown!

  Each kit comes with a one of a kind 3 piece hand sculpted papier mache figure set (bust and two arms).

  Along with flat and louped cartouche treatments, speckling, grounded and in hand peyote stitch, flat and curved couching, French wired leaves and flowers, detached hair and lace techniques, netted overlays, designing and working clothing, and bead history, I will also teach you how to make these gorgeous fully detached yellow roses. The same technique can be applied to any flower~ known to nature or contrived of your own imagination. 

The cost of  this year long course is 1,000.00USD, and includes full class kit, kit shipping, and 12 monthly downloadable lessons. I am super excited to offer my class on this new platform! Class starts October 1st~ if you would like more information on how to sign up, you can email either me at rlkinnison@yahoo.com, or Lamora  at lamora@accesscommodities.com

Tuesday, October 29, 2019

Flat Top Casket Progress

Precious is Finished!
 Hard to believe she is finished...kind of depressing actually, I really miss working on her every day.....time to start thinking about the next one I guess~ which will be a more traditional double casket...not that this one isnt traditional. By traditional I mean, getting to use my antique silks and silk gimps and plates and all the fun  wonderful 17th c reproduction trims and threads I have been collecting.
It was really hard for me to get a good picture, so I gave up and just took a couple videos~
This first one was particularly frustrating, because she just doesnt look anywhere near how she looks in person. The dim candlelight just makes the marguarite beads of the water and grotto just dance...not to mention the gilt trim...I am more than happy with it, I love it. 

Since I live at the end of a dirt road, off another dirt road...its super dusty in my house so I had an acrylic case made~ the top slides over the fitted base to keep all the dust and whatever else(fingers) out! 

If you think something like this is too much for you to ever finish~ just remember, a little here, a little there, and 5 years later (maybe sooner for you) its done!

Wednesday, October 16, 2019

My Flat Casket Progress

All Stitching is Finished!

 Can you believe it? I can't. Nearly every day stitching on something that I hoped would one day come to and end, as much as I thought, 'is this ever going to be finished'?  Well my friends...that day has come!
Five years of work here on the piano...just hangin out
Enjoy this little video~ the next time you see these panels, they will be on their casket!


Since I stitched over paper...there are no tedious steps now...just cut these babies out and glue them on...not lying...I may have already started  XOXOXOXXO


Sunday, October 13, 2019

Casket Progress~

Swan side finished~ 
 I have been so busy getting my orders filled I havent had much time to work on my casket, but like I always say, a little here...a little there...adds up and voi~la, I finished the swan side of my casket last week~ WOO!
 Once the roses were on, I made a few other flowers to make things interesting....just an excuse to use beads I haven't used yet really......

 This is on the lion side....it was imperative that I find a spot for these tiny stripe beads....I was not going to spend 5 years on a beaded stumpwork casket, and not have them somewhere....since nearly every single 17th c beadwork piece I have studied has had striped beads on it someplace.
It's cute. I like it.

 The design I drew out included these bellflowers....I have snowdrops on one of the friezes, and debated several years I guess....on weather to make these snowdrops, or yellow bells...(the Yellow Fritillary). Me and yellow bells go waaaay back...I mean, probably before I could talk. We would venture out each spring to pick them...I can remember my Pa bringing some home from the mill in his lunchbox....cant imagine what the fellas thought seeing my Pa out picking wildflowers on his lunchbreak...XOXOXOXOXOX
I love them so much, really when I got to this point, there was no question, yellow bells went on both the swan side and lion sides.
 
  With so many roses, I needed some rosebuds. I think I had 6 or 7 for each side planned....and as I was making them, I did what I was afraid I would do...and slid out my finished panels from their storage case to 'just make sure' they looked 'full' enough.  :::::::sigh:::::  I knew it. I didn't like the lid~ too sparse, so I decided I would spend my sewing day making rosebuds, and as many as I got finished in that one day, I would put on the lid.

 I got 11 made, and attached them on the garland around Lady Victory ~ the angels loved how they smelled so they each picked out a few to hold too~

 Once the rosebuds were on, it was just leaves left....I made 30 leaves for the swan side to complete it. I could have put more on there, but I think I need to draw the line somewhere.....I have had folks comment that they think I just like making tedious little things forever and will never get it finished......not the case.
Tho I do really love the process, I do in fact, want to get it finished!

  I have more caskets planned you know ;)

As for the lion side....the last side...it is finished save for the leaves...30 leaves as well...and yesterday while camping I got 7 of them done...the end is very near my friends!

~A Day Spent Stitching, is a Blessed Daye Indeed~

Tuesday, September 17, 2019

Initials & Date are ON

So I Guess That Makes it Official...
 I officially need to get my fingers greased up and get to towne on these sides to finish them this year. I like the larger pearls...yes, REAL pearls~ I wanted them to look chunky and in a 'script' that I have seen in pearls on several period caskets~ the small one millimeter pearls I used on the front were just too small to get the look I wanted
If you look to the left, you will see a bit of the evil Satan's Bush on the Swan side panel....ohhh those bushes. Tip: Test your stitches on a practice piece before commiting on the actual panel
And I have an active practice doodle frame set up for such things....but did I use it this time? Nope. I had studied a casket up close at Colonial Williamsburg, and on it, in 4 different places, I found about 1/2" or smaller(I know why) areas with a very fascinating, microscopic stitch that I really loved the look of. It looks exactly like what I was able to execute in beads...but I still havent figured out the stitch in silk yet~ no its not a bullion stitch of any kind...anyways, I was bound and determined to have that on my casket.
Until.
Hours upon hours upon hours and a zillion beads later....I had like....literally....half inch of space worked...my eyes were killing me, I could no longer retain focus, my neck hurt....it was torture. 
TORTURE!!!!!!!!!
But me being stubborn as I am, I kept going until I filled in every last space of my bushes, and covered over forever the garbled of overwritten mess of 2014, 2015, 2016, 2018 of dates I had planned on having there....
I moved them over to the Lions side

So, I better get busy on this~ I have all the background roses finished, all that is left that is drawn on the panels now are the grape clusters, so those will be next, then it will be a never ending sea of leaves leaves and leaves...and then most likely, more leaves
To say I cant wait would be an understatement...but...
I cant wait

Thursday, August 22, 2019

What A Time!

 2019 Bath Textile Summer School
  Have just arrived back home to Colorado from spending the past few weeks in England.  I had a fabulous time, and want to send a big Thank You to all of my students at the Bath Textile Summer School for taking my classes and being such enthusiastic learners!  Bookings open on August 24th for next years summer school~ click the link above to go check out the new website and see the classes on offer.  I am honored to have been asked to return in 2022, and will be designing a special piece(s) to commemorate the Great, Beautiful, city of Bath, as seen above, looking on from Prior Park.

  This year's classes were held at the Bath Royal Literary & Scientific Institution situated in the heart of Bath alongside the Queen's Square.

  In my first class, Pretty Ladye, we focused on surface bead techniques and how to build up a figure

 The BRLSI has gorgeous classroom spaces~ they are large & bright,with ample lighting. My room directly overlooked Queen's Square...and yes, that's a dinosaur casting on the wall. It's easy to see why the Lonsdale Room is referred to as the Dinosaur Room!

  Not bad for a single day's progress~ the beads do work up so much faster than silk

 My second class, Bath Bunny, focused on more detached techniques, and specifically how to build beaded stumpwork animals~

 It was an absolute joy to have two of my prior students visit and bring with them their completed Bath Arbor Baskets~ It's great to see them side by side to see how different & unique they are~ I love them!

  I never require my students to have any prior knowledge of beadwork to take my classes. Some work fast, some work slow~ it doesnt matter. I always provide step by step written instructions so that they can be referred to at a later time~ but just look what these girls were able to get finished in class...makes me super happy! 

Thankyou so much to Lynne & Michael Roche for inviting me to come and teach~ they both work so hard to make sure everything runs smoothly. It was and honor to be in such fine company with fellow tutors Jenny Adin Christie and  Janet Bolton again. Ah! Such. A. Wonderful . Time.

If you have placed an order whilst I have been away, thankyou for waiting! I am on my way to the post today to ship them all out, so look for a ship notice email later on this evening.

Sunday, July 21, 2019

Flat Casket Progress

Not Much...
The last day I worked on my casket was April 19th....work has been heavy with orders and getting ready for Bath Textile Summer School and such, so I set it aside for a bit. Too blasted hot to do anything outside...about had a heat stroke yesterday mowing the yard...so inside today working on wings for Msr. Swan...now on to m'Ladye's demure wing. They're so difficult to get to look 'right'. I have a picture in my mind, and when what I make doesn't match it, is very frustrating. He had several wings made and unpicked...feathers made for a different part...didn't look good, so repurposed into a different area...that sort of thing. It's very time consuming, but keeps my mind occupied.
Weather it likes it or not...this casket 
WILL
Be
FINISHED
THIS 
YEAR
!!

Monday, April 15, 2019

My Flat Top Casket Progress

When Things Go Good......
Keep Going

  Been a few weekends since I shared progress on my casket....the pillars went slow and were super boring....but one has to keep plugging away at the boring parts...to get to the fun stuff. The peacocks.....ugggggg...the peacocks, that's a different story

  Did anything go right with these little devils? I suppose so, because they turned out fairly well....I'm not super excited about them, well...hang on, I AM.....super excited they are DONE. Both panels worth...which brings me to a 'tip' for ya'll.  Really think about multiples of anything in your design. Will you have enough thread or beads of the right colors....not just for one...but (in my case) four? Will you want do work multiples of the same thing...over and over and over????   I have my answer. No. These beasties were horrible....horrible to work  And when I finished one.....there were three more to work. I had a real problem picking bead colours, because I am using all antique beads, I just cant run to the store to buy another colour....I have to work with the colours I have, in the amounts I have...and I ran in to a real problem with the "amount" factor.  I spent hours trying colour combinations that didn't work, ripping things out ect ect...  I thought about making two differently coloured pairs....but in the end decided I wanted them all the same, because the entire casket as a whole is elements of the same scene/area.  I ended up working the four bodies first, as some of the body colour was going to be in the tails, but I could change that if I ran out in the bodies....then four wings came next, then the wicked tails...stitched over kid leather. Murder on my fingers. Murder on my precious size 16 bead needles. But. They. Are. Done.

 Stumpwork, of any sort, is like working a huge puzzle~ you may want to go right to the fun stuff...but things have an order of working. For example, the pond wall. I chose my colours....was in the mood to work something quick and easy....had my string padding in place.....but nope..  Couldn't work the wall until I worked the snail that was sitting on top of it.  Doesn't she look like an eye???  She's my little secret spy snail.

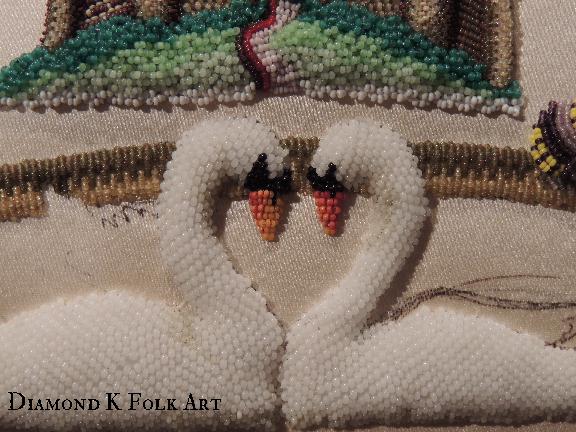
 And then, I still couldn't work the wall because the swan's heads were over some of it....so this weekend, was swan time~ WOO HOO!  I had been wanting and dreaming about working these swans for ...forever. The start was not grand. No. Not even 'good'. Didn't like the colours of white I had chosen...so those got unpicked. Then I worked the padding in grey, and when I went to put the first whites over it, didn't like that, so switched to white padding...which meant all the grey padding had to be unpicked....but no biggie...I had a plan, and the energy around these swans was good. So good, that they literally flew forth from my fingertips...as in, less than a day ya'll!!!

 What was one, became two... and though I was now technically 'free' to work the blasted wall I had been aiming at, I just couldn't let them live on my casket with no beaks!!!!

  Perhaps it was lil mudhead's fault everything went so well this weekend~ he is always good luck for my stitching. This is the palette of colours just for the beaks...and yes, all of these colours are in them!

 Beaks...and wall, finito!

Still have much more to go on this panel, but it's getting there....I have to work the water next, before I can finish the swans and give them their wings...then this side will be down to just flowers. Just flowers, I say....there are a zillion petals and leaves I'm not really looking forward to doing...but hey, one gets energetic when the light starts to squeak out the end of the tunnel!  Normally I would be excited for next weekend, 'water' time...but I will probably end up skipping my stitching time for track meets and Easter. 
Happy Stitching!