Showing posts with label thread palettes. Show all posts

Sunday, July 25, 2021

New Little Helpers....

  Hand Painted Needle Minders

For those who like to keep track of their needles or pins on their embroidery without having to stab them through the ground fabric, I have a cute selection of needle minders in the ETSY shop today!
They are each handmade and painted by me. 
I wouldn't say these are doodles, as I put a lot of time into them, but I had so much fun! I didn't follow any pattern~just cut out what I felt like and painted what came off my fingers at the time.

In case you are not familiar with a needle minder, it has a magnet on the back and comes with a second. You place the minder on the front of the fabric, and the second magnet behind it on the back of the fabric and this holds the minder in place. The magnets are very strong and hold any pins or needles you put on the front of it in place.


Each one is unique, painted in several layers of transparent watercolours so the beautiful wood grain of the sycamore shines through


They are roughly around an inch and half in diameter...some a little larger, some a little smaller


All are signed and dated on the backs


If you are in need of one, they are available today in my ETSY store, link is to the right in the sidebar.

Happy Stitching!

Friday, November 20, 2020

Special Original 17th c Blackwork Nativity Spool Tray Available

 Humbly Born in a Stable Rude


It's been a very challenging year for me this year, as I am sure it has for many of ya'll as well. Sometimes the stress and just absolute heartbreak just gets to be too much for me so I try and trick myself into not thinking about it by really concentrating on other things. I had been wanting to make something special to offer for Christmas for quite a while, but just wasnt feeling it, if you know what I mean.  Earlier this year a really awesome 17th c redwork panel of Moses in the Rushes was sold at auction, and one day when I was numbly going thru my saved pictures to keep my mind occupied. I landed on that picture. At that moment, I knew what I wanted to make and spent the rest of the day drawing out a 17th c Nativity scene.

I took inspiration from  three 17th c embroideries~ there arent that many with Nativity subject matter. I know of one tent stitch piece at the V&A that is so bright and colourful, it doesnt even look like a Nativity scene until you start really investigating it. A woman is sitting by a stream above a grotto surrounded by shaded green hollocks....and then you notice there is a baby aside her...then you see the sheep and shepherds in the background and realize the man on the other side of her is Joseph, there is a stable with a donkey and cow...there is an angel...its all very subtle.  I didnt want my nativity to be subtle!

The angle is above looking down on Mary who is kneeling aside baby Jesus in his manger. Joseph is standing aside the stable with two shepherds kneeling with their sheep to the other side of Mary.  I tried to fit a donkey into the stable but he just didnt fit without making it look over detailed. Joseph's dove flies overhead and of coarse no 17th c scene would be complete without a huge mulberry tree ;)


I love painting blackwork and after sharing this with a friend, got immediate feedback to make it into a black or redwork project to stitch.....so ...perhaps a special for next year 


For now though, this is my one special offering for Christmas 2020. I made it from a beautiful piece of hard maple, and fit it with 21 pegs. Yes~ 21 pegs! My largest spool tray to date. As you can see above both the small and large spools fit on it nicely. It measures 8 & 1/4" x 7 & 3/8". 


Signed and dated on the bottom of coarse


This special tray is available at a cost of 650.00 including shipping~ a direct reflection of how expensive wood has become, and how many hours I have into it. If you love it and would like to purchase it you can email me at rlkinnison@yahoo.com


Saturday, September 29, 2018

on eBay this week!

Lil Mermaid in her Grotto
The first week of Autumn has arrived! It seems too soon~ I am not sure I want summer to be over just yet. School has finally started here, and its even more hectic now than it was over summer. Where is my quiet time???? I am beginning to wonder if I will even remember what that means in a few months....
I have been working a little here and there on my casket,  when I can get the time. I started out planning to work the front and back panels at the same time, starting with the clouds at the top of each panel. Well. Well. 
I am still amazed, at how a little bunch of innocent enough CLOUDS.....totally kicked my tuccas....over. and over. and over again. I worked and ripped out that blasted bunch of clouds on my back panel at least five times, with some parts more than that. By the time I called them done, I was, and still am...so sick of blasted clouds I don't even want to look at the ones on the front panel.

So after the clouds straight from Satin himself(oddly enough I wanted them to be stormy clouds...not happy clouds)...I have been working on the two trees I have on my back panel.  I bet you can't guess how many beads is in this little bushy tree.....not including the trunk.....
O.K. I am getting sidetracked, which is usual for me lately~ anyways, what does this have to do with the thread palette set  I have on eBay this week?  I drafted the front panel of my casket to include the mermaid and grotto from an unfinished picture at the Cooper Hewitt Museum. I love this little mermaid~ she is so happy and full of life, with her little fishy friends swimming along with her while she combs her hair. The original is unworked, so I have been thinking about what colors I am going to use, and that gave me the idea to make her into a thread palette, so I could play with fun happy colors and see how they work together.
The palette itself is a figured maple, and this time, I carved the clamshell, instead of leaving it flat. I really love how it came out. I  used quartersawn sycamore for the three thread winders~ there is a snail, also from the Cooper Hewitt panel, a little baby clamshell and a fish. If you would like to see them, you can find them on eBay this week, here

Monday, July 23, 2018

2019 Bath Textile Summer School


Bath, U.K. ,12-17 August 2019

    The classes have now been posted on the Bath Textile Summer School website for next year, you can find them here to learn more about what I am teaching. Hover over the 2019 workshop section, and you will find me last in the drop down menu.  This year pictures of some of our past workes are included on the information page, so as to not be confusing, I thought I would post pictures of both class projects here. Above is "Pretty Ladye", and below, "Bath Bunny".  My focus this year is surface techniques, for those who would like to add a beadwork element on to a casket panel or picture. Both classes work with modern Japanese Miyuki size 15/0 seed beads, so they have nice large holes, and are both good representations of the details one can get with this larger size of bead.   Pretty Ladye is a super special class, each large bust is sculpted with brown lampwork glass eyes. Aside the fact it takes me about 3 weeks to sculpt a single figure, I had a horrible time getting suitable glass eyes this small, and for this reason, BTSS 2019 may be my only running of this class.   (She would be a wonderful start to the top of a casket...hint hint!)

    Bunny is so adorable! Students of this class will learn detached techniques, such as the flower petals, and my method of working up an animal figure in beads using twilling, or peyote stitch.   I am making a great effort this year to keep the kit cost as low as possible, but more even, the international shipping~ so I will be only shipping the prework kits for each class, and handing out the rest of the kit in class. Prework will include silk satin ground, instructions, and padding for the cartouches only, so packets will be small to keep both shipping & customs charges to a minimum. 
One things I love about teaching the beadwork, is that my methods can also be used for regular raised stumpwork in silks and metals threads.. the materials maybe different, but the way one goes about it, in the steps, is the same for both.

 I have been plugging away on my special something and am super happy with how its coming on so far.  I really love 17th c blackwork, and it is such a challenge to creating depth on a flat surface while painting with a single color.  Like I said, I am painting one for me, and one to share, so here I took advantage of having two to show the difference between just penwork, and painted. I loooove it!  This bunch of grapes took just under 3 hours to paint...of coarse I am keeping track of the hours!

Friday, December 15, 2017

on eBay this week!

12 Spool Flemish Spool Palette

   My last offering before Christmas~ if you would like to see more views or perhaps place a bid, you can find it here, or click the sidebar link to my eBay specials. 


Wednesday, December 06, 2017

One eBay this week!

A Posey of Roses for Christmas
I really loved the round rose thread winder I sold a bit ago so I decided to make a palette set with similar posies. I kept the red & green colours and think, tho they are roses...it looks quite Christmassey! If you would like to see it in more detail, and perhaps place a much appreciated bid, you can see it here on eBay.

Merry Christmas!

Monday, November 20, 2017

It's so Dark....

Makes me Want to Hibernate
I don't know what is up with it being so dark lately...but I don't like it. Here in southern Colorado, its midnight dark by 5pm! Depressing. I don't remember it getting so dark, so early last year.... Its hard to get things done when all I want to do is sleep. I have been working very hard tho, tho at the moment it doesnt look like I have anything to show for it. Last weekend I worked the four butterflies on the top panel of my flat top casket...so this weekend I was super excited to get to start my two angels. Their wings are a big focal point~ each feather I am working separately.  I drew in lightly with pencil where each feather would go....eventually.

 So there's not much to show for an entire weekend of work...the two angel busts are attached now...but thats about it.  You can see their poor feet dangling on the panel~ I just have them pinned in....not sure if they will even have feet or not yet....

 The entire weekend, just about, I spent working 2 pieces of needle weaving....for portions of their gowns. I wanted them to be open and kind of lacey...so made up my own stitch. The second piece has more open areas, so they both wont be totally the same. It was fun, but took what seemed like eons...

 I have been working like crazy out in the shop trying to get orders filled for Christmas, and working on orders due in January and Feb(I just can't crank out things in a day)....I think it is hard for people to really understand how much time and effort I put into my work....so I took a few pictures of the shop yesterday to try and maybe show why ya'll have to wait for things.  When you open up one of my kits and see all the cut and portioned threads....they didnt arrive like that! We had to measure, cut, package and label each and every container....me...myself and I. We have a great time doing it...but it takes time.  Oh...and that awesome picture on the cover....of the finished model....we stitched that too, so that we can write you the most complete stitching instructions possible. We make an awesome team, ....me, myself, and I...but we can only do so much in a day.

 The wood for my stitching tools I mill myself...we are planing down stock for padded mirror cases in the picture above.... Each and every hole on a thread palette, gets drilled not once, but twice~ once from the front, half way, and then again from the back, so there is no tear out....same goes for holes in the slats of my slate frames....there are 48 holes on a single large slat, so 96 holes per large slate frame, drilled twice is 196 holes I have to drill for one large slate frame....then they all get sanded.....and yes, each and every hole I drill, gets sanded inside the hole!  When you see a shaped thread winder...I cut out each and every one, myself, on a scroll saw. If it's a circle.....dont even dare think I use some hole saw jig....absolutely not~ I cut that sucker out freehand, absolutely.

 Speaking of slate frames.... I had a visitor to the shop the other day see this stack of frames I have to make the mortise & tenon joints for, and he says...'so you use a mortising bit on a router for those I been thinking about getting one'   To which I replied, "no~ I dont use power tools for my slate frames~ theyre too small. A power bit has too much power and bends in the wood when its this small~ I use rasps and a chisel."  ...He didn't believe me until I showed him, to which I then got the~ you are crazy comment. Its  what I do~ I enjoy the process just as much as I enjoy the finished product.

I wanted to have a slide top spool box ready for eBay this weekend...I got the box done, but not painted, so it will be coming soon! I am also working on some regular spool palettes for those of you who dont want a hole box. Here are three sets of spindles....and yes, I make them too~
  
 It took an entire afternoon, and I mean an entire afternoon to sand and shape the tops of the spindles!

 I have been working on some new designs in between other things. Got in some new wood, this is quarter sawn sycamore, and I love love love the design of the grain~ its only achievable by sawing the wood this way.  I have been wanting to make this shape of a thread winder for a while~ I have to have a steady hand on my saw....it's a replica of a c1840 winder...coming to eBay this week!

 As you can see, we(me, myself and I) have all sorts of things going at once...while some things are getting clamped...I work on something else....everyone is patiently waiting for their turn!

 Ok...I'm so excited about it, here is a peek of the thread winder going on eBay this week! For me, this is the best winder I have made to date~ I have been experimenting with different finishes to try and get a more Early American looking finish to my work, and finally, finally have a lacquer based finish that I am super super happy with. Its strong and super smooth to the touch. The varnish I have been using sometimes can feel tacky to the touch after fully cured~ which was just the nature of the varnish...I have been trying to get my finish to look and feel like a hand rubbed and worn finish....and finally, success! I know ya'll will be as happy with it as I am....not to mention the colors of the design~ these are water colours folks!


And if all that wasnt enough to keep me busy... husband decided to throw a new puppy into my day. We lost our beloved Yetti on the 4th of July, and well...I really wasnt ready for another Pyrenees yet....any puppy for that matter. But what can you do~ that wicked little face is so cute. I personally wanted to name him 'White Devil'....because he tears around the house, eats everything in sight...my shoes, the kids shoes....pots, pans...I caught him chewing up tiles from the floor the other day :::sigh:::  ...but alas, his name is Yukon, so everyone~ say hello to Yukon....he wont be little little for long!

Tuesday, August 01, 2017

on eBay this week!

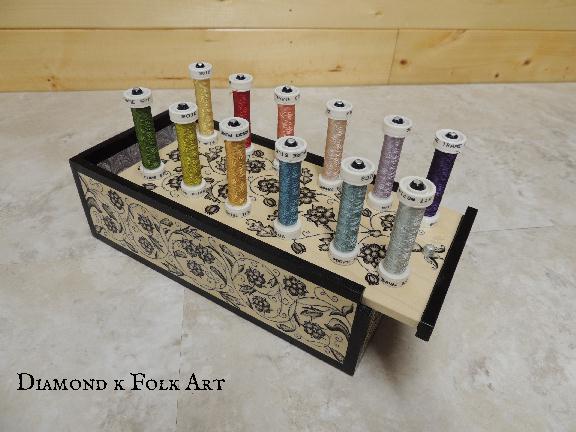
One of a Kind 17th c Blackwork Slide Top Spool Sewing Box
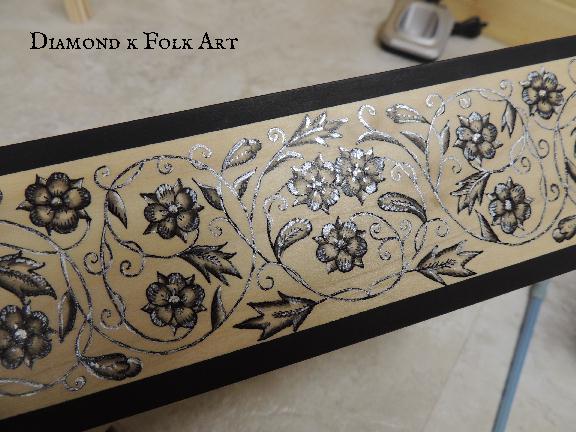
 So yesterday I shared with you the original embroidery pattern I adapted for my box~  I really love it, it just spoke to me. The minute I saw it, I had a vision of it painted to look like blackwork embroidery. Now days, if one says blackwork, people think of cross stitch and patterns made by back stitches on even weave cloth....17th c blackwork is nothing like that. Above is photo of a coif~ the majority of the shading is done with Fil Turk...or speckling stitch, and all in one color. (the above just happens to be done in red, so I guess, technically its redwork)

 All of the things I make are hand made~ and by hand made, I mean....I actually make it, with my hands. and then, I paint it, with my hands! Its not some cheezy deal on there!  I planed the wood to thickness, cut it, and actually made the box~ yes, I did! Do I follow plans? No. I just thought it up, and make it as I go....it looks the same construction as the last box I made, but is slightly different size because, well, like I said, I make it as I go, so everything fits perfect!  I hand draw the design, after I have designed it, onto the piece, then I paint it, and then varnish over several days. After All that varnish dries, then I finish the inside with a hand made Italian marbled paper....why Italian? Cause its hand made of coarse, and its pretty, and I love it!

 There are 6 coats of black on this piece, to get the deep dark hues and depth that I wanted.

To finish, all is overpainted in real silver ink! I love love love silver~ the black and silver embroidered jackets are some of my all time favorite,  and its high time I put some silver on something. Dont know why I waited so long, because its really beautiful~ its very subtle~ you really dont notice it until you move the box just the right way, and then the light just shines off the silver...and it wont tarnish because its under layers of varnish!

 Inside is a pretty coordinating blue grey peacock pattern marbled paper

Absolutely it is one of a kind~ if you would like to see large pictures where you can really zoom in, it is on offer this week on eBay~ you can see it here , or click on the link to the right in the sidebar to my eBay specials~ (I also have a spool palette on this week if you dont need a whole box!)

Saturday, June 17, 2017

an Heirloom Quality Box on eBay this week

One of a Kind Flemish Slide Top Spool Box

I have been working on a special, Heirloom quality box to offer and have it up for sale this week on eBay~ you can find it here , or click the link in the sidebar to me eBay specials.   I have over 42 hours of work into painting this box, aside from actually making it, and finishing the isnide.  I wanted to make something special, that there will only be ever just ONE of~ so if you like it, feel free to bid on it!  For the hours I have put into it, the start price is a steal of a deal~ I challenge you to find anyone else to produce a nice slide top box and paint it for less~  So many times people will not bid on my eBay auction, and instead ask me to make them one of whatever it is I have offered~ not so on this piece. I will not take orders ~ this is the ONLY one

 If you want something really special and pretty to hold your stitchy needfuls, that no one else will EVER have~ please, go check it out!

Tuesday, May 30, 2017

Workin My Fingers to the Bone

 My Dayes of Frostbite & Sunburns are over!!!

   I have been working overtime double triple and beyond the past few months, and today, today! I spent my first 'quiet time' painting in my new woodshop! woo hooo!!!!!!  For our 25th wedding anniversary, husband bought me a 10x20 Weather King Lofted Barn...well...I should rephrase that...he wanted to get a 30' long and skinny tube of a building....but I have been pining for a lofted barn for at least the last 5 years, and no Sir...I would not give in! As excited as I was to see it being delivered....I also got kind of overwhelmed~ I had a lot of work to do to get it ready for me. 
 As I work now, my embroidery and wood are all in the same areas~ if I have to do any cutting, sanding, planing ect....I have to dig out my equipment, drag it outside, set it up....then work out in the weather...so in the winter I literally freeze my tuccass and fingers off, and in the summer I get the most horrible sunburns!  If its raining, I cant do anything~ so alot of my work sched is dependent on the weather. 
Well....not any more!


  See the dirt to the left of me here under the building....as I am signing for my shop....thats 12 ton of road base that I spread out~ and then my son & I got up close and personal with a 'jumping jack' tamper to get it all level. This stuff is harder than cement once its compacted. 

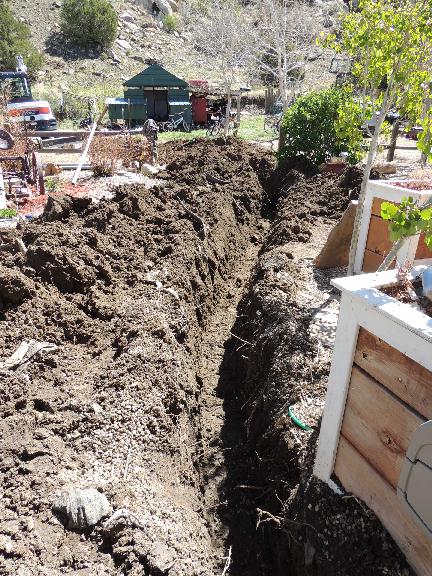
  The ditch for the new electric ...120 feet long and 4 and half feet deep....and yes, I got to fill it all back in by hand...plus another 18 ton of road base I got to spread out over the driveway afterwards...took me over a week...never want to see another pile of dirt for at least a couple of years.  

 Weather King makes awesome buildings~ you can even design your own on their website. I chose the lofted barn with the two big doors, so I can wheel  my tablesaw outside onto the deck when I need to cut something big...and  the two lofts above give me plenty of storage~ one side for wood, the other for all my packing/shipping materials. After the electric was finished, next came insulation.

Peg board wonderful pegboards! I have always loved them~ I can hang all my tools and wood so I can seeeeeeee everything~ oh it will be glorious for sure!

In the midst of working on the shop, I have been finishing up prep for class in August~ 54 pages of step by step instructions back from the printer, ready to go! I really am looking forward to getting all my woodworking things into their own space, so I can get back to having my embroidery out full time, instead of piles of wood everywhere...and I mean EVERYWHERE! 

Things getting messy.....but progressing

Nearly done~ got my work bench made in the center, that I can move around, with benches round the walls

Done and varnished! I have soooo much bench space now~ I can work on cabinets and cases and slate frames and boxes all at the same time~ going to be fantabulous. Shelves round the entire shop to put up all my tools
So I finished yesterday, and was supposed to be moving all the equipment in today....but I am painting on a slate frame and palette set and the shop was just calling to me to sit and paint...so thats what I did. Its so nice and quiet, I can now sit or stand by my window here and listen to my blackbirds and paint....so look for something pretty awesome coming to eBay....after I get my orders finished so I can work on it....you may be able to sneek a lil peek if you look hard in the corner!

Wednesday, May 17, 2017

One of a Kind Spool Palette on eBay...again this week!

Trying again!

If you liked the spool palette I had on eBay earlier and couldn't see it or bid, I have relisted it this week. I think I got all the problems fixed. eBay is automating so many things, I am finding it harder and harder to 'successfully'  fill out the listing forms. I apologize for my lack of technical finesse. The listing is still being run as no international shipping, only because I cannot figure out how to change it~ so if you are not in the US and are interested in purchasing it, just drop me a line and I can let you know how much shipping will be to you.  
You can find it here on eBay. 

Wednesday, February 15, 2017

New on eBay this week

A Palette for SPOOLS!!! YAY

For folks, like me, who stitch with silk & threads on spools.....I designed this palette to hold those little buggers nice and secure! I am currently stitching with filament silk and ANY little thing would snag on my spools and zoom...off they would go onto the floor. Well not any more~ I designed a new palette, for spools~ made me one and love love love it!  

 Center is painted with my signature roses and pansies

    No more messy sewing or side tables! Now you can keep your spools nice and tidy, and right where you need them! If you like this one,  made from a pretty piece of oak, its on ebay this week! 
 You can see it here , or click the link to my eBay specials on the right sidebar