Showing posts with label clothing construction. Show all posts

Sunday, September 07, 2014

As I Promised...

  I love my early china dollys!  Poor little Sarah has been nekkid for so long. When I bought her, she had the most hideous 1950s made dress on, the sight of it made us both ill! I then found this lovely gown, and she liked it very much...but I didn't....
 Well, I did like it.... but it was white! It was stitched beautifully and all original to her period~ then along came a ladye who really wanted it for her dollye, so I gave in and sold it. Even tho it was white, I should have kept it...yep, shouldn't have sold it. But I did, and I have promised I would find Dear Sarah another prettier gown to wear ever since.  There are an absolute plethora of whites available...whites whites whites...but Sarah did not want a plain white dress. So I have been looking and looking, and poor girl was just tired of waiting, so Mamma promised if we didn't find a period gown over her nap this summer, I would make her one
 I have quite a large chunk of the lining of an old quilt made for a 4 poster bed~ its a fabulously thin early block print cotton ...quite a bit earlier than Sarah, but something a girl would have had around in Mamma's scrap bag to make dollye a dress out of. She chose a popular fan front style
 Dress doesn't look bad without the sleeves does it?  Sarah is an oddly rather plump shaped girl~ that's one of the reasons its so hard to find original gowns to fit the early dolls~ their bodies all hand made and proportions unique to themselves~ one cannot just look at the shoulder to hem measure of an old dress and have it fit. Her chest is very broad & full, tiny waist, and not much body at all! Her legs are extremely short with fashion feet
 Her arms are stuffed very firm with horsehair~ so in making sleeves I had to give her something that would slip over them easily without having to have them bend, because they wont! All of my other early dolls of this period still retain their original clothing, and are all wearing the popular pagoda shape, or bell sleeves~ I have to imagine that part of the reason, aside from them being in fashion at the time, was because they were the easiest to get the dolls in and out of.  Little piping at the waist and neck are the only simple embellishments
 Look at those chubby feet! They are so short and broad over the foot I dont think I will ever find her shoes....I thought perhaps she could wear these little red ones I have, but nope, too long, way too long and clumsy looking on her. She will just have to wait a bit longer.....
She is happy to join the girls~ Abby, Sophie and Joy(you can just see her feet there) are getting ready for Pip's birthday today~ nine years old already! The girls are all giggling and trying to remember back when they were just nine years old.....

 Addendum~  Priscilla has asked about Sarah's ugly dress in the comments, so here it is!
 As you can see, it was newly thrown together and did not suit her nature. Priscilla also asked the ages of the girls in the picture~ large girl on the far left is Abbigail Blake,  her(or her owners) actual name inked on her body~ she and Sophie sitting next to her in the green dress are c1840-50 girls. Sarah is a little later in period, 1855-1860~ the mold of her exposed ears is not a common one~ she has no ringletts around the sides or back of her head.
To answer yet another question, yes, textiles were so precious they were used and reused and reused again. I do not, nor have I ever partaken in the cutting  of early clothes or finished textiles (quilts, coverlets, runners, church garb) to use in my doll making. My hands would literally not be able to cut, never. I do run across pieces tho at sales and such, unpicked large hunks are very rare these days. The fabric I bought that I used for Sarah's dress I bought as actual yardage wrapped tight in a sack at the International Quilt Festival in Houston several years ago...it wasn't until I unwrapped it after I returned home that I found it was in two large pieces, a right and left, each with cut outs for the post at the foot of the bed. I also found several little snippets of string every here and there, telling me it was indeed once a lining of a tied quilt or coverlet.  Flat yardage I have no problem with cutting~ I can think of no better way to honor the textile itself, and all the hard work and skill that went into its making, than by using it to dress an early dollye

Friday, November 23, 2012

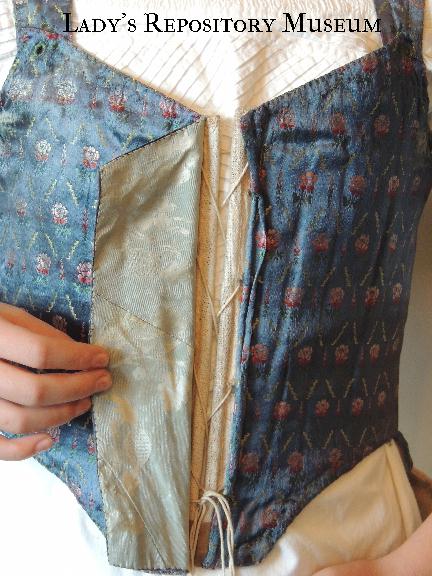
c1785-95 Child's Soft Boned Bodice

  Cinching up tight....

   Emma is modeling a young girl's soft boned bodice, c1785-95.   This would have been worn as part of a gown, fully visible, with matching sleeves that pined onto the straps. It looks a bit wonky because Emma is wearing a later mid 19th c boat neck chemise underneath of it, instead of a proper shift.


Designed to grow with the child , the front lacing opening is covered by a wide flap that pins closed over it~ so as the child grows, and the front no longer touches when fully laced, the flap will cover this.  I have seen rare maternity stays with this feature as well, but to this this bodice's tiny size, and the fact the straps have two sets of eyelet holes as well, this is most definitely for a growing girl

There are horsehair pads stitched to each side in the back to help puff out the waistline of its matching skirt~ long since gone.  Note the sort of 'hump' you can see going across her shoulder blades horizontally,  this is not a seam, but where the boning in the back stops for the bodice straps to ease over the shoulders
The pads are stitched of coarse linen and stuffed hard in the ends with horsehair.  There is a line of stitching to keep all stuffing in a neat little roll at the end of the pad


Do not confuse a soft boned bodice for a set of stays. From the inside, it looks like a set of boned stays, and is constructed in nearly the same manner, but the outside is covered in a figured silk.  The reason I say 'soft boned' is because this bodice is ONLY boned at the back and front, with no fill at all in the sides

The shoulder straps have two sets of eyelet holes, Emma is wearing with them pined at the first, or shortest position. As a child grew, they could then move the straps to the outermost eyelet hole. Of I what I have seen of these early garments, most  would knot their shoulder straps somewhat permanently~ some even stitched them in place, and then would only have to do up the front or back laces of their stays or bodices when worn

The inside of the front flap is a gorgeous early 1740 powder blue silk damask, and not entirely one large piece either, but made up of several smaller pieces joined together, which again is fitting for a child's garment~ many were made from Mamma's olde cast off gowns


Saturday, November 19, 2011

Rare 18th c Sleeve Links

Such a rare what~not. Just think of things that you take for granted, and use every day, but never actually keep. I can think of several things that get worn, clothing wise, until they are worn OUT, and then tossed out. I shudder to think of how much of early everyday life has been lost this way. Every now and again, we get to peek into the past thru treasures in an untouched box, or perhaps an original diary when it comes to our attentions. I am so thankful for the big attics in the North East, and the fact that 'things' could just get stuck in a box, crammed up there, and left...not for years or decades even...but generations!


Earlier this year, I had the absolute honor and pleasure, of being able to acquire such a trunk for the Museum. It was literally like the drawer of a dresser had been taken out and put in a trunk, and forgotten. Everything dated from the mid 18th c up to the 1820s for the menswear. Everyday things ready to serve their master, just waiting to be used again!


These are mid 18th c "sleeve links". They are just one of several pair that still reside in their original undersleeves. I guess to compare to something current, they are the ancestor to the common cuff links we know of today. They are very simple, and very utilitarian. 2 mother of pearl shirt size buttons, joined together by a linen thread.


There is a bit of frugality to them as well~ you will notice that the more expensive carved mother of pearl button is to the OUTSIDE, the inner link that wouldn't be seen, is totally plain. The linen thread is passed thru 4 times each, and not knotted, but wound round itself several times to the outside of the inner button, as seen here


Linen thread has been wound around the connecting threads, to reinforce the link between the two buttons, and to regulate the width to allow for the thickness of the materials they are to hold together. The bulk of the threads have shifted to one side over time and use.


I thought this very interesting, that the original buttonholes in the sleeves have been 'narrowed' by overstitching, to accommodate the smaller size of the sleeve links.


Done on both sides, as you can see. I know my living history readers will very much enjoy this post~ an easily made period correct detail that should be incorporated into your wardrobe. Just think how much money one could save, having a single pair of sleeve links, instead of a pair of buttons sewn to each and every sleeve, collar and breeches.

Friday, July 08, 2011

Bits on Lacing a corset......


Trevette asked a wonderful question today that I have been asked before several times, so thought I would share my answer to her with you all~


Rachael, dear, I hope this finds you having a lovely day.

I'm writing to ask a big favor. Would you mind writing me about what happens to the two ends of the ribbon when you lace up stays? I mean I know only one ribbon shows on the front but it looks like you do end up at bottom with the two ends of the ribbon, so I'm wondering, what happens in the back?

In my head I can imagine a possible way , but not sure it would hold together or hold stays straight.

I went back and read your marvelous post and exquisite photos about making Marguarite's beautiful corset and want to say a huge thank you again for all the wonderful and generous information and photos you give about doll clothing construction.

Please forgive me if this is asking too much. All my very best to you, Trevette


This is a good question Trevette~ there are numerous ways to lace up a corset, and these vary even more, on the period, type of corset or stays being laced, and if the wearer is dressing themselves, or having someone else help them. I have shown a picture of Grete in her stays, and how they are laced up the back, this is the most common, very simple way using a SINGLE stay lace, very long. It is laced up one side, ever OTHER hole, turned at the top, and laced down the other side. Care is taken to leave a long tail on the front end of the lace, so when you come back down, with your leftover end now, you have and end hanging to tie a pretty bow. Then both ends and the bow knot will be at the bottom back of the corset, and these are simply tucked up under the back. If there is alot hanging, I wrap this in a little coil before I tuck it up under to keep all nice and tidy.

Now if you will also notice, I have drawn two loops at center back~ if you were a person dressing yourself, this is how you would lace your stays~ you will have a single LONG lace, with a knot directly at one end. You will lace up one side, every other hole like before, turn at the top and come back down the other side, only this time, you will tie your lace in a knot at its end, after all is laced thru. Now at the center back, you will pull out two loops of lacing, like I have drawn, of equal amounts, with both knots and ends of your lace at the very bottom of the stays. You will leave a few inches of a gap, so you can easily step into your stays/corset, and slide it on. Once in the proper position around your waist, you will grab these loops, the one on the right with your right hand, one on left with your left hand, and PULL them forward directly out in front of you, this will tighten the corset on both sides, top to bottom all at the same time. But there is a trick to it! (You will take the right loop in the picture above, across the BACK of the corset's LEFT side, and around to the front where you will grab it with your right hand, and same with the other side)There is usually enough lace length to wrap around the waist once or even twice, and tie in the front in a little bow. Once the petticoat is on, the knot is tucked beneath the waistband to conceal. I hope this makes sense :)


This is a great working illustration of why the invention of the front metal busk was so important and innovative in its day~ a woman could have someone lace the corset in the back and knot it off~ permanently. She was then free to get in and out of it by simply opening and closing the front busk~ no more strings everywhere!

Thursday, December 16, 2010

Marguarite's 17th c Corset / Bodies Complete

I couldn't be more please with how these came out! As soon as I am finished with Marguarite's Smock, I will post a picture of her wearing them. Until then, I think you will enjoy these. Finished, her bodies measure 6.5" across the shoulder, and 12" at center front from bust to busk point
I used the last of my matching hand dyed silk ribbon for the points, and since I don't have miniature metal aglets, I made my own

Each ribbon point is wrapped in copper wire, and then dipped several times in beeswax....and yes... bees wax from our own bees :)


I used a precious scrap of handspun tow to tie the shoulder straps together in a permanent knot


The tabbed skirts flare out quite gracefully


back view


Back is laced with a single ribbon in the proper 17th c fashion. All in all, I had an absolutely fun and wonderful time stitching these, and of coarse, I kept track of every minute, writing down the time I started stitching in my journal, and again when I finished to get up for anything.... for a total stitching time of 64 hours, 1 minute.

Monday, December 13, 2010

Binding the Bottom of Marguarite's 17th Century Corset


Here you can see that I have finished back stitching the silk binding, right sides together, to the bottom of Marguarite's pair of bodies. This was extremely slow to stitch, about 6 hours for this one step if I remember right. You can see the 'skirts', or tabs, pointing up and away there. I actually used a double thickness of silk on my binding here, as I didnt want the ends of the bamboo working their way thru it, and its so thin, I just felt the bottom needed more. After the binding was on, I again trimmed the linings. NOTE: The center busk pocket. I wanted to leave an open pocket so it could be removed, so the binding only goes thru the upper layer of lining, not thru all layers here.

After the linings are trimmed, I brought the silk to the back and whipped it down, just like on the top edge. It looks right spiffy now!

Here is my busk pocket opening....cause, well, one never knows when they will fall in love, and need to give their busk to their departing beau to carve while he is out Whaling...... If you want to have a pocket like this so your busk is removable, here is a tip~ make sure to cut all your pieces so this opening is the salvage edge! There is no bulk, and its nice and tidy.


Nearly done now. This is the front view after binding. I still need to press the tabbed skirts down.....


And finish the last of the brass grommets~ there are two at the bottom back opening, and then four more each side for the ribbon points (ties used for attaching a farthingale).


Saturday, December 11, 2010

Binding a 17th Century Pair of Dollye Bodies
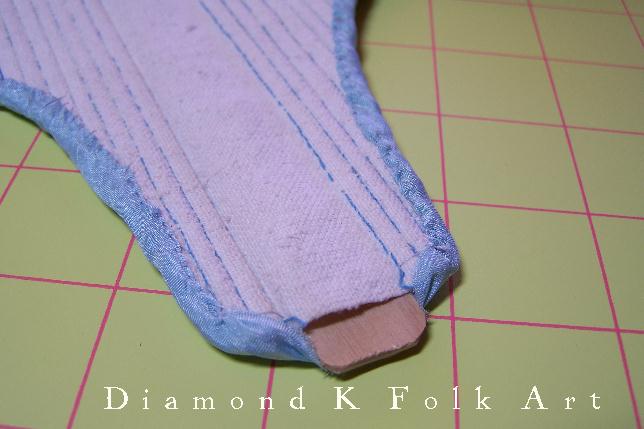
Here are some progress pictures of Marguarite's pair of bodies. I used 1" hand dyed bias cut silk ribbon for the binding, doubled over as shown both for strength and a more opaque coverage, since its such a light color, and such a thin tissue silk ribbon.
I waited until I was at the strap to trim it to shape (really cuts down on the edges raveling cause the straps are always flopping around while I'm sewing). In the picture above, I have the binding on, and you can see the edges of the linen lining sticking out around it....the next step is to trim all this off~ very important for a nice uniform and equal binding!

After the excess lining is cut away, the ribbon is brought around to the back with my thumb there, stretched as far as it will go and whipped down. To answer your question why am I wearing gloves.....for two , well three reasons actually. The first, the linen I used for the lining is antique and really thick and densely woven, really hard to get the needle thru~ the gloves are excellent at helping me grip the needle and pull it thru nearly effortlessly...2, on my left hand, the rubber helped to grip the slippery silk and pull it taught, and 3, they also keep any oils I have on my hands and fingers off my work. I love sewing in rubber gloves..........


Here is the binding as seen on the front, and the whipped edge to the inside. I really love these two colors together, and in the 17th century...everything was colorful!


Next step was to finish the brass eyelet holes that were up next to the binding at the back opening, and on the front and straps. Top is finished!!! And, I must admit, it looks awesome :)


Starting on the bottom edge now, saved the hardest for last I guess. First, I pin'd the 3 tabs to the bottom edge in their rightful places~ largest next to the back opening, inbetween in the middle, and smallest to the front most area next to the center boning.


I then carefully stitch the binding silk over all the layers. This is very slow going on the bottom edge, as the bodies are extremely stiff, and I cant bend them to make my normal running back stitch, so I am left to stab each stitch one at a time, straight up and down thru all layers, including thru the bamboo, which I am using my pliers to help with. If anyone ever x-rays this in the future, they will find the tip end of my last needle buried in the bamboo 7th from the left...too many broken needles today, and I cant get this one out, so in it will stay!

Tuesday, November 02, 2010

If U want somthin' done, do it yourself.......

That's what my parents always told me growing up, and what I tell my own children still. I guess if I had a saying I live by, it would be that. I find it much easier to do or make for myself, instead of trying to find from others, or depend on others for~ and especially so when it comes to dolly things! When I started making reproduction doll size corsets and stays, I grew so tired of trying to find supplies at the right scale, that I just eventually gave in and made my own. Little brass rings are very hard to find in the right scale for stitching over to make lacing eyelets up the back of a set of stays....who on earth would use hunky klunky metal grommets....iiiiiick! Above the the back closing of Marguarite's bodies, boning channels are stitched, and I have lightly marked with a pen where I want the eyelets to go~ just one side tho. After I get the first side done, I use it as a guide for the other side, so no need for marking.


Making the metal rings are very simple~ all you need is a pair of flush cut wire cutters and flat pliers (can find in jewelry supply), a mandrel to wrap your wire around (size of the mandrel or rod, will be the finished size of your eyelet holes), and wire. I used brass wire, cause it doesn't rust, and is nice and stiff. Use a heavier gauge for larger rings~ Marguarite's are small size, so I am using 24g.

Just take a length of wire, and wrap it around your mandrel~ you can use a pencil, wooden dowel, knitting needles...those are great cause they come in a variety of sizes....
Keep the wire as tight to the rod as possible, and try not to twist it.

When you get a length of wire wrapped around the rod, slip it off, and then take your flush cutters and just snip a line up from one end to the other, and the rings will fall off as you continue on to the next. You'll end up with a pile of open ended rings like this


The next step is to 'finish' the rings off with your flat pliers. Mine also have round tips, as you can see above. If you look closely at the picture, the two rings on the left are the before ones, the two on the right are finished. I take and pinch them the rest of the way closed and then take and lay them on the flat surface of the pliers, and give them a good squish so they lay nice and flat and are not twisted at all. Once you have your rings, just lay them on the surface where you want them, and stitch over them all the way around to cover the brass, and they make a very nice reinforced and even eyelet hole.


After I got the eyelet holes done, I filled the boning channels on each side of the back opening, and am now ready for binding. I will stitch the final lacing eyelets after the binding is on, as they are just directly above it.

Tuesday, October 26, 2010

17th c Pair of Bodies Progress!!


I have been progressing nicely on this pair of bodies. I am making every effort to be as period correct as possible, and in nearly every minute of stitching, I keep thinking to myself, its really no wonder why men were the staymakers! One really does need a lot of strength in their hands~ I have overly strong hands, and mine are really feeling this every step of the way. Got the back boning channels stitched, and decided to only make 3 on each side of the back opening~ Dorthea's had 4, but this is a scaled down version, and I just didn't like the bulky look of 4 channels. The wide one next to the opening is for the lacing holes.

So next step, once all the channels are stitched, is to fill with your boning material. Whalebone, splints and bents(type of stiff grass) were all used in the 17th c as boning/ stiffening materials. I have plenty of whalebone, and I really would have liked to have used it, but its so darn brittle, it just cannot be cut. Perhaps it wasn't like that 200 years ago when it was harvested, but it sure is now, so I will save that for something with 1/4" channels, something I wont have to cut it down for. A person could also use hemp or jute twine to bone their channels as well, I have used both in later period corsets and it works wonderfully....but I wanted a really rigid, period correct look, so I am using bamboo for Marguarite's bodies. Above I have already cut a hardwood center busk, and bones the 3 channels each side of it. I used the pliers to nip the ends off right at the edge of the material. I was going to work from the center out, like I normally do, but since I had to still stitch the lower edges of the boning channels going up the side of the front panel, and I needed to actually be able to get my hand around the material to stitch it, I switched and did the side sections next.

This really worked out well, and I stitched the channels as I filled them, so the little pieces wouldn't slip out. I used bamboo BBQ skewers, and split them with my x~acto knife to the right thickness, then whittled the edges until they were the perfect fit for the channels. On the side pieces, I cut them to the exact angles top and bottom, then slipped them in, and stitched the baseline below them. Here is a hint when using any type wood material for your boning. Trust me, this will save you much time and effort! Before you fill the channel, first pre-fit or stretch it with something smooth~ I used a metal rod that was the exact size of my channels. Insert the metal rod all the way up to the tip of the channel...and it wont be easy! You will have to wiggle and jiggle it to separate the 2 layers of lining from each other....twisting is actually best, I found. This acts like a glove stretcher, and once you pull it out and insert your boning material, it will slip right in like butter.


This is the main reason why, if you are using a fragile fabric like silk or velvet for the outer layer, you want to have a backing fabric for it, so your boning doesn't pierce it, or grab a thread and make a run or hole. The boning is placed between the 2 linings, not up against the outer fabric. See my rubber gloves~ I am forever changed and love sewing with them on~ they help my sewing hand grasp the needle easily, and I wore one on my other hand while doing the boning, to help grab the bodies better, and they also kept any dirt and oil on my hand from getting ground into the fabric. One really has to get physical when boning a corset like this. I wont lie, there was some swearing involved......

Here is the above bamboo stitched into its channel. If you have angled channels, it really does make a huge difference to take the time and cut the angles in the boning material as well, so the entire channel is filled. If you leave the top and bottom of the boning straight across, it will look "hokey"....this is why I don't like to use steel boning, because it is so hard to cut.


Front panel fully boned~ woo hoo!


Trim the boning right to the edge, the binding will cover this, and keep them from popping out.


Inside. Next step is to stitch the lacing holes at the back opening~ don't fill the back boning channels yet~ it is easier to needle the eyelet holes first, then add the stiffness last.