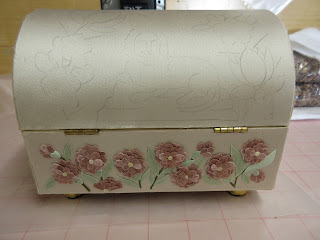
Here is a tour of my finished Gum Work casket. I hope you enjoyed following along on YouTube! If you haven't already got on the mailing list for my new 2022 classes, just drop me a line at rlkinnison@yahoo.com to be put on the list.
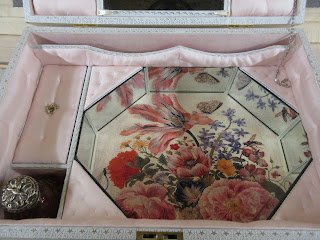
Casket 1070-1873, shown above at the Victoria & Albert Museum in London is one of my favorite caskets because I just love its unique trim. You can see it here. It's not the only extant casket that has lace over ribbon for trim, but it's my favorite. The lace makes for such a feminine look. This is the casket that was inspiration for the trim on my little dome top casket.
I hand stitched lace over ribbon to make my trim, and my last Finishing Tips video on YouTube below shows how I apply the trim~ which is the same for ANY type of trim I am wanting to apply. Hope ya'll have a wonderful Christmas and come back tomorrow for a little video tour of the finished casket
Things to Think about when Looking for Trims for a Box or Casket
Happy Friday! I hope you are having a great stitching week...or perhaps getting ready for a great stitching weekend. I will be at a craft show with Pip all day tomorrow, so my usual Saturday video is a day early this week. The only thing left to share of the making of my little Dome Top Casket is how I apply the trim, but before I get to that, I first wanted to have just a little chat about the trim itself, and what you should take into consideration when searching out the perfect trim for your own project.
Check back next Friday to see how I apply the trim to the box, and then on Christmas Day I'll post a video of the finished casket. I cannot convey enough how much fun this little project was and that I hope it has inspired you to continue on your own project, or maybe even start up a new one!
I do believe this is the first peek you will get to see at the completed Gum Worke~ if you like it and want to learn how to do it for yourself, I will be having a class starting in January~ just drop me a line to rlkinnison@yahoo.com to get on the mailing list.
So.....you have laboured for perhaps years on your embroidery and it's finally finished. All that is left is to glue it onto your box or casket. Easy right? You may be surprised to learn that the majority of folks I know when they get to this point, they panic. Some don't even get as far as opening the glue pot, just the thought of glue on their embroidery is overwhelming enough for them to stop and make the thing live unappreciated in a drawer for the rest of its life.
I am here as a calming voice to assure you, it's really NO. BIG. DEAL.
Take a deep breath, gather your tools, and watch this week's YouTube video on how to do it below!
Each panel is glued on in the same way, one at a time, no matter what you have worked onto the panel itself. It could be cross-stitch, crewelwork, stumpwork, or beadwork...no matter, they all go on the same way. Come on back next week for a fun video on choosing trim!
There were many techniques used in the 17th century to cover girls' cabinets, workboxes, and caskets. One of my favorites is Silk Gum Worke. I have talked about it before, and am very pleased with the results I have been able to obtain. Gum work caskets and items are much rarer than their stumpwork or beaded counterparts, as they are somewhat fragile. Occasionally things pop out of worldwide obscurity. For a brief moment, like the lid opening on a box of treasures, we get to peek in, and then the lid is shut and we are left longing for more. Such was the case with the above silk and silk gum work casket from the Caldwell collection. It was sold by Brunk Auctions in 2006, you can see the auction page here. One just cannot appreciate the beauty of silk gum work via a photograph...its impossible.
I have studied pieces in person and they are so old and tattered now. Four hundred years of dust and sun and wear has left them tired. I wanted to know what they looked like when new.... and I want you to too!
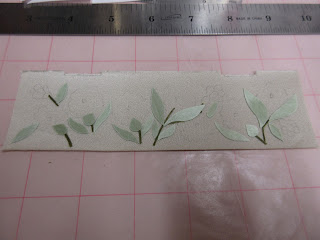
This is the topic of my video for today...it's not so much a tip, as it is a treat. The gummed silk is extremely luminous. In the process of making the sheets, the silk fibers are aligned parallel to each other. I refer to this alignment as the grain. To make a panel, I first start with the stems and leaves, as shown above. Notice how some of the leaves are lighter, and some are darker...but they are all cut from the same silk. The light catches the grain at different angles and is reflected off in vibrant bursts of light.
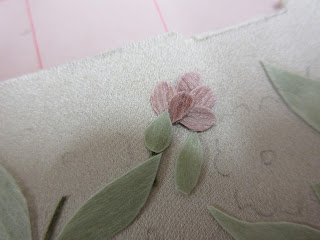
Next petals are placed.
One by one, the flowers grow petal by petal
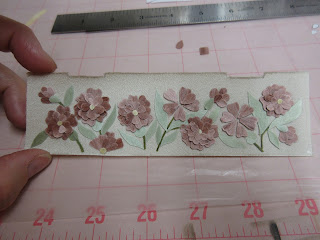
Though the pieces are flat, the way they are built up gives the flowers added dimension. I used the same pink silk for all the flower petals.
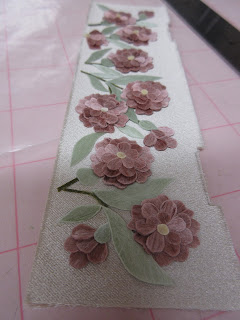
Here is the finished panel on the back of my little dome top casket. While it looks pretty here, one just cannot understand the movement you can get from this technique, so I offer you today a little video, below. It still does not do the real thing justice, but at least is a little better than a flat picture.
If you are interested in learning more about this technique, drop me a line to rlkinnison@yahoo.com to be put on the mailing list for my upcoming Jan 2022 class, Gum Worke~ The Arte of 17th Century Gummed Silk.
Today is just a short video to show you the progress of my Dome Top Casket and to reinforce my point that while you do need a good sound foundation for a casket, it need not be an overly fancy or expensive one. It's more about what you do to the box....than the box itself. Of course, I have not been stretching this project out minutes at a time. Its been finished for a while and SUPER hard to not just share the whole thing. I think overall, from start to finish, it was less than 2 months time from buying the box on Amazon here , to its total outside completion. BTW, I see that the price of the box has gone up, when I bought it it was 11.00 and now is up to 18.00. Still an excellent value! You will see the link on Amazon there are three sizes~ I used the large size for my little casket.
I am working on a new teaching website and am planning on launching 2 new classes at the first of the year. The first will be Puffed Silkes~ 17th c Inspired Padded Box Interiors.
This class will teach you the skills to make a padded interior for any shape of box or casket, as elaborate or simple as you want.
The second will be a very exciting class on how to make Gummed Silk~ Gum Worke ~ The Arte of 17th Century Gummed Silk, where I will teach you my technique for making gummed sleeven silk.
Either class offers skills no one who wishes to make their own casket should be without. My little Dome Top Casket is a perfect example of combining the two.
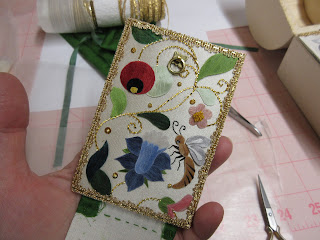
Traditionally, a picture or casket covered in gummed silk was worked only in gummed silk. It was usually flat...like the closer view of the interior door above. But unlike the 17th c examples I have studied, I like to add silk stumpwork stitches and goldwork to really make the surface come to life....and wait until you see the outside! While it is amazing as flat work...I will show you how much dimension you can achieve with Gum Worke. It really is a fun and fabulous technique!
Do you ever feel like you are on a roller coaster that won't stop? Lately, I have been desperately trying to get off the one I am on but it never slows down enough for me to leap out. Every time I turn around it seems like it's time to go to bed and my to-do list is not even half-finished for the day. Maybe the sun is on the same schedule? It goes to bed around here by 5pm. IF anyone has any hints on how to s-l-o-w t-h-i-n-g-s d-o-w-n a bit, I would very much appreciate it.
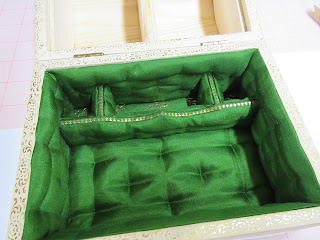
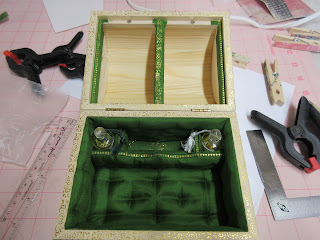
The Dome Casket flew together and I am so happy with how it came out! In the line of progression for today's Floss Tube Finer Finishing Tips YouTube series, I am continuing to prep for the embroidery of the interior doors. What you don't see in the video is the finished padded interior, shown above. Isn't it the most gorgeous shade of green?
I have a list in my head going of interior colour schemes I want to do, and this green was high up on the list.
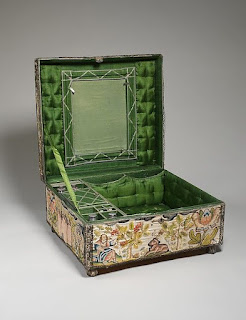
I have always admired the interior of this one at the Met Museum, shown above. Click that link to go to the Museum's page to really check it out! It was the inspiration for my padded interior, except with gold trim. I love my tiny little Penhaligons bottles nestled so snugly into their cubbies. Who am I kidding, I just love padded interiors....and if YOU love them, well I may just have the class you have been looking for coming up soon! It's not a project class in particular. It will teach you the skills to make a padded interior to fit any shape or size box you can dream of! If you think that's something you would be interested in, just shoot me an email (rlkinnison@yahoo.com)to get on the mailing list, I am hoping for a January 2022 start!
Just a quick tip today showing you how I roll the glued paper onto the surface of the silk to glue it on. I use this rolling method for gluing finished embroidery panels as well. Along with the Yes! Paste, one will get no bubbles!
The Lady's Repository Museum is a privately owned museum dedicated to the collection, preservation and study of unique early American fashions of both women and children, the later being a specialty.
All proceeds from Diamond K Folk Art sales (antique reproduction Folk Art, Dolls & hooked rugs) directly support the Museum, of which can be found on ETSY, eBay and the DKFA Blog~ please see the links on the sidebar. You can also mail me at rlkinnison@yahoo.com