Dressing a Slate Frame
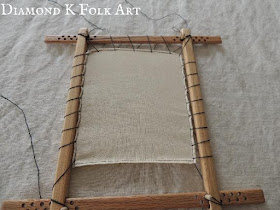
I have had several questions since I started selling my slate frames on how to go about mounting the fabric onto the frame...so here are some step by step photos of how I do mine~First off, you will notice that my hand made frames are a little different than some other mass produced frames available~ mine do not have any nylon webbing attached. Not only is this the period correct configuration, I think, once you try it, you will find it much simpler to mount your fabric by lacing all four sides than just two. So, to begin~ as seen above, you will need your slate frame, pegs(just four), scissors, prepared fabric, lacing cord and needle with big enough eye to fit your lacing cord thru.
To prepare the fabric for mounting, turn over the edges and stitch at least once~ this will keep the edge from raveling on you, and will also add some strength to it and keep the lacing from ripping out thru a bare edge. For large pieces of fabric, especially if you are using my large 36" frame, I highly suggest turning the edge over a cording.
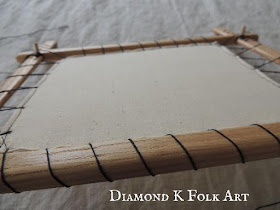
To begin, first lay your fabric on a flat surface, then place the frame over it. Adjust the size of the frame to allow a few inches on all sides of the fabric. Set all four pegs nowI use Londonderry linen thread size 18/3 to lace my frames~ I like the size, and it doesnt stretch that much over time. Here is am using black so you can see it easier than if I was using my normal natural color. Each side is laced separately, and to start each side, I put a slip knot of sorts into the beginning end of the thread. I loupe it around, then just make a little half hitch knott.
This leaves the end in a loupe that will be placed over the corner peg.
I like to position my frame with the edge I will be lacing extending out over the edge of my surface, as seen above. This lets me continually lace the frame without having to pick it up at all.
To start, the loupe is placed over the peg, with the tail end brought around the outside of the frame, and then up thru the corner of the fabric. Pay attention to this simple little step!!! Bringing the lace around the frame in this way, will help to pull it all together and keep it square.
The first side, I bring the fabric right up even with the edge of the frame. Note how the needle is brought up over the machine stitched line.
Continue until you reach the other side of the frame, bringing your lace around the corner of the frame, just like when we started~ and I wrap twice around the peg with a slip knot to end.
The second side to lace is the opposite side of the frame~ just like the first, but pulling as tightly as you can with each stitch.
Third side of the frame is laced.
Lacing the last side of the frame~ with each stitch, holding the lacing cord down with my thumb to keep tension as I go~ I like to end my laces with a slip knott, so that they can be easily undone if I have to tighten them later
The best thing about using a slate frame is that one can achieve a drum tightness that just is not possible on any other frame
Isn't this little frame cute? Cute cute cute! I have been wanting to make some mini frames from some of the ends I have kept from my larger ones~ this is my 'Super Mini' size....tho there was actually more work involved to make the smaller frames than the bigger ones! If you are interested in a Super Mini, I will be listing these as specials in my ETSY shop as I get them finished, (they will not be a regular offering). All sizes and wood types will be different....just whatever I make at the time!


No comments:
Post a Comment
Thankyou for Visiting the Lady's Repository Museum!