Saturday, April 30, 2016

Dressing a Slate Frame

Dressing a Slate Frame
 I have had several questions since I started selling my slate frames on how to go about mounting the fabric onto the frame...so here are some step by step photos of  how I do mine~
  First off, you will notice that my hand made frames are a little different than some other mass produced frames available~  mine do not have any nylon webbing attached. Not only is this the period correct configuration, I think, once you try it, you will find it much simpler to mount your fabric by lacing all four sides than just two. So, to begin~ as seen above, you will need your slate frame, pegs(just four), scissors, prepared fabric, lacing cord and needle with big enough eye to fit your lacing cord thru.

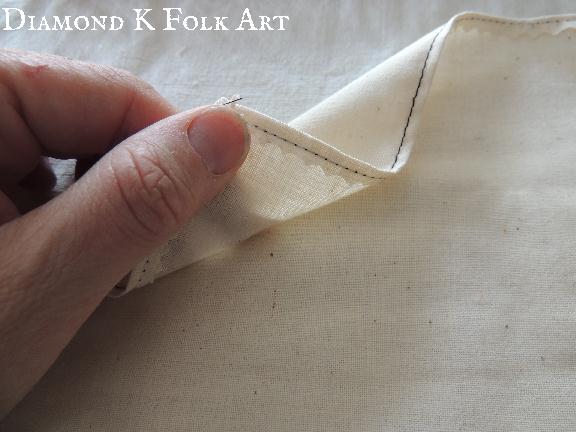
To prepare the fabric for mounting, turn over the edges and stitch at least once~ this will keep the edge from raveling on you, and will also add some strength to it and keep the lacing from ripping out thru a bare edge. For large pieces of fabric, especially if you are using my large 36" frame, I highly suggest turning the edge over a cording. 
 To begin, first lay your fabric on a flat surface, then place the frame over it. Adjust the size of the frame to allow a few inches on all sides of the fabric. Set all four pegs now
 I use Londonderry linen thread size 18/3 to lace my frames~ I like the size, and it doesnt stretch that much over time. Here is am using black so you can see it easier than if I was using my normal natural color. Each side is laced separately, and to start each side, I put a slip knot of sorts into the beginning end of the thread. I loupe it around, then just make a little half hitch knott.
 This leaves the end in a loupe that will be placed over the corner peg.
 I like to position my frame with the edge I will be lacing extending out over the edge of my surface, as seen above. This lets me continually lace the frame without having to pick it up at all.
  To start, the loupe is placed over the peg, with the tail end brought around the outside of the frame, and then up thru the corner of the fabric. Pay attention to this simple little step!!! Bringing the lace around the frame in this way, will help to pull it all together and keep it square.
 The first side, I bring the fabric right up even with the edge of the frame. Note how the needle is brought up  over the machine stitched line.
 Continue until you reach the other side of the frame, bringing your lace around the corner of the frame, just like when we started~ and I wrap twice around the peg with a slip knot to end.
 The second side to lace is the opposite side of the frame~ just like the first, but pulling as tightly as you can with each stitch.
 Third side of the frame is laced.
 Lacing the last side of the frame~ with each stitch, holding the lacing cord down with my thumb to keep tension as I go~  I like to end my laces with a slip knott, so that they can be easily undone if I have to tighten them later

 The best thing about using a slate frame is that one can achieve a drum tightness that just is not possible on any other frame
Isn't this little frame cute? Cute cute cute! I have been wanting to make some mini frames from some of the ends I have kept from my larger ones~ this is my 'Super Mini' size....tho there was actually more work involved to make the smaller frames than the bigger ones!   If you are interested in a Super Mini, I will be listing these as specials in my ETSY shop as I get them finished, (they will not be a regular offering). All sizes and wood types will be different....just whatever I make at the time!

Monday, April 25, 2016

So what is that 'Thingy' on there....

Service with a Smile~ Always

 There is nothing like owning your own business. It is the most rewarding and awesome feeling, yet at the same time, it can be so stressful and demanding it nearly sucks the life right out of you.  Diamond K Folk Art is me. There is no one else to rely on to make dolls or do my embroidery or woodworking....no one else to blame if something goes wrong...like when I cut the tip of my finger off last week. (no worries~ its all GOOD).  I love my 'job'. My family could say something else I'm sure... I work from the second my eyes open in the morning, until well after they go to bed, each and every day. To me my job isnt 'work'~ its my life, its what I love to do...so its what I want to do, all day and night long, every day of the week! It is stressful tho, having to depend on making something someone else wants to buy. I know how hard I work for my money, and I know others work just as hard and harder for theirs, so when they choose to buy something from me, I really do appreciate it in every way possible.  One little way of saying thankyou for me, is to include a little smile with each and every order~ no matter if its for something for 10.00 or 100.00.  Each and every Diamond K Folk Art purchase gets wrapped in my signature paper and string, with a little mache ornament tied on...sometimes Ill stick candy in there...but most of the time, you will get a little ornament~ and hopefully the surprise will make you smile, cause its really me smiling back at you saying "thankyou for your order"~
  I make each and every one of my smiles~ the most common are mache ornaments like these~ hand pressed from mache out of antique or reproduction springerle cookie molds. You can keep them, some put them on their Christmas tree...or you can pass your smile on to someone else. Alot of my customers collect them, and being a bit OCD like I am, I do keep track of just which ones I put one very order, so hopefully you will never get the same one twice :)
 After pressing and drying, little smiles look rather bland, so the backgrounds get carefully painted with watercolours and then varnished. Theyre pretty sturdy little buggers, but still, dont let your wee ones or furbabies eat them! The mache and watercolours are non toxic, but the varnish isnt!

Monday, April 18, 2016

4 day 17th c Beaded Basket Workshop

Come Join Me August 2017 at the Bath Textile Summer School!
  Save the dates! The week beginning August 21st, 2017, I will be teaching a 4 day workshop at the gorgeous Holburne Museum in Bath England on 17th c beadwork baskets as part of the Bath Textile Summer School.
 If you have ever wanted to make your own 17th c inspired beaded basket, you wont want to miss my class! We will work 8 hours a day, Monday thru Friday~ with a break on Wed. to catch up if needed :) Students will be making their own versions of my Bath Arbor Basket, above. And if that wasnt cool enough already, the Holburne's 17th c beadwork basket will be just across the hall for plenty of inspiration!

 In this 4 day workshop prepare for bead overload! We will explore 17th c techniques for basket construction and dive into the wonderful world of 17th c inspired bead work figures, flowers, bugs and insects. Class will focus on starting, and completing, a fully beaded stumpwork figure. We will study the amazing Holburne basket, and sample some of the many forms of early bead work such as twilling, right angle weave, French and Victorian beading, couching and wyrework. Students will be introduced to a wide variety of antique beads and will learn how to use color and size to reproduce the unique look of 17th c beadwork . The basket will be sent as a kit prior to class, and will need to be completed and brought with you to class.
  
 The class kit containing basket frame, hand sculpted figure, needles, instructions and antique beads required is prepared for you to purchase after your successful class registration. The antique & vintage beads included in the kit are for working the Ladye and basket base only. Suggestions for beads to work the flowers of students choice will be included in the class materials list.
 The focus of our class time will be to work the Ladye, but will also include the basics for designing and working all the pretties that you can pile onto your basket!
 Class number will be very limited, 14 I think, so if interested, I would suggest you shoot an email to the head of Bath Textile Summer School, Lynne Roche~ her email is posted on the BTSC website~ link is above. Registrations will begin on Aug 20, 2016, but class info will be available sooner than that. Hope to see you there!

Sunday, April 10, 2016


Flemish Fantasy Kits Shipping this week!

I have been packing kits all week, and will begin shipping them out tomorrow. Thankyou all so very much, I have been overwhelmed with the response for my new line of kits!  I have personally packed each and every one~ checked, rechecked and checked again to make sure they are all perfectly complete

  I  kept the instructions to a user friendly 22 illustrated pages, with another 3 page packet of keys.  Of coarse, if anyone ever has any questions, as noted in each kit, you may get in touch with me anytime with questions.

  Each item placed in each kit carefully with love and intent~ for a most pleasurable stitching experience!
 I'm really excited about this new line, and already have started on next years special ornament.....ten times more fantabulous than this years!   If you havent got your kit yet, they are still available on my blog page~ they will be available only this year, 2016, or until I run out, which ever comes first ;)